Interacting with text
Nintex Workflow 2013 provides a rich text editor, the RTE control, with which to edit text in plain text or rich text formats.
Registering the control
The following Register directive registers the RTE control for use on a configuration page.
<%@ Register TagPrefix="Nintex" TagName="RTE" Src="~/_layouts/15/NintexWorkflow/RTE.ascx" %>
Declaring the control
The following example illustrates how to add an RTE control to a template control on a configuration page.
<Nintex:RTE runat="server" id="ctlRTE" Height="120" Width="400"
    HideModeChooser="True" ModeSelectorText="" UseEmailStyles="false"></Nintex:RTE>
Implementing the control
The RTE control has a number of options available to users, depending on the context and purpose of the control on the configuration page.
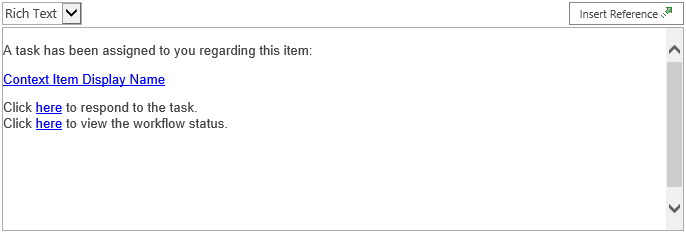
The appearance of the control can be adjusted in the following ways:
-
If the ClearFieldOnInsert property is set to true, the current value of the control is replaced with a workflow reference when the user uses the Insert Reference dialog to insert a workflow reference.
-
If the DialogTitle property is set to a string, the value is displayed as the title of the Insert Reference dialog when the user clicks the Insert Reference button.
-
Set the EditInInsertReferenceDialog property to true to allow the user to edit the value within the Insert Reference dialog.
-
Set the Height property to specify the height, in pixels, of the text area for the control.
-
Set the HideInsertReferenceButton property to true to hide the Insert Reference button.
-
If the HideModeChooser property is set to true, the mode dropdown list is hidden, so that the user cannot select between plain text and rich text.
-
Set the IncludeSecureStringWFConstants property to true to include workflow constants in the Insert Reference dialog.
-
Set the IncludeSensitiveWFConstants property to true to include sensitive workflow constants in the Insert Reference dialog.
Note: The workflow action must allow the use of sensitive workflow constants; otherwise, sensitive workflow constants included in this control cannot be successfully resolved.
-
Set the InsertRefItemFilter property to a valid filter, to filter the workflow references displayed in the Insert Reference dialog.
-
Use the RTEClientId property to retrieve the client ID for the control, to interact with the control by using JavaScript.
-
Set the value of the SecondaryPickerType property to the identifier of a known secondary picker control, to display the control next to the Insert Reference button.
-
Set the value of the SetWidth property to a StandardLengths enumeration value, to override the Width property with a commonly-used predefined width.
-
Set the StartInPlainText property to true to start the control in plain text mode; otherwise, the control starts in rich text mode.
-
Set the TabIndex property to determine the tab order of controls in the configuration property section.
-
Use the Text property to get or set the contents of the control as text, without formatting.
-
If the content provided by the control is to be used in an email sent with the Message class, or displayed on a page that references the email style sheet configured for use by Nintex Workflow 2013, set the UseEmailStyles property to true to display the predefined CSS styles in the ribbon when editing content.
For more information about the email style sheet, see Customizing the email style sheet.
-
Get the value of the Value property to retrieve the current value of the control.
-
Set the Width property to specify the width, in pixels, of the text area for the control.
JavaScript functions
Several JavaScript functions are provided for manipulating the mode and value of the RTE control. For more information about the JavaScript functions available for the RTE control, see RTE.
Customizing the email style sheet
The following global settings in Nintex Workflow 2013 indicate whether the product uses a CSS style sheet to format email content. The following global settings are in the Email settings group:
-
Use css styles in HTML emails
If this global setting is set to Yes, Nintex Workflow 2013 uses the CSS style sheet specified in the Location of stylesheet containing email styles global setting to provide styles for formatting email content. Otherwise, plain text without formatting is used for email content.
-
Location of stylesheet containing email styles
If Use css styles in HTML emails is set to Yes, the styles in the CSS style sheet specified in this global setting are used to format email content.
Nintex Workflow 2013 provides a default CSS style sheet, at the following location, where <Site> represents the SharePoint site:
http://<Site>/_layouts/NintexWorkflow/htmleditorstyles.css
You can, however, create your own custom CSS style sheet, if you want to change the styles used to format email content, and replace the existing email style sheet with your custom CSS style sheet.
To replace the email style sheet
-
Create a CSS style sheet that conforms to the requirements of an email style sheet. For more information, see Email style sheet requirements.
-
Copy the new email style sheet to a subfolder in the Layouts mapped folder of the SharePoint 2013 hive on each web front end server.
-
Set the Location of stylesheet containing email styles global setting to the location of the new email style sheet.
-
Either wait 15 minutes for Internet Information Services (IIS) to update, or reset IIS, either from IIS Manager or with the iisreset command-line utility, to force IIS to update immediately.
Email style sheet requirements
The email style sheet must meet the following structure and selector requirements to be used in the RTE control and the Message class.
Structural requirements
The following example illustrates the expected structure of selectors in the email style sheet.
.ntx-keyword-identifier
{
/* style elements */
}
.ntx-keyword-identifier
{
/* style elements */
}
The email style sheet must comply with the following structural requirements; otherwise, unpredictable results may occur.
-
The opening curly brace ({) character and closing curly brace (}) character for each selector must be on a new line, by itself, as in the example.
-
No whitespace is allowed between the closing curly brace (}) character and the next selector.
-
Use only supported selector names, as indicated in the default email style sheet.
Some selectors support the -ms-name attribute, to specify the display name for the selector.
Note: The relationship between the ribbon of the RTE control and the email style sheet is defined by SharePoint 2013, not Nintex Workflow 2013.
Selector requirements
The RTE control and the Message class expect a defined set of selectors, with which to populate controls and properties used to format email content.
The following table illustrates the most commonly-used selectors. The table does not contain a comprehensive list. Review the default email style sheet for a comprehensive list of expected selectors.
| Selector | Usage | Description and example |
|---|---|---|
| rteFontFace | .ntx-rteFontFace-10
{
-ms-name: "Lucida Console";
font-family: "Lucida Console", monaco, sans-serif;
}
|
Controls the predefined fonts available to the control. 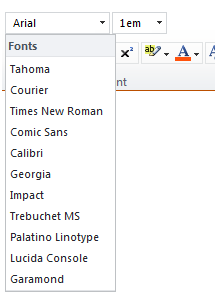
|
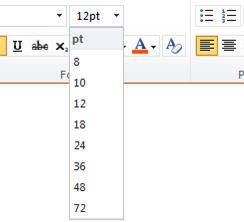
| rteFontSize | .ntx-rteFontSize-8
{
font-size: 72pt;
}
|
Controls the predefined font sizes available to the control.
|
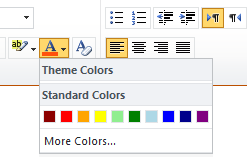
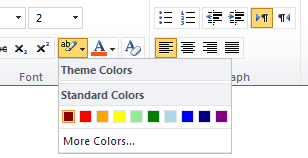
| rteForeColor | .ntx-rteForeColor-8
{
color: blue;
-ms-name: "";
-ms-color: "Blue";
}
|
Controls the predefined text colors available to the control.
|
| rteBackColor | .ntx-rteBackColor-3
{
background-color: orange;
-ms-name: "";
-ms-color: "Gold";
}
|
Controls the predefined text background colors available to the control.
|
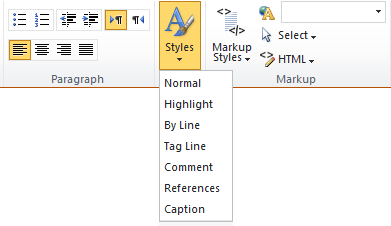
| rteStyle | .ntx-rteStyle-Normal
{
-ms-name: "Normal";
font-family: Verdana, Arial, sans-serif;
font-size: 8pt;
}
|
Controls the options available in the Styles dropdown list for the control.
|
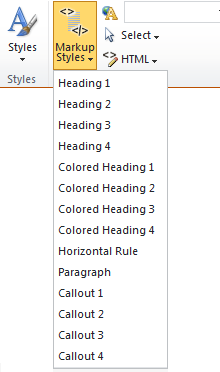
| rteElement | H4.ntx-rteElement-H4
{
-ms-name: "Heading 4";
font-size: 1em;
font-weight: normal;
font-style: italic;
}
|
Controls the options available in the Markup Styles dropdown list for the control. Tip: The HTML element tag name at the beginning of the selector specifies with which element the text selected in the RTE control is wrapped.
|
See Also
Concepts
Operations
Working with configuration pages