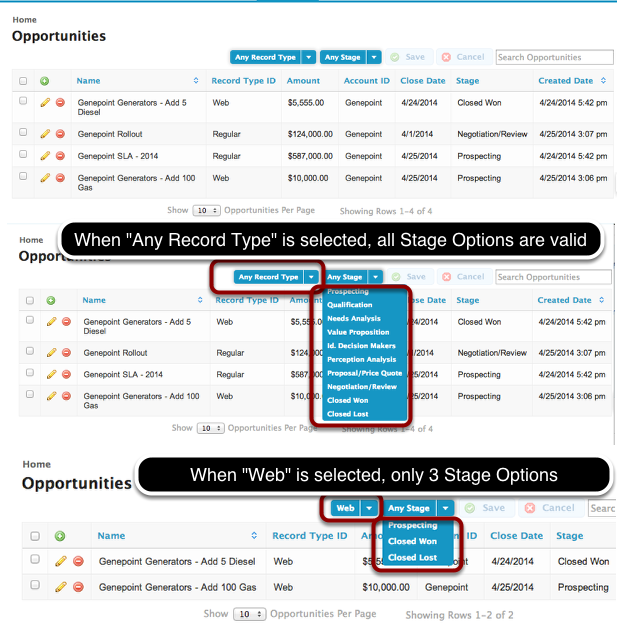
Use a Snippet as a Filter Item Source to create "Dependent Filters"
Select option Filters can have 4 different types of Item Sources:
- Manual
- Rows in a model
- Picklist Field Metadata
- Snippet
This tutorial shows you an example of using a Snippet as a Filter Item Source. The use case is to create a "Dependent Filter" on Opportunity StageName values where only StageNames valid for a selected Opportunity RecordType / Sales Process will be shown.
Note: This tutorial assumes you are using record types on the Opportunity object. If you are not currently doing so, you may see some discrepancies between the steps listed below—as well as the sample XML from above—and your build time experience.
Introduction: Opportunity Sales Processes and Record Types
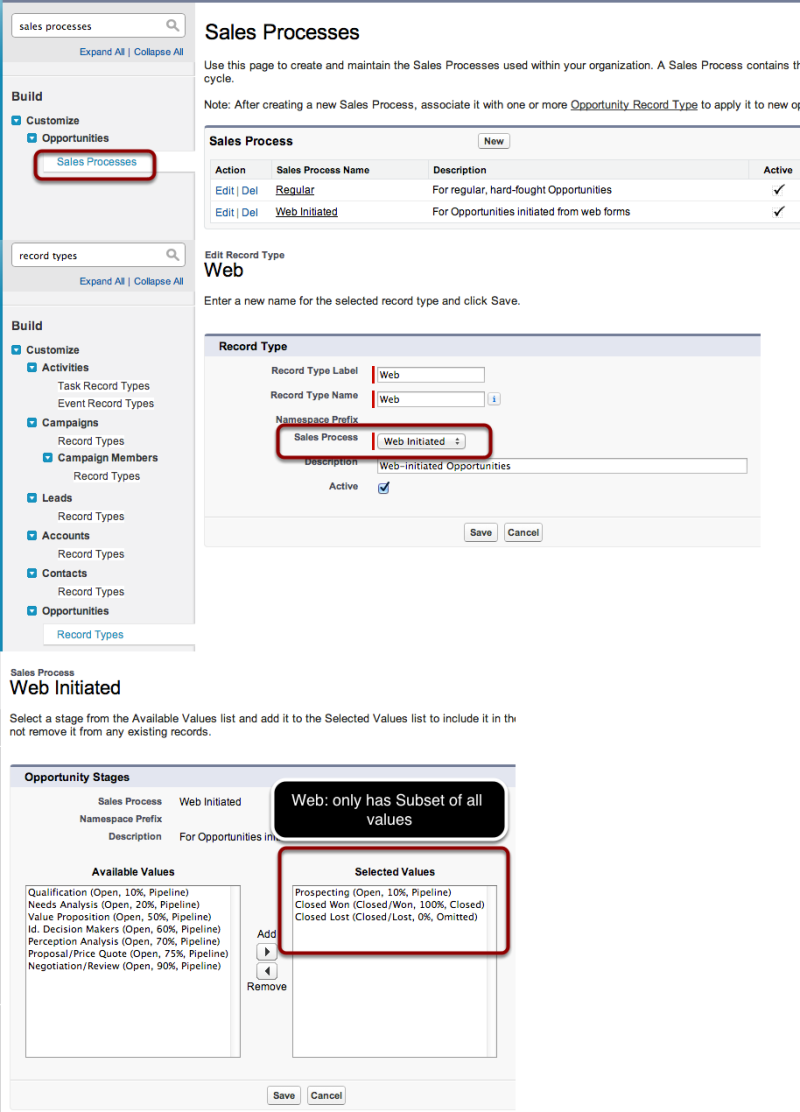
The Salesforce Opportunity object allows you to define different "Sales Processes". Each Sales Process can have a unique set of valid Stage Names. You then associate a Sales Process to each Opportunity Record Type. This allows you to have different Stage Name picklist values available depending on an Opportunity's selected Record Type.
For this tutorial, we have created 2 Sales Processes, with the following associated Picklist Values:
- Web: [Prospecting, Closed Won, Closed Lost]
- Regular: [Prospecting, Qualification, Needs Analysis, ..., Closed Won, Closed Lost]
And then we created 2 Opportunity Record Types: "Web" and "Regular", with the corresponding Sales Process associated to each.
Step 1: Create an Opportunity Tab page
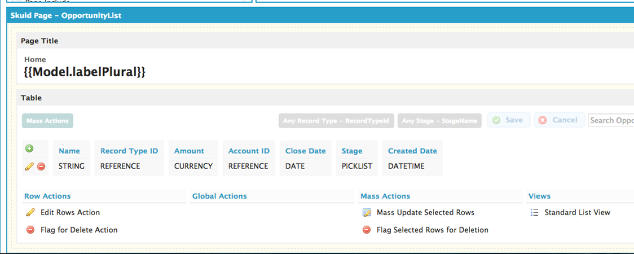
We'll use the "Object List / Tab page" template as a starting point, then we'll add in some basic fields, including RecordTypeId and StageName.
Step 2: Add an "OpportunityRecordTypes" Model
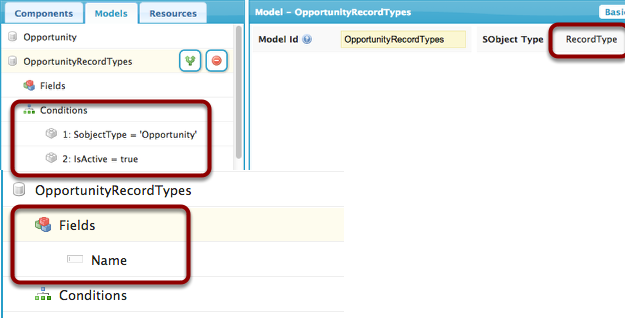
Before we can Filter on Opportunity StageName, we want to Filter on Opportunity RecordTypeId. In order to Filter our Opportunities by RecordTypeId, we'll need to create a Model that finds all active Opportunity Record Types.
- Go to Models and click "Add Model". This Model's SObject Type should be RecordType, and its Name must be OpportunityRecordTypes
- Make sure that the Name field is included.
- There should be 2 Conditions: 1: SobjectType = 'Opportunity', 2: IsActive = true
Step 3: Add Filterable Conditions on your Opportunity Model
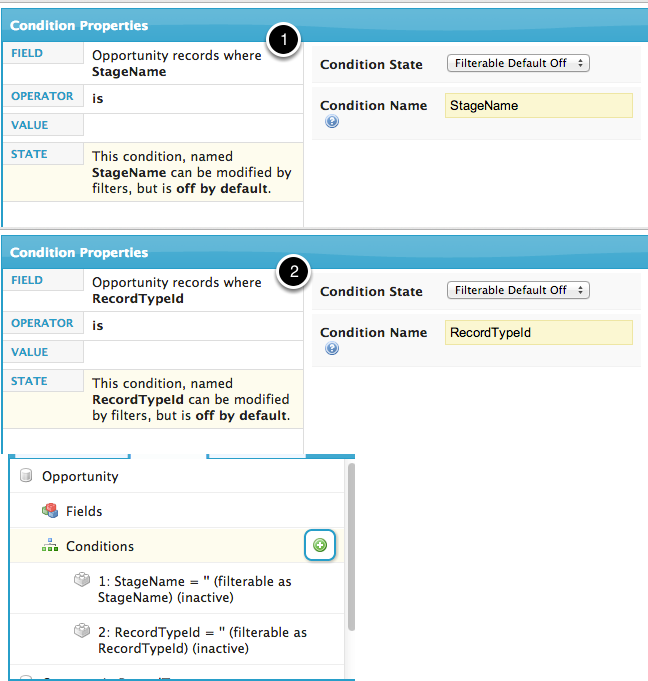
In order for our Table to Filter our Opportunities Model, we'll need to have Filterable Conditions on the Opportunity Model.
For this example, we need two Filterable Conditions:
- RecordTypeId = '' (filterable as RecordTypeId) (inactive)
- StageName = '' (filterable as StageName) (inactive)
Both of these Conditions' "State" should be set to Filterable (Default Off), and the value should be left blank.
Step 4: Add a Table Filter to allow selection of Record Type
A. Add a new Table Filter
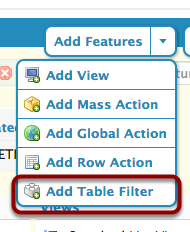
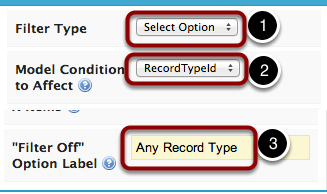
B. Set Filter properties
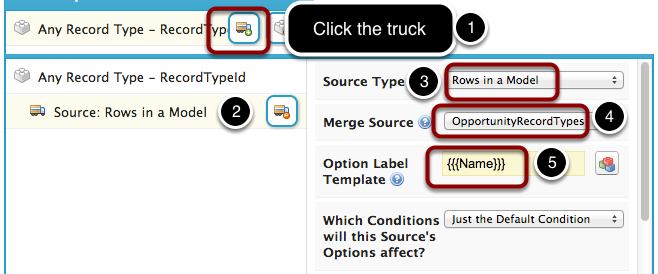
C. Add new Item Source, of type "Rows from a Model" - ---------------------------------------------------
Step 5: Add a Table Filter to allow selection of StageName
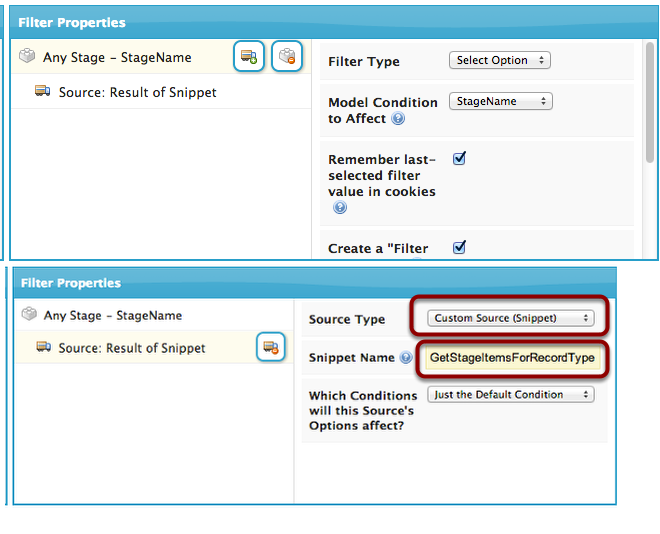
This is the key step, where we add a Table Filter that will let us pick from StageName values that are valid for the user-selected RecordTypeId, or, if no RecordTypeId has been selected, all StageName values will be shown.
As before, we create a new Table Filter of type SelectOption. We specify StageName as the Model Condition to Affect, and then we go to create a new Item Source.
This is where we pick "Custom source (snippet)", indicating to Nintex Apps that we want a JavaScript Snippet (which we'll create in the next step) to provide us with Items to use in our Select option Filter.
The Snippet Name should be set to GetStageItemsForRecordType as this is what we'll call our Snippet when we create it in the next step.
Step 6: Create the Snippet: GetStageItemsForRecordType
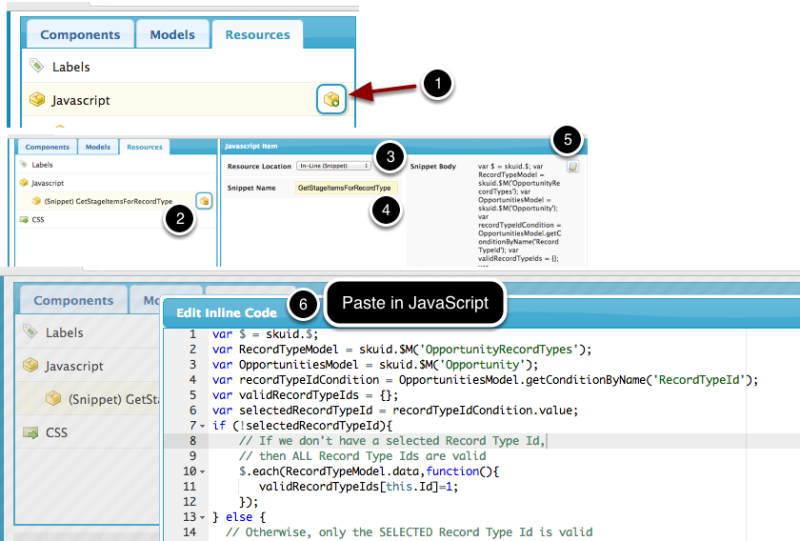
- Create a new JavaScript Resource
- Click on the Resource to open its Properties window
- Set its Resource Location to Inline (Snippet)
- Set Snippet Name to GetStageItemsForRecordType
- Click on the Resource Body editor to launch the Inline Code editor.
- Paste in the following JavaScript code:
var $ = skuid.$;
var RecordTypeModel = skuid.$M('OpportunityRecordTypes');
var OpportunitiesModel = skuid.$M('Opportunity');
var recordTypeIdCondition = OpportunitiesModel.getConditionByName('RecordTypeId');
var validRecordTypeIds = {};
var selectedRecordTypeId = recordTypeIdCondition.value;
if (!selectedRecordTypeId){
// If we don't have a selected Record Type Id,
// then ALL Record Type Ids are valid
$.each(RecordTypeModel.data,function(){
validRecordTypeIds[this.Id]=1;
});
} else {
// Otherwise, only the SELECTED Record Type ID is valid
validRecordTypeIds[selectedRecordTypeId]=1;
}
var filterItems = [];
var validEntryValues = {};
var d = skuid.utils.getAPIDescribeLayout('Opportunity');
$.each(d.recordTypeMappings,function(i,rtm){
if (rtm.recordTypeId in validRecordTypeIds) {
$.each(rtm.picklistsForRecordType,function(j,picklist){
if (picklist.picklistName==='StageName'){
$.each(picklist.picklistValues,function(k,pv){
if (pv.active==='true'){
validEntryValues[pv.value]=1;
}
});
// All we care about is the StageName picklist
return false;
}
});
}
});
$.each(OpportunitiesModel.getField('StageName').picklistEntries,function(i,pe){
if (pe.active && (pe.value in validEntryValues)) {
filterItems.push(pe);
}
});
return filterItems;
Explanation of JavaScript
Essentially all that a Custom Filter Item Source Snippet needs to return is an Array / List of Filter Items to display. A Filter Item should be a JavaScript object with label and value properties, where label is the text to display to the user, and value is the actual value that, when a user selects this Item, the Filter will inject into its specified Model Condition to Affect. So for instance if we wanted to have 2 Filter Items, "Cheese" and "Pizza", we could just have this as our Filter Item Source Snippet:
var filterItems = [];
filterItems.push({ label: 'Cheese', value: 'cheese' });
filterItems.push({ label: 'Pizza', value: 'pizza' });
return filterItems;
The bulk of the JavaScript code for GetStageItemsForRecordType is taken up with finding the selected Record Type, going to the Salesforce Web Services / AJAX API to get at the metadata for which StageNames are valid for a given RecordType, and then filtering out the list of StageName picklist entries appropriately.
Step 7: Result -- a StageName filter dependent on RecordType!
