|
 |

|
 |

|
 |

|

|
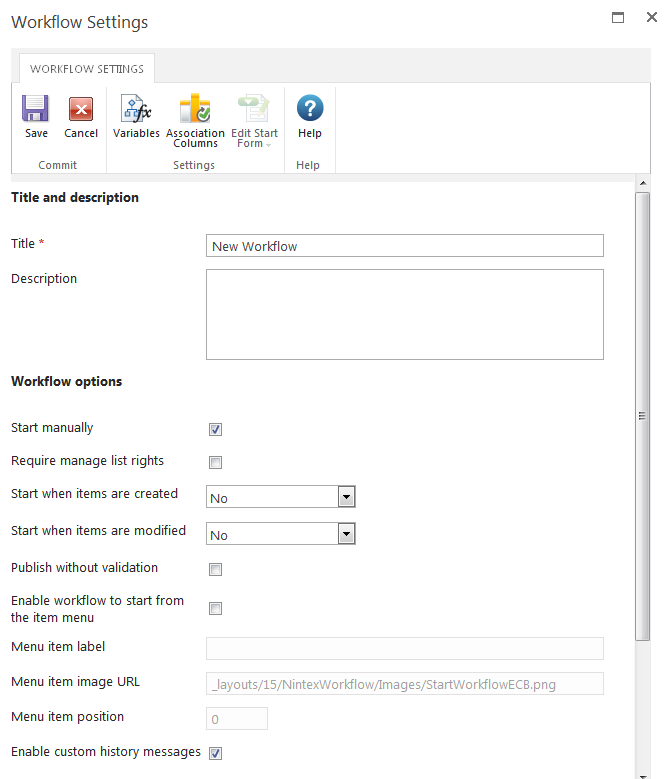
Use the Workflow Settings dialog to set the workflow title and description, workflow start options, workflow variables and start data, association columns, and select a custom start form.

Workflow options
- Start manually: When this setting is checked for a workflow, the user has the option to start the workflow manually from the list item menu.
- Require manage list rights (available for list and library workflows only): When this setting is checked, the user starting the workflow will require the Manage Lists right and the Contributor permissions level.
- Require manage web rights (available for site workflows only): When this setting is checked, the user starting the workflow will require Manage Web Site rights.
- Start when items are created (available for list and library workflows only): When a list item is created or uploaded, all workflows in the list with this option enabled will start.
- Conditional (available for list workflows only): Displays the Conditions button to define conditions for starting the workflow (conditional start configuration). This button displays the Conditional Startup Options dialog box, which contains settings for defining one or more conditions based on field, operator, and value or field.
- Start when items are modified (available for list and library workflows only): When a library or list item is modified, all workflows in the library or list with this option enabled will start. Checking-in a document will not trigger a workflow to start.
- Conditional: Displays the Conditions button to define conditions for starting the workflow (conditional start configuration). This button displays the Conditional Startup Options dialog box, which contains settings for defining one or more conditions based on field, operator, and value or field.
- Enable verbose logging: When this setting is checked, verbose information is available for the workflow. Please refer to Verbose logging.
- Publish without validation: Advanced option. Specifies that a validation step is skipped when the workflow is published. Not validating the workflow is not recommended. If the workflow is large and takes a significant length of time to publish, choosing to skip validation will help decrease how long the publish operation takes. However, if a validation issue is missed, the workflow may show unexpected errors.
- Enable workflow to start from the item menu: When this setting is checked, the workflow is displayed and can be started from the item's context menu. All other menu item related options are dependent on this setting being checked.
- Menu item label: The label for the workflow when displayed in the item's context menu.
- Menu item image URL: The URL of the icon for the workflow when displayed in the item's context menu. The URL can be absolute or site relative.
- Menu item position: The order priority of the workflow within the item's context menu relative to the other menu items.
- Enable custom history messages: When this setting is checked, actions which have 'Message to log on completion set' will be included in the Workflow History. Please refer to Workflow Action Common Settings.
- Create workflow status column: When this setting is checked, a column with the workflow's name will be added to the list or library when this workflow runs.
- Expected workflow duration: The workflow will record this duration in the database for reporting purposes.
- Task list: All tasks created by a workflow are stored in a SharePoint task list on the team site. This option allows the task list that the workflow uses to be changed from the default.
- History list: As the workflow progresses, each step within the workflow is recorded in the SharePoint workflow history list. This option allows a history list that has been enabled for Nintex Workflow to be selected. Please refer to Managing workflow history lists.
- Form type: Specify if the start form to be used is the default, custom, or InfoPath form.
Ribbon menu buttons
- Variables: Create workflow variables and start data. Please refer to Workflow variables.
- Association Columns: Specify site columns that will be associated with this workflow. Please refer to Association columns.
- Edit Start Form: Edit the start form with Microsoft InfoPath 2013. If InfoPath 2013 is not installed on the user's PC, an alert will be shown and no form editing will occur.
Note: Workflows are associated with a library or a list. Folders and sub-folders within libraries are subject to the same workflows as the parent library. Therefore, if a workflow is set to start when items are created or modified, any item, regardless of how many folders or sub-folders down it is stored, will trigger all the workflows that are set to start automatically.