
|
 |
|
 |
|
 |
|

|
The My Workflow Tasks web part is used to display a list of workflow related tasks that have been assigned to the user currently logged on. The web part is used on a page within a site.
Note: Tasks that are no longer valid due to missing information will display a link to remove the entry from the web part.
To use the My Workflow Tasks web part:
- Navigate to the page of the site to which you want to add the web part.
-
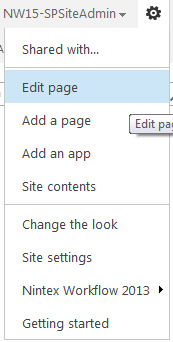
Click on the Settings Icon
 , in the top right-hand corner. Click on Edit Page.
- Click within the Rich Content area, where the web part is to be inserted.
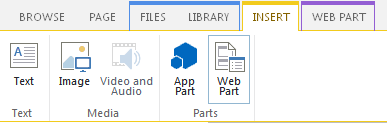
- In the Ribbon, click on the Insert tab, then click on Web Part.
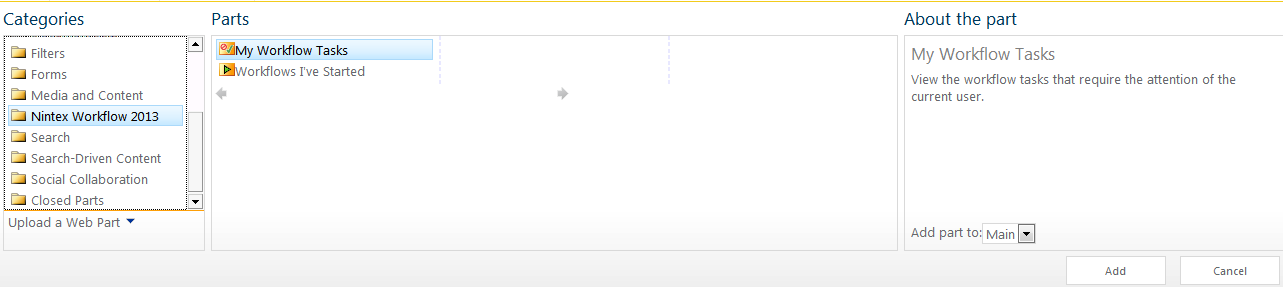
- In the Categories section, click on Nintex Workflow 2013.
- In the Web Parts section, click on the My Workflow Tasks.
- Click the Add button.
- The page will reload with the web part in place.

- The default web part settings will display:
- Item: The title of the item.
- Workflow: The name of the workflow.
- Status: The status of the workflow related task (relative to the 'expected duration' set at the time of workflow construction).
- Waiting since: How long the current task has been necessary and not completed.
- Current Action: The action for which the running workflow is waiting.
- If you would like to use the web part with its default settings, then click Stop editing.

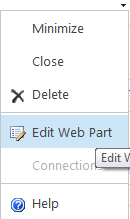
- Edit the settings for the web part, click the
 to activate the web part menu, then click on Edit Web Part.
- A series of options will be shown to the right of the page that are specific to this web part.
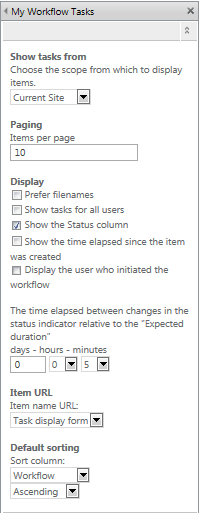
Web Part Settings: My Workflow Tasks
- Show tasks from: Set to show workflows from the current site or from all the sites in the site collection. Organizations that are licensed for the Nintex Workflow Enterprise version will be provided the additional option to choose the entire Farm.
- Paging: Set how many items are displayed on the page by the webpart.
- Display:
- Prefer filenames: By default, document titles are displayed in the web part. If there is no document title set, the document's filename is displayed.
- Show tasks for all users: Displays the tasks for the current user only (default) or for all users (another column is added).
- Show the Status Column: The status indicator has three states, 'New', an orange circle and a red circle. Setting the interval here determines how much time before the "Expected duration" the red circle is displayed. The same interval is used for the other two states. For example, if the status indicator interval is set at 8 hours then the red indicator will be displayed 8 hours before the 'Expected duration' is reached, the orange indicator will be displayed 8 hours before the red indicator is displayed and all time before that, the status indicator will be 'New'.
- Show the time elapsed since the item was created: Shows the time elapsed since the item was created.
- Display the user who initiated the workflow: Displays the user who initiated the workflow.
- Item name URL: Specifies where the user is direct to when they click on the list item name in the web part.
- Task display form: Directs to the view page of the task item. Please note: The default view form for 'Request approval', 'Request review' and "Assign a Flexi task' has the same behavior as the edit form.
- Task edit form: Directs to the edit page of the task.
- Item display URL: Directs to the item that the task is associated to.
- Custom: Specify a custom page to direct to. The following placeholders can be added to the query string:
- {TaskListID}: The GUID of the task list.
- {TaskID}: The ID of the task item in the task list.
- {ListID}: The GUID of the list that the workflow associated to the task is running in.
- {ItemID}: The ID of the item that the workflow associated to the task is running on.
- Default sorting: Specifies the order that records are displayed in.