2. Create a Role for the Finance Processing Task Recipient
In this step, you will create a new role for the Finance Processing (workflow) step. Roles are simply groups of users that you can assign tasks to. The advantage of using a role for a task recipient is you can manage the role membership without having to edit (and redeploy) the workflow itself. Roles can have many users, but must have at least one. For this tutorial, the Finance Processing Role will have one role member, Bob Maggio.
-
Launch the K2 Management site, then create a new role called Finance Processing Role. Add Bob Maggio as the sole member of the role. Role management is found under the node iUsersn the K2 Management menu.If you are building this tutorial in a K2-provided Denallix environment, assign the user as described in the steps. If you are building this tutorial in your own environment or a shared environment, assign your own user account or a co-worker’s account, so that you or they can action the task when testing the application.
- Launch the K2 Management site.If you are unsure of how to launch the K2 Management site, see Accessing K2 Sites.
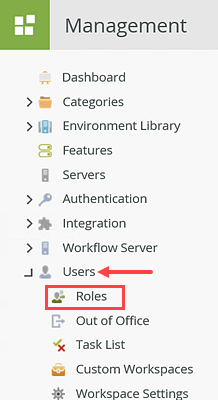
- The K2 Management site launches with the dashboard. Expand the Users node. Click Roles.
- Roles administration opens in the central pane. First, you will add a new role, then second, you will add a user to the role. Remember that you can add many users to a single role if you need to. For this tutorial, you just add just one user. Click New. Name the new role
Finance Processing Role
then for the Description, enter
This role contains the task recipients for the Expense Claim, Finance Processing step.If you are working in a shared environment where other people may be building the same application, we recommend that you add your initials to the Role name. For example:
Finance Processing Role YourInitials
That way, you can identify which Role is the one you created.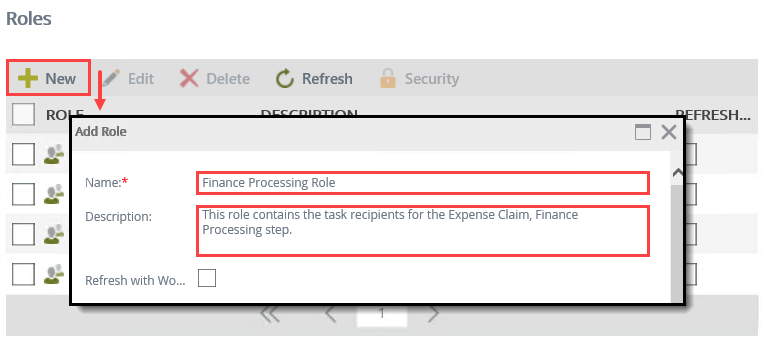
- Now you will search for Bob Maggio, then add him to the role. (If you are working in your own environment, you should add a user that you know can assist you later on when testing the workflow.) Make sure the Search scope is set to Users and the Label to K2. In the search text box, enter
bob
then click the Search icon. Notice that Bob now appears in the results section. Select Bob's row, then click Add. Bob now appears in the role member's section. Click OK to complete the role configuration.If you are building this tutorial in a K2-provided Denallix environment, assign the user as described in the steps. If you are building this tutorial in your own environment or a shared environment, assign your own user account or a co-worker’s account, so that you or they can action the task when testing the application.Although not labeled, there are two sections for adding new role members. As you search for users, K2 returns the results in the upper section. Some searches may return many users. For example, if there were three users with "Bob" as a first name. This section allows you to select the user you want, then add them as a member to the role membership (lower) section.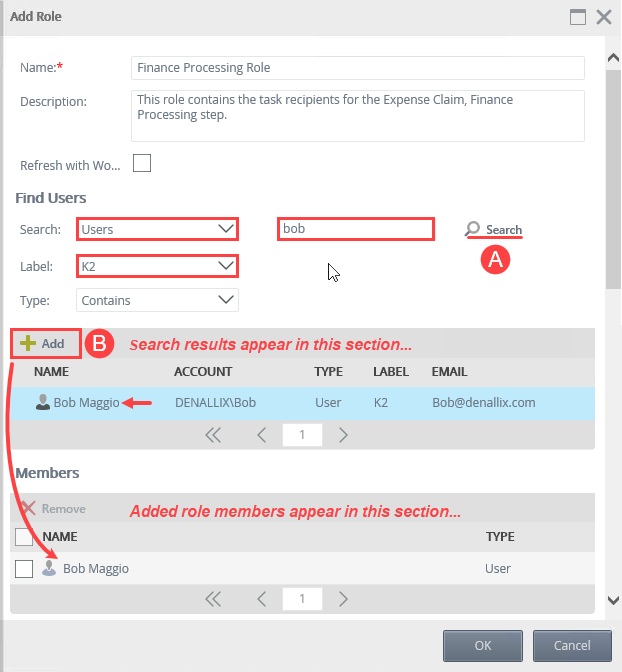
- Launch the K2 Management site.
Review
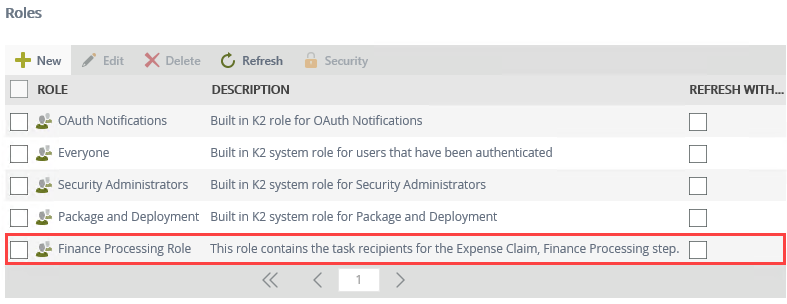
In this step, you created the Finance Processing Role, then added Bob Maggio as the sole role member. In some cases, you may want to assign a workflow task to a group of users. For example, you may want to configure the workflow so that at least two users approve a request before the workflow continues along the "approved" outcome. By managing the task recipients from a role, you can add and remove users without having to open the workflow.