3. Build the Leave Request Item View
In this step you will design an item view from the Leave Request SmartObject. (Item views contain content from a single record, whereas list views contains a list of many records.)
-
Design a new view based on the Leave Request SmartObject and name it Leave Request Item View, then move it to the Views category. This view is the user interface for entering leave request details.
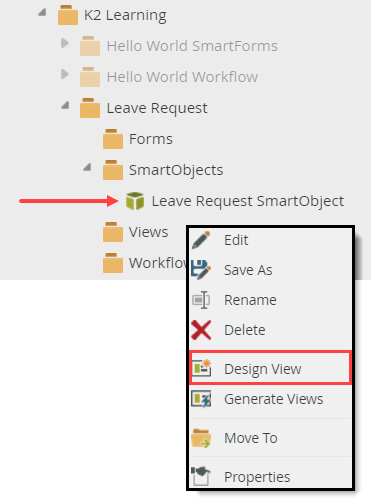
- Begin by designing a view from the Leave Request SmartObject. Right-click the Leave Request SmartObject (located in the SmartObjects category) and select Design View.
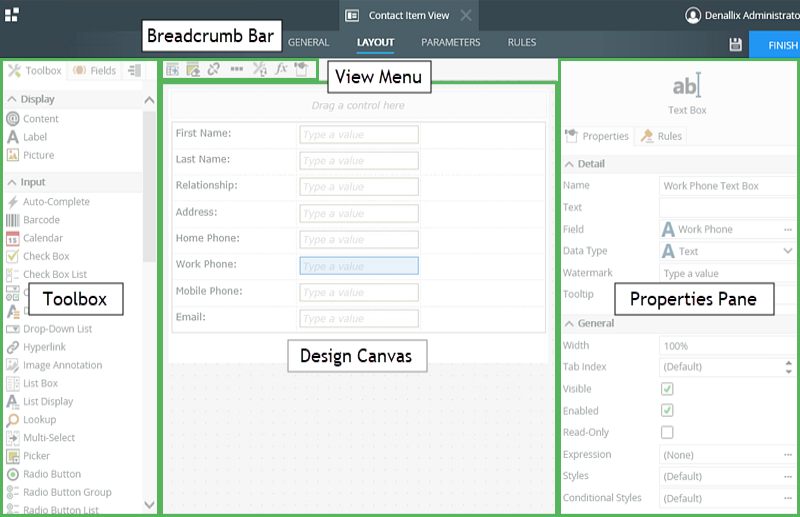
- Breadcrumb Bar: use the breadcrumb bar to switch designer screens
- General: view details, such as name, SmartObject, view type
- Layout: design canvas, view menu, toolbox, properties
- Parameters: add and configure view parameters, assign default values
- Rules: add new rules, edit existing rules
- View Menu: change control types, add functions, clear canvas
- Toolbox: add or change controls and methods
- Toolbox: add controls directly to the design canvas
- Fields: add SmartObject fields from the bound SmartObject
- Methods: add methods in button format to the design canvas
- Design Canvas: drag and drop controls, fields and methods to create a reusable view
- Properties Pane: edit and configure control properties
- Rules (separate tab): add, edit and configure a control's rules
- Next, you will name the view and move it to the Views category. Because you designed the view from the Leave Request SmartObject (in the SmartObjects category), K2 created the view in the SmartObject category. To keep organized, you will move it to the Views category.
The designer opens on the General settings screen. Name the new view
Leave Request Item View
then change the category to the Views category. To change the category, click the ellipses on the right side of the Category field, then select Views. Click OK. Confirm the Item View option is the view type. Click CREATE. (You do not need to change the data source since you designed the item view from the SmartObject).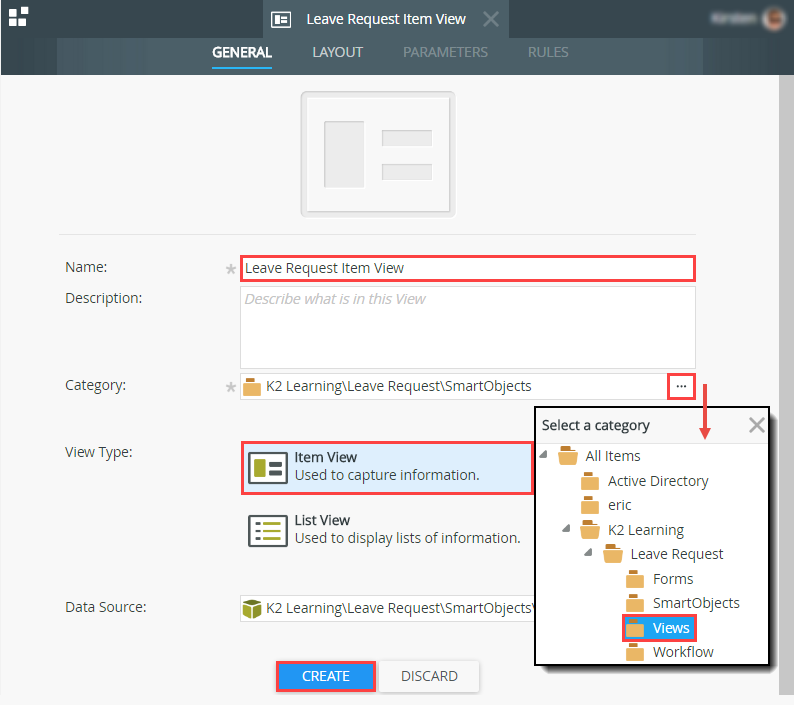
K2 Designer is the tool used to build and edit SmartObjects, views, forms, and workflows. You can add controls from the Toolbox, edit the view and form layout from the View Menu, and edit control properties from the Properties pane. The Design Canvas provides a visual representation of your view or form as you go.The K2 Designer layout and terminology
- Begin by designing a view from the Leave Request SmartObject. Right-click the Leave Request SmartObject (located in the SmartObjects category) and select Design View.
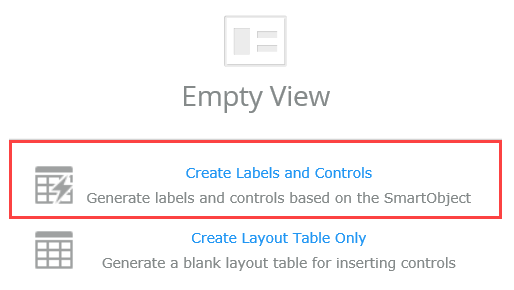
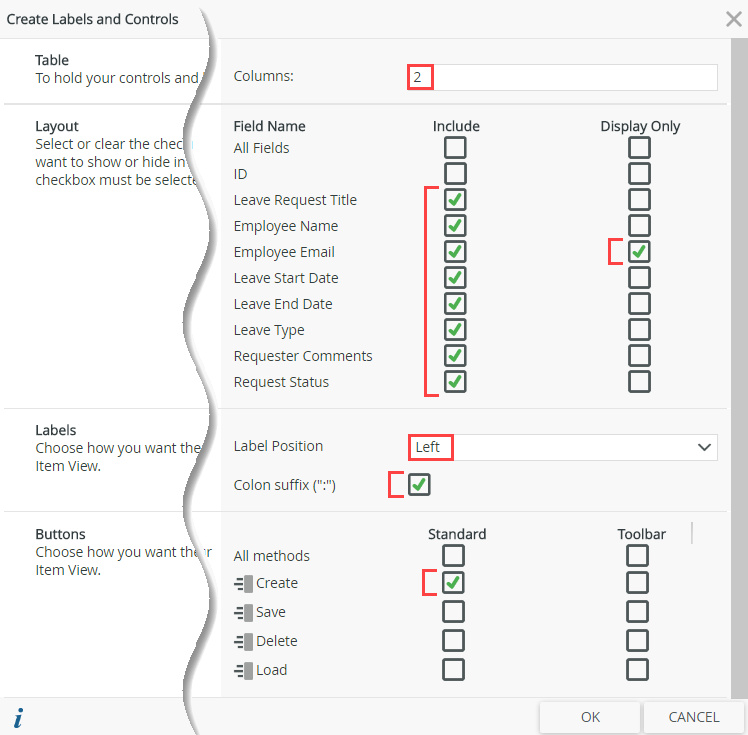
- Create the labels and controls you will use for the Leave Request user interface. Click Create Labels and Controls and include all the fields except the ID. Make the Employee Email field Display Only. Confirm or set two columns for the layout table. Change the Label position to Left and add the Colon suffix. CHECK the option for the Create button (only).
- Next, you can choose whether to have K2 automatically generate a view for you based on the controls you select, or you can add an empty layout table and add the controls you need manually. In this application, you will let K2 generate the layout table and controls for you. On the Layout screen, click Create Labels and Controls.
- On the Create Labels and Controls screen, make the following configurations (see the screenshot below for reference)
- Keep the number of columns set to 2.
- The first column will house your control labels and the second column will house the controls.
- Include all the fields, except the ID.
- This is a hidden field that will contain the SmartObject record ID. You do not need it to be a part of your user interface.
- Select the Display Only option for the Employee Email.
- You do not want the user to change the email value.
- Change the Label Position to Left.
- CHECK the box to add the Colon suffix.
- CHECK the box to add the Standard Create button.
- You are allowing K2 to perform some of the legwork. You can also add a button control to your view and configure it to create a new record in the SmartObject. In this step, K2 will generate the create button and add the necessary rules to create the record.
- Keep the number of columns set to 2.
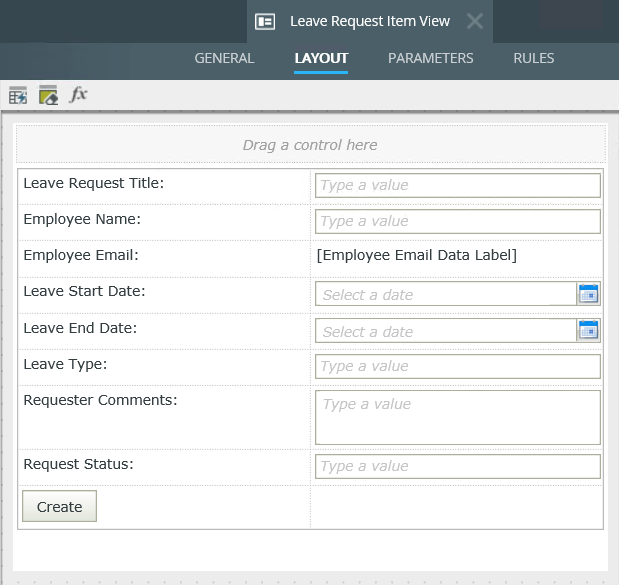
Your generated view should look like the image below.
- Next, you can choose whether to have K2 automatically generate a view for you based on the controls you select, or you can add an empty layout table and add the controls you need manually. In this application, you will let K2 generate the layout table and controls for you. On the Layout screen, click Create Labels and Controls.
-
To improve the layout of the view, you will make minor adjustments to the layout table and two controls. Change the width of the first column so that it is in closer alignment to the view labels. Change the Width of the Leave Start Date and Leave End Date controls to 50%.
- Adjust the view for better layout. First, reduce the width of the label column.
- Next, adjust the width of the two calendar controls. Click to highlight the Leave Start Date Calendar control. In the Properties pane, change the Width to
50%
then repeat this step for the Leave End Date Calendar control.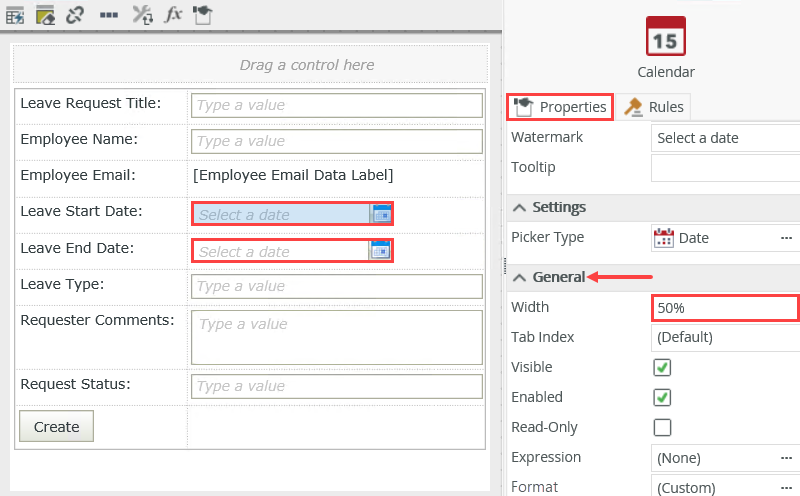
- Adjust the view for better layout. First, reduce the width of the label column.
-
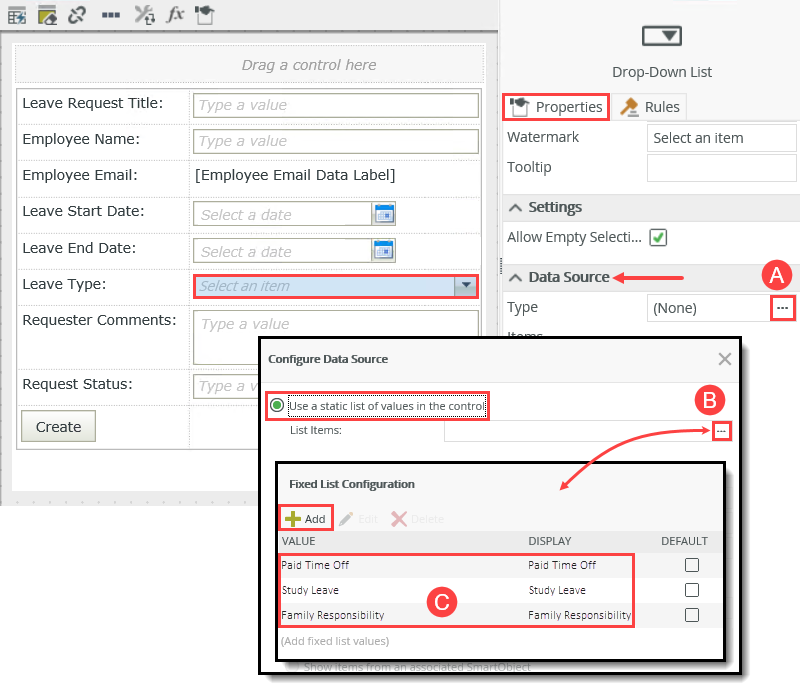
To keep the leave type values consistent across records, change the Leave Type Text Box control to a Drop-Down List and add the following entries (for both Value and Display):
Paid Time Off
Study Leave
Family Responsibility
then change the Width of the Leave Type Drop-Down List to 50%. Once again, changing the width makes accessing the drop-down control more convenient.- To keep the leave type values consistent across records, you will change the Leave Type Text Box control to a drop-down list and add static list item values. In this way, you must select a leave type, rather than entering your own, which may or may not match your organization's recognized leave types. At some point, you may also want to run reports based on leave types. Using consistent values will help to ensure reports include all records.
Highlight the Leave Type Text Box control. Select the Change Control icon found in the View Canvas menu. Change the control to a Drop-Down List. Click OK.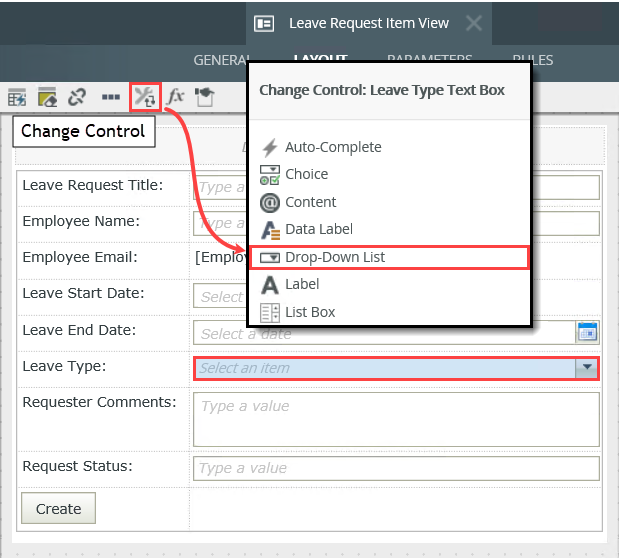
- With the Leave Type Drop-Down List control still highlighted, open the Data Source > Type editor found in the Properties pane. Select the option to Use a static list of values in the control. Open the list editor and Add the following options for both the Value and the Display, then click OK. Click OK once again to complete the configuration.
- Paid Time Off
- Study Leave
- Family Responsibility
- Change the Width property of the Leave Type Drop-Down List control to
50%.
- To keep the leave type values consistent across records, you will change the Leave Type Text Box control to a drop-down list and add static list item values. In this way, you must select a leave type, rather than entering your own, which may or may not match your organization's recognized leave types. At some point, you may also want to run reports based on leave types. Using consistent values will help to ensure reports include all records.
-
To improve the layout of the view even more, move the Create button to the second cell and align it to the right.
The Leave Request Item View
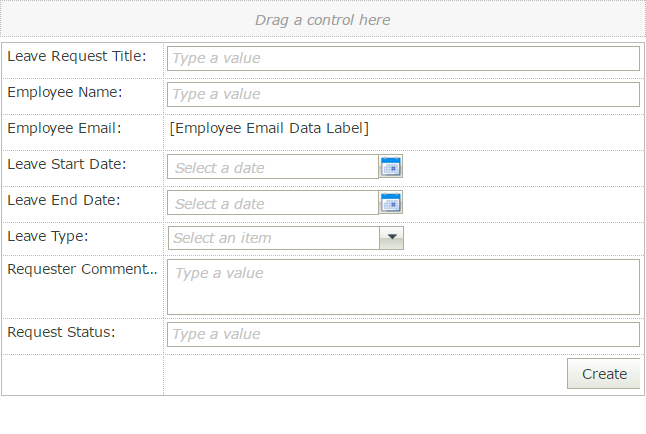
- There is one more change for the layout of the view. You will move the Create button to the right side of the layout table. The create button (or submit button) is the last control you interact with and you want its location to be easy to find. There are a number of studies that indicate on a two-column form, the best location is the lower right side of the screen.
Click, then drag, the Create button into the second cell of the row. Click within the cell itself to highlight it, then click the Right-Align icon found in the View Canvas menu. If you do not see the align icons, make your screen larger to expose the icons.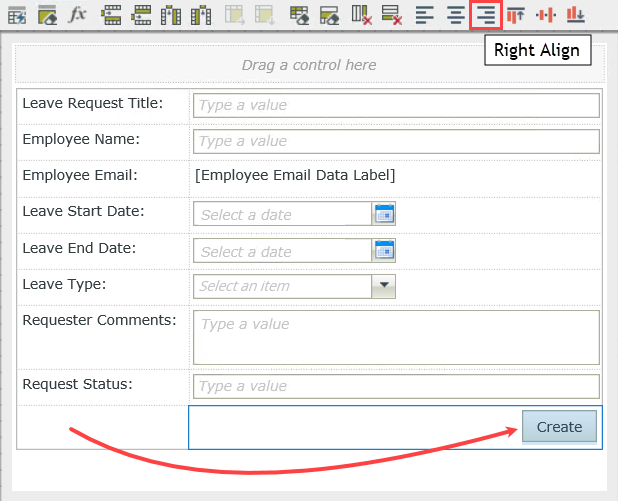
- Click FINISH to save and exit the view. The Finish button is in the upper right corner of your screen.
Your view should look like the image below.

- There is one more change for the layout of the view. You will move the Create button to the right side of the layout table. The create button (or submit button) is the last control you interact with and you want its location to be easy to find. There are a number of studies that indicate on a two-column form, the best location is the lower right side of the screen.
Review
In this step, you created an item view from the Leave Request SmartObject. You selected which properties to use as form fields, and adjusted the layout of the view to work well for our users. You also learned some basics about using the properties pane to configure controls.
In the next step, we will build the List view that will display a list of leave requests.