Expense Claim Application Design
The Expense Claim application you will build in this tutorial expands on basic K2 concepts and includes the four primary components: Data, Forms, Workflow, and Reports. In the sections below, we have provided a detailed description of each component and how it integrates into the Expense Claim application.
The data component for the Expense Claim application consists of one role and four SmartObjects. Two of the SmartObjects connect to external data sources and two are SmartBox SmartObjects. (You will also build a composite SmartObject for reporting. It is described in the Reports section.)
Finance Processing Role
While not technically a data component, the role is also a precursor to the application build, so it is included in this section. Roles are simply groups of users that you can assign tasks to. The advantage of this is the ability to manage the role membership in one place. This avoids editing a published workflow, which then requires redeployment. You will assign the Finance Processing task recipient to the Finance Processing Role. The Finance Processing Role has one member, Bob Maggio.
Service Instances for Azure SQL Server; Endpoints Web Service
Two SmartObjects connect to external data sources. Prior to creating the SmartObjects, you will create service instances of existing Service Types. Service instances connect to a specific data source from which SmartObjects are generated. The service instance can be thought of as the connection string that "talks" to the data source.
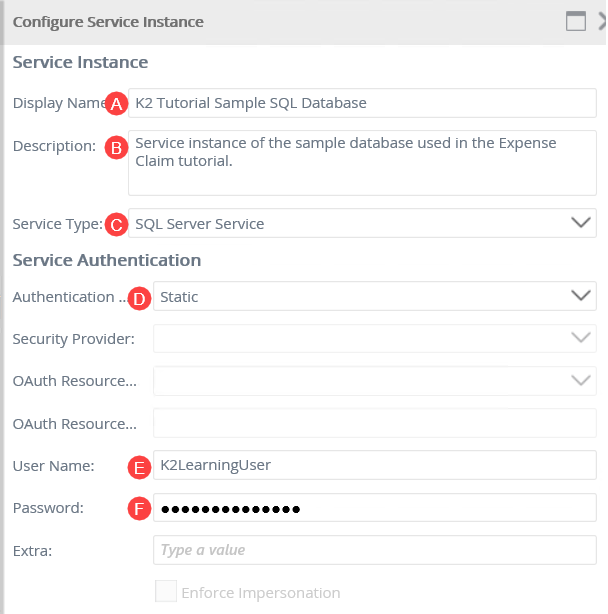
The first service instance is an Azure SQL Database that returns expense claim categories. This data source returns values for the Categories drop-down list. You will select a category as part of entering expense claim line items.
A partial view of the Azure SQL Database Service Instance configuration
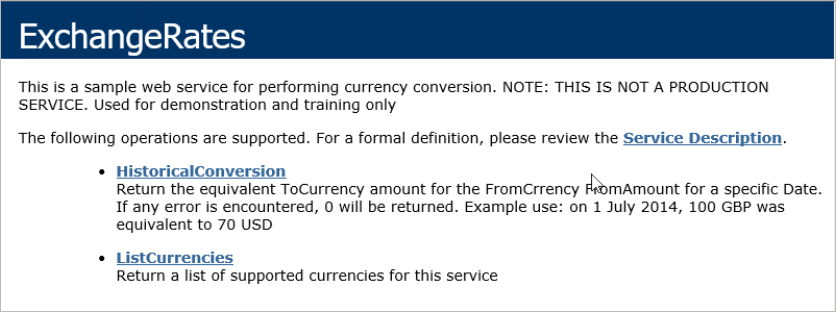
The second service instance connects to an Endpoints Web Service. This data source returns two methods. The first method returns values for the Currency Code drop-down list. The second method performs a data conversion calculation that returns a US dollar amount for any amount entered under another country currency code. This allows you to enter expenses from other countries, presumably where business travel occurred. You will configure both methods as part of this application.
The test page for the Endpoints Web Service Exchange Rates
Expense Claim Categories SmartObject
You will generate the first SmartObject from the Azure SQL Database service instance. In a later step, you will associate this SmartObject with the Expense Claims Details SmartObject, creating a bond between the two data sources. Finally, you configure the Categories drop-down list so that it retrieves its list items from the SmartObject.
Generating the Categories SmartObject

Expense Claim Currency Codes SmartObject
You will create the Expense Claim Currency Codes SmartObject from scratch. This SmartObject has two methods. The first retrieves a list of currency codes and the second performs a currency calculation. Similar to the categories SmartObject, the first method provides Currency Code drop-down list values, which you select as part of entering your expense claim line items. The second method takes values from four parameters, then returns a string value representing US dollars. This allows you to enter expense claims that occurred in other countries without having to perform the currency conversion manually.
Configuring the input and return properties and parameters for the currency code calculation method

Expense Claim Header SmartObject
You will build the Expense Claim Header SmartObject from scratch. This is a SmartBox SmartObject, which is K2-provided storage within the K2 table on the SQL server housing the K2 database. This data source stores the header content of the expense claim, which includes properties such as Employee Name, Request Title, Request Comments, Approval Date, and so forth.
The Expense Claim Header SmartBox SmartObject

Expense Claim Details SmartObject
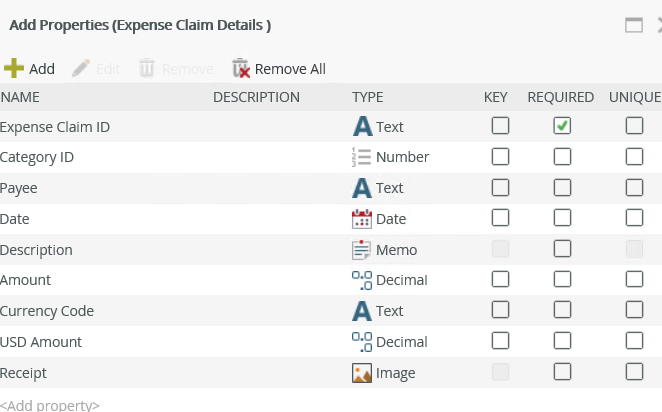
The Expense Claim Details SmartObject is also a SmartBox data source that you create from scratch. This data source stores the details, or expense claim line items. You will bind records from the header SmartObject to records from the details SmartObject via a common ID property. This creates a header-details, or parent-child record model. You will have one parent record with one or more child records. You will associate this SmartObject with both the Expense Claim Categories SmartObject and the Expense Claim Currency Codes SmartObject. This creates a bond between the SmartObjects and will come into play as you configure drop-down list control data sources.
The Expense Claim Details SmartBox SmartObject
The application forms component consists of an item view that is bound to the Expense Claim Header SmartObject, a list view that is bound to the Expense Claim Details SmartObject, a solitary item view used for finance processing, and a form to contain the views.
Expense Claim Header (Item) View
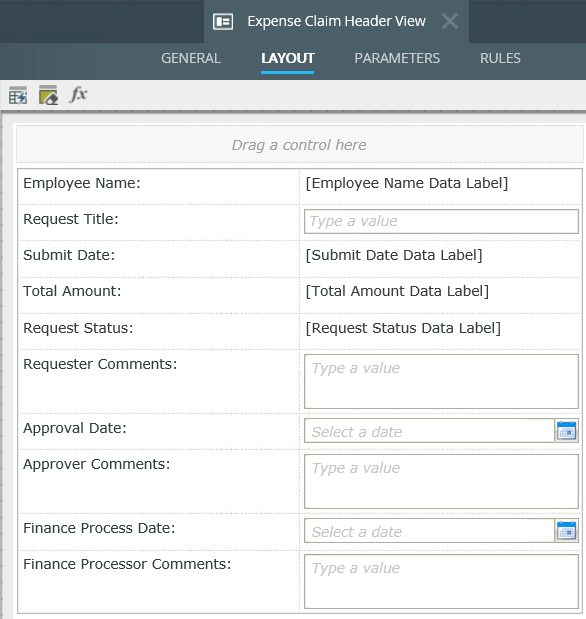
The Expense Claim Header View is an item view that you will create from the header SmartObject. This view displays the controls for entering, editing, and displaying content such as Employee Name, Request Title, Approval Date, and so forth. The Expense Claim Header SmartObject stores the content from this view.
The Expense Claim Header View
Expense Claim Details (List) View
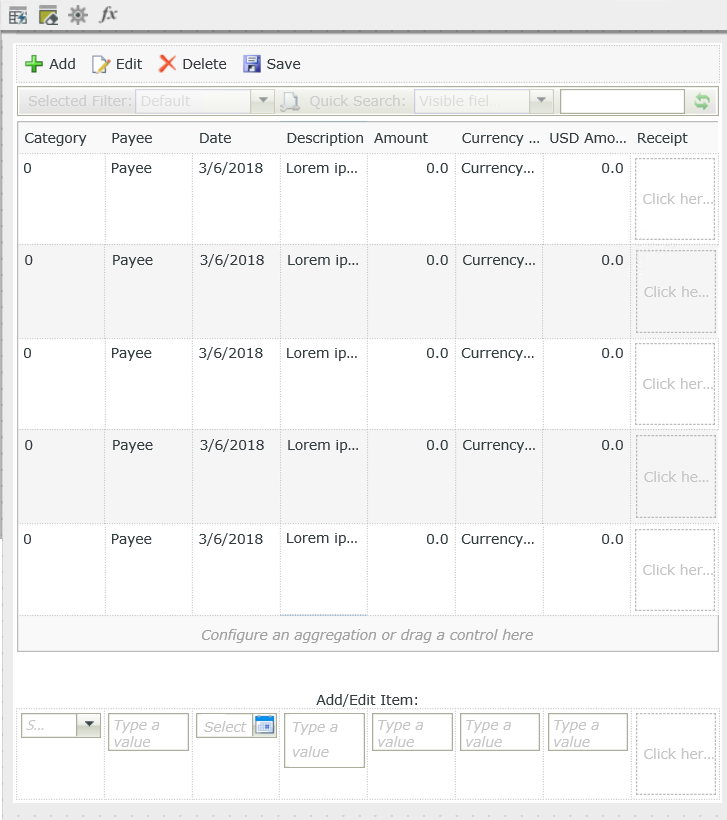
The Expense Claim Details View is a list view that you will create from the details SmartObject. This view displays the controls for entering, editing, and displaying expense claim line items content. The Expense Claim Details SmartObject stores the content from this view. Each row of line items entered on this view becomes a separate record in the SmartObject. In the parent-child record model, you will have one parent (header) record, and one or more (details) child records per parent record.
The Expense Claim Details View
Expense Claim Finance Processing View
Workflow task steps are often configured using a wizard which walks you through the SmartForm-workflow integration settings. These settings include creating new states and configuring rules to open and action worklist items. To demonstrate how to configure a SmartForm-workflow integration manually, you will not use the task wizard for the Finance Processing step. Instead, you will create a view to display the actions, then configure rules to process the worklist item. The Expense Claim Finance Processing View is part of the manual configuration.
The Expense Claim Finance Processing View

Expense Claim Form
The Expense Claim Form is the container for all three views, plus additional button controls. This is the user interface for the request originator, the claim approver, and the finance processor. You will use the same form for all three users, configuring rules behind states to control the format and behavior of the form for each user experience.
The Expense Claim Form before adding submit buttons

The workflow component for this application consists of a task step for claim approval, a task step for the originator to rework the claim, and a task step for finance processing. You will add steps to update the status at significant points in the workflow, then send emails regarding the status. Key features of this workflow are two conditional rules which perform business analysis of a data field, resulting in the direction the workflow takes.
Data field analysis to determine workflow path
You will add a conditional rule that analyzes the claim amount. If the amount is less than or equal to $100, the claim does not require approval and the workflow routes directly to the finance processing task step. If the claim amount is greater than $100, the claim requires approval and the workflow routes to the claim approval task step. This demonstrate how you can configure a workflow to perform business analysis on a form field, then direct the workflow based on the result.
Data field analysis to determine task recipient
Once again, you will configure a conditional rule to determine the recipient of the claim approval task. If the claim amount is less than or equal to $500, the claim approver is the originator's manager. If the claim amount is greater than $500, then a member the finance department must approve the claim. 
The Expense Claim Workflow you will build in this tutorial

Forms Revisited
Once you have deployed the workflow, you will return to the form to concentrate on rules. Specifically, you will customize the form's configuration and behavior based on the current user task. You do this by creating states. States are bound to a specific user task via a serial number, allowing the form to be customized based on the task at hand. For example, you might want form fields editable for the person submitting the expense claim for the first time so they can enter their claim details. However, the claim approver shouldn't change any of the original details, so you might create a state for the claim approval task and edit rules for that state which make the fields read-only. In this way, you can use one form for many different uses.
Originators State
This is the form's configuration and behavior the original requester experiences. You will edit this state for the following (in part):
- Hide the Finance Processing View
- Hide the Finance Process controls (submit button)
- Make the approver and finance processor comments text areas read-only
Claim Approval State
This is the form's configuration and behavior the claim approver experiences. You will edit this state for the following (in part):
- Hide the Finance Processing View
- Hide the Finance Process controls (submit button)
- Make all fields read-only except the approver comments
Finance Processing State
This is the form's configuration and behavior the finance processor experiences. You will edit this state for the following (in part):
- Show the Finance Processing View
- Show the Finance Process controls (submit button)
- Make all fields read-only except the finance processor comments
- Add rules to open and action the worklist item
Originator Rework State
This is he form's configuration and behavior the original requester experiences if they have to rework their claim. You will edit this state for the following (in part):
- Hide the Finance Processing View
- Hide the Finance Process controls (submit button)
- Make the approver and finance processor comments text areas read-only
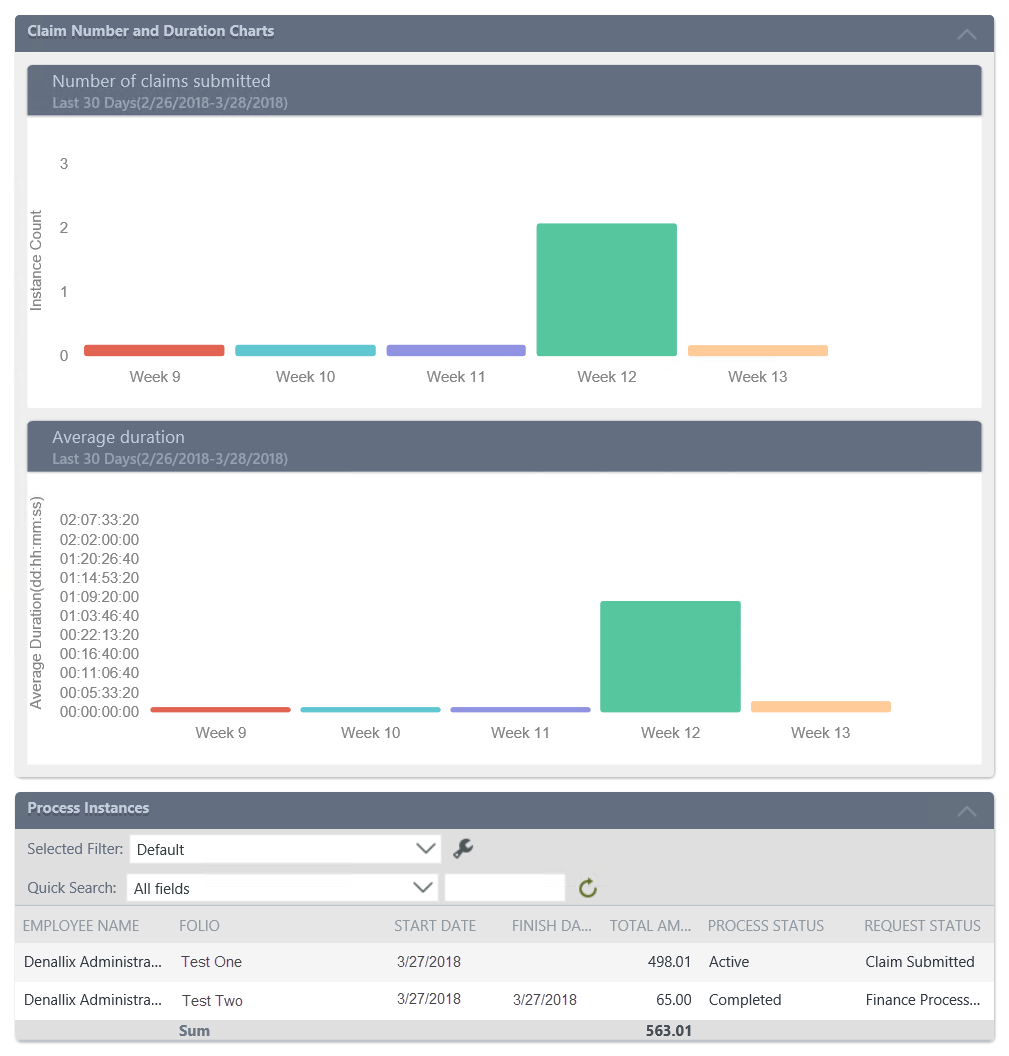
The last section explores reporting options. The key feature in this section is a composite SmartObject, which binds two different data sources into one output, or list, much like a JOIN statement in SQL. You will create an item view and add reporting controls that display data in a chart format. You will add two charts: one for displaying the number of expense claims submitted and the other for displaying the average duration of claim processing. You will create a list view to display the records from the composite SmartObject. Finally, you will create a reporting form that contains both views.
Composite SmartObject joins workflow instance data with Expense Claim Header SmartObject data
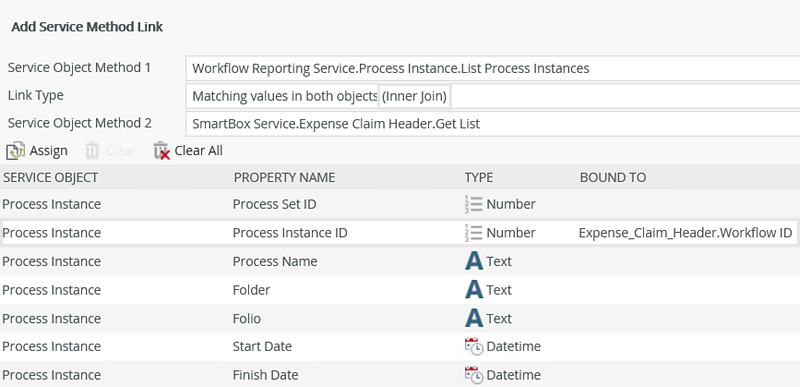
The composite SmartObject you will build binds two different data sources into one SmartObject. You will retrieve data from the system-generate Process Instance SmartObject that contains properties such as Start Date, Finish Date, and Folio. (The Folio is a system value that you will configure to display the title of each request entered.) You will combine the system data with data from the Expense Claim Header SmartObject, using properties such as the Employee Name, Request Status, Total Amount. This gives you a nice picture of who submitted an expense claim, the amount, and the current status of the claim.
Binding data sources for a composite SmartObject
Expense Claim Report Dashboard Form
The report form contains both views which displays the two charts representing the number of claims submitted and the average duration of claim processing, along with a list of process instances from the composite SmartObject. Here, you can tell at a glance how many claims have yet to be processed, as well as who submitted them and the claim amount. The charts become more useful as more claims get submitted. You might begin to observe trends, such as which weekdays are heavy for claim submittal.
The Expense Claim Report Dashboard Form
Now that you have in-depth knowledge of the application components, it's time to get started. Have fun building your Expense Claim application!