Custom Task
What does it do?
A user task is that point in the workflow that requires some human interaction; i.e. a workflow participant is required to do something. The Custom User Task facilitates the interaction with a workflow participant to complete an action/actions. Custom User Tasks define the actual points of interaction between the participants and the workflow. Adding events (client and server) entails considering:
- What needs to be done?
- The sequence in which it needs to happen?
- Who needs to be involved (participants) - and at what stage?
- What data the event needs?
- The sequencing and the participants are particularly important - as they provide clues as to when multiple events can be added to the same activity.
The Custom User Task generates an automated Task which is sent to workflow participants, and is used to keep users up to date and notify them of new worklist items. In the K2 Workflow Designer, the Custom User Task can be configured by dragging the Custom User Task icon onto the relevant step on the design canvas. The Custom User Task is used to create a task for a user which is not specifically linked to a Form in the K2 Workflow Designer. A URL can be specified where the task will be opened and a serial number or parameters can be added to the URL for identification purposes. The Custom User Task can be found by opening the User Tasks in the Workflow Steps tab.
How is it used?
Custom tasks are created when more functionality is required than provided by SharePoint forms or K2 smartforms. A business process may utilize a custom task for complex order processing.
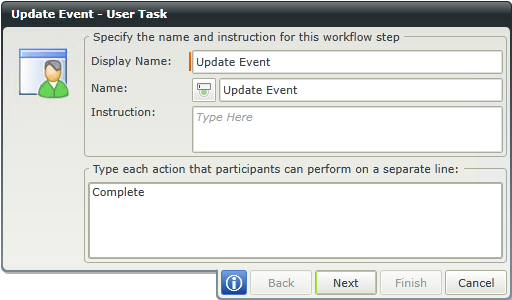
On the User Task page of the wizard, enter the name of the workflow step, any required instructions, and the actions participants can perform with each action on a new line.
| Field | Description | Sample Value |
|---|---|---|
| Display Name | The activity display name. This name is visible at design time and runtime. See Changing the Activity Name | Type the name for this workflow step. |
| Name | The activity system name. This name is only visible and configurable at design time. See Changing the Activity Name | Type the name for this workflow step. |
| Instruction | Represents an instruction of what the user is expected to do or what the workflow step will do. | Type the instruction or description of what this workflow step will do or what the user is expected to do. |
| Action | Represents the action or actions that can be performed with this workflow step for example Approve, Decline | Type a name for each action that needs to be completed by participants on this workflow step. To add multiple actions, press Enter after each action. |
| Allow user to action the task without completing the Form |
When selected, participants will be provided with the ability to select an Action without opening the specified form. |
This option is selected by default and is not visible when using the wizard for the first time. Edit the wizard to see this option and amend as required. |
| Automatically generate Outcomes for the above Actions |
When selected, Outcomes are automatically created from the entered actions. |
This option is selected by default and is not visible when using the wizard for the first time. Edit the wizard to see this option and amend as required. |
Activity names are unique within a workflow and have two types of names, one for display and one for the system. When changing an activity name, dependency issues might occur due to broken dependencies such as to underlying rules. When designing the form, dependency issue indicators identify these issues. There is a difference between the Display Name and the Name fields of the activity on the user task page, and you must understand the impact of changing these names.
The Display Name of the activity can be configured at design time and is visible at runtime. Changing this name does not cause dependency issues.
The Name of the activity represents the system name of the activity and is only visible and configurable at design time. Changing the Name causes dependency issues as the system name is used in items such as rules associated with the activity. Changing the system name is sometimes necessary if you have a user task, for example, with activity name ‘ABC’, and you delete the user task and redeploy the workflow. The rules associated with the activity are not removed from the form and any instances that were started on a previous version of the workflow continue. However, all new instances started result in an error as there are dependency issues because of the deleted activity. You can resolve this by adding another user task to the workflow using the same system name ('ABC') but perhaps with a different display name. When deploying the workflow, the previous rules are updated with the details and configuration of the new user task. If the user task is to be removed from the workflow entirely, remember to fix the dependency issues as described in Fixing Dependency Issues.
=Changing the display name of an activity does not cause any dependency issues as no dependencies are broken. Follow the steps below to configure a scenario where the display name of an activity is changed:
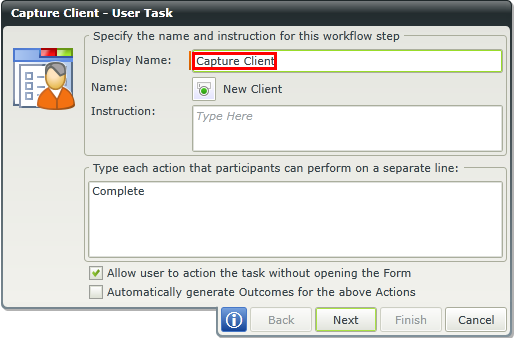
- Create a workflow containing an activity called New Client.
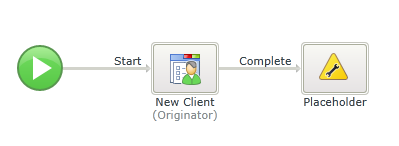
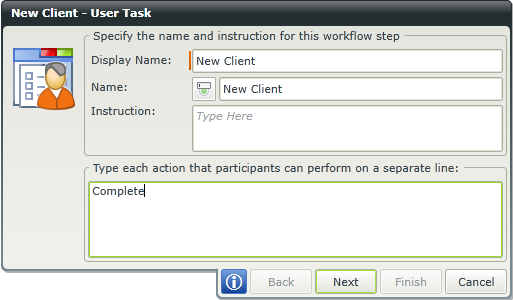
- The user task looks like this. Note the Display Name and Name fields are the same.
- Save and deploy the workflow.
- Open the K2 Designer and edit the client form linked to the workflow.
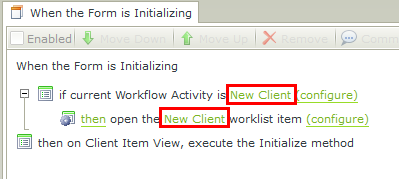
- Navigate to the rules, select the relevant state and edit the rule When the Form is Initializing.
- Note the name of the activity.
- Open the workflow and change the Display Name of the New Client activity to Capture Client.
- Click Next three times.
- You'll see the different activity name in the rule actions listed before the workflow is deployed.

- Finish the wizard.
- Redeploy the workflow.
- Open the K2 Designer and edit the Client form.
- Navigate to the rules and edit the When the Form is Initializing rule.
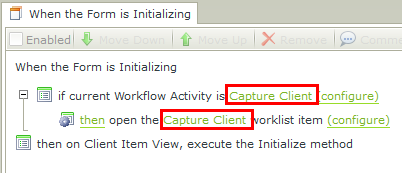
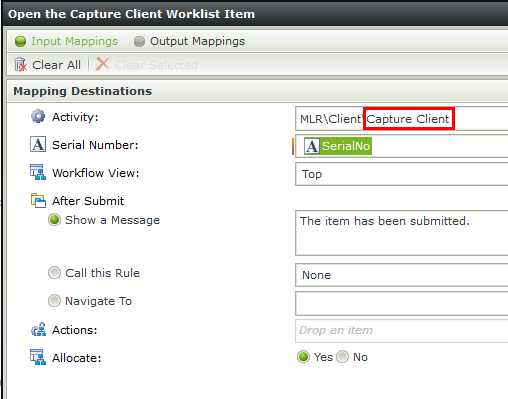
- Click configure next to the rule action Open the Capture Client Worklist Item. Note the new activity name.
Changing the activity Name (aka the system name) can help you fix dependency issues created where an activity is deleted from a workflow. Follow the steps below to do this:
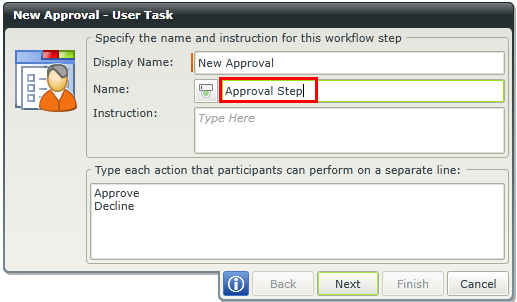
- Create a workflow containing an activity called Approval Step.
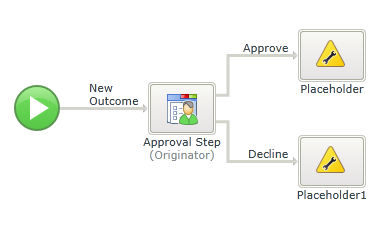
- The user task looks like this. Note the Display Name and Name fields are the same.
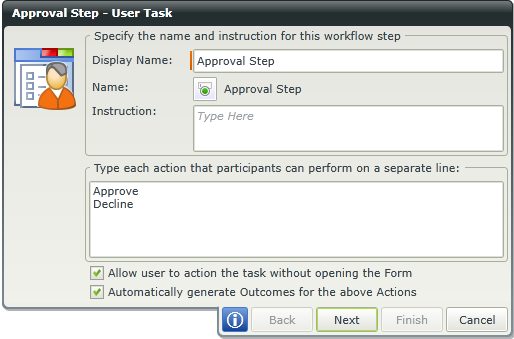
- Save and deploy the workflow.
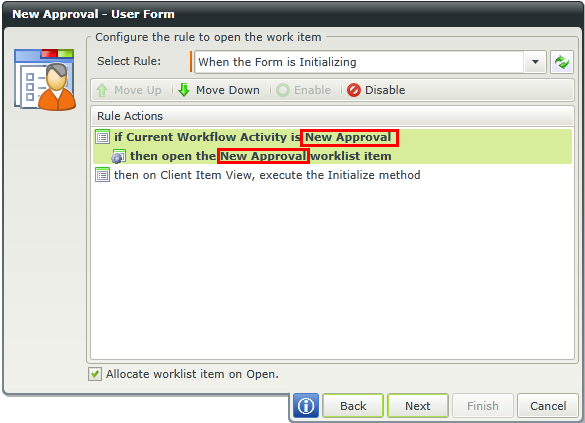
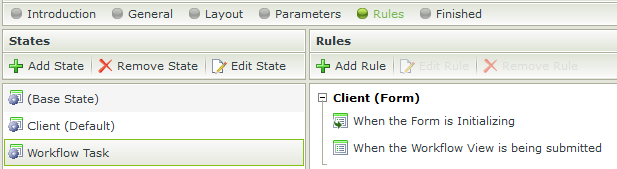
- Open the K2 Designer and edit the form linked to the workflow.
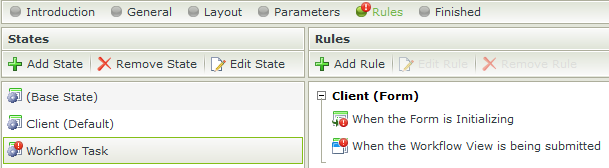
- Navigate to the rules, select the relevant state and edit the rule When the Workflow View is being submitted.
- Note the name of the activity.
- Open the workflow and delete the activity called Approval Step, including its outcomes. This action raises dependency issues to linked rules in the form used for this activity as the activity is gone and the dependency broken.
- Redeploy the workflow.
- Open the K2 Designer and edit the form.
- Navigate to the rules. Note the items containing dependency issue indicators as a result of the broken dependency between the deleted activity and the rules.
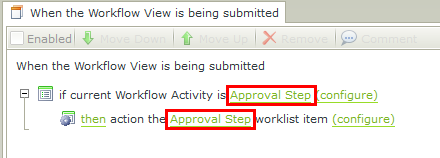
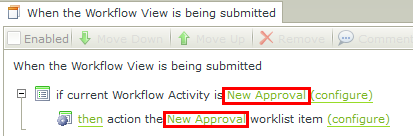
- Edit the rule When the Workflow View is being submitted and note the dependency issue on the activity name.
- Close the form.
- To fix the dependency issues add another user task using the same system name. Edit the workflow and add another user task with outcomes.
- Toggle the button to change the Name. Type "New Approval" for the Display Name field and "Approval Step" for the Name field, matching what the deleted activity's system name was, which fixes the dependency issues.
- Click Next twice.
- Note the new activity display name used on the rule page.
- Finish the user task wizard and deploy the workflow.
- Edit the form and navigate to the rules.
- Note that there are no dependency issues.
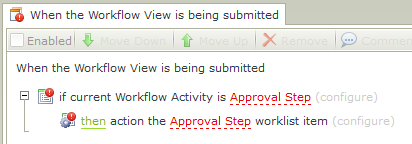
- Edit the rule When the Workflow View is being submitted and note the new activity display name. The new activity has been used to fix the dependency issue by using the same activity system name that was used in the first activity, called "Approval Step".
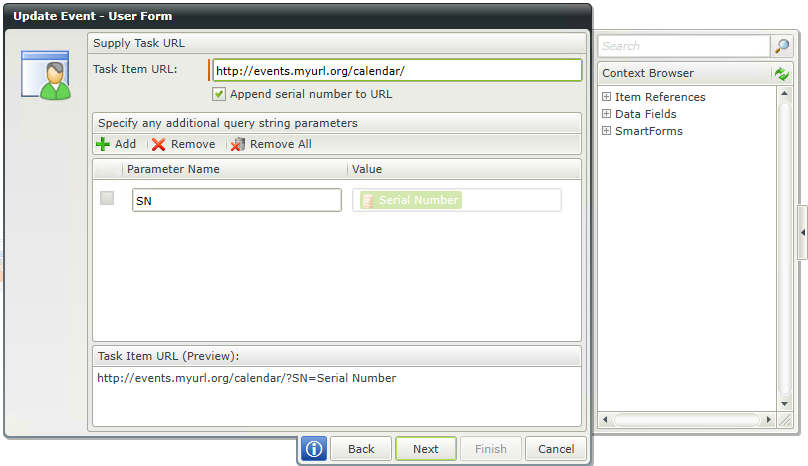
On the User Form page of the wizard, configure the URL to open and the parameters to send.
| Field | Description | Sample Value |
|---|---|---|
| Task Item URL | The URL for the task item | Type a URL for the task item or drag a value from the Context Browser such as pre-configured Data Field or SmartForm data. Note that SmartForm data can only be used when this workflow starts with a SmartForm. The serial number for this task can also be added to the URL if the check box is selected for this function. |
| Append Serial Number to URL | The serial number for this task can also be added to the URL if the check box is selected for this function. | Select the option |
| Query String Parameters |
|
Specify additional query string parameters. Enter a parameter name and type a value or drag a pre-configured field from the Context Browser such as a Data Field, Item Reference or SmartObject Load method property. Note that when a SmartObject Load method property is used, an input property is required for the correct information to load. |
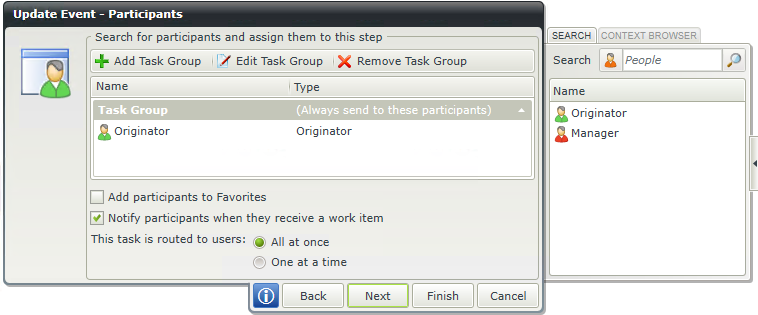
Participants define who executes the User Task (one participant minimum). To add participants to a Task Group, drag the icon from the Context Browser onto the Participants window. Select participants based on relationship (such as Manager), role, group, or individual accounts.
| Field | Description | Sample Value |
|---|---|---|
| Task Group | Represents the users or groups worklist items will be sent to |
|
| Add participants to Favorites | Adds the members of the Task Groups to the Favorites list for easy access. | Select this option to add the members of the Task Groups to the Favorites list. |
| Notify participants when they receive a work item | Sends a notification to members of the Task Groups when they receive the work item | Select this option to send a notification to members of the Task Groups when they receive the work item. |
| This task is routed to users |
All at once - All members of all Task Groups receive the User Task at the same time. |
Select the routing option to be executed. |
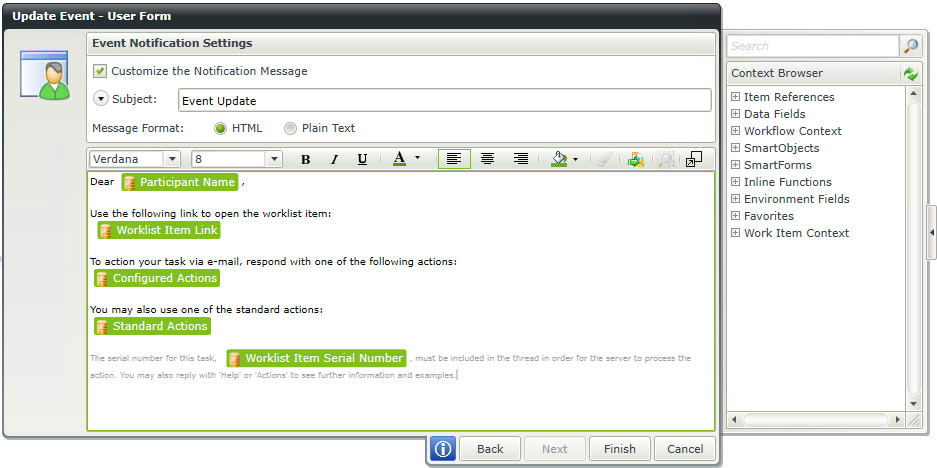
You can customize the notification sent to participants. (Notify participants when they receive a work item must be selected in the Participants window of the wizard.)
Customize the notification message by providing a subject line, additional recipients, and custom message text. Use the Context Browser to add fields (form, list, and data) from the workflow item.
| Field | Description | Sample Value |
|---|---|---|
| Customize the Notification Message | If this option is not selected, a default event notification will be sent. When selected, the notification can be customized. | Select the option to customize the notification. |
| Subject | When configuring the customized notification, not all the available options are displayed at first. Clicking the drop-down in front of the Subject property will display all of the options that can be configured. Add a subject for the e-mail | Add a subject for the e-mail for example Approve Leave. |
| Cc | Configure this property to send a carbon copy | Type a value, or drag a value from the Context Browser such as a pre-configured Data Field, Item Reference or a SmartObject Load method. Note that when a SmartObject Load method is used, an input property is required for the correct data to load. |
| Bcc | Configure this property to send a blind carbon copy | Type a value, or drag a value from the Context Browser such as a pre-configured Data Field, Item Reference or a SmartObject Load method. Note that when a SmartObject Load method is used, an input property is required for the correct data to load. |
| Attachments | Send an attachment with the e-mail | SmartObject methods, Workflow Context Attachments, and Inline Functions that return images or files, can be used to configure the Attachment property. Note that when a SmartObject Load method property is used, an input property is required for the correct information to load. The Process Instance node of the Workflow Context Browser contains the Attachment field for use when a workflow has attachments enabled. |
| Message Format |
HTML - Full formatting of the message, including fonts, colors, and images. |
Select one of the two options. |
| Message | Enter the e-mail message. | To include information from the workflow task, drag values from the Context Browser into the editor such as a pre-configured Data Field, Item Reference or a SmartObject Load method property. Note that when a SmartObject Load method property is used, an input property is required for the correct data to load. If the message is HTML, formatting can be applied using the toolbar above the message editor. |