InfoPath Integration Process Wizard
What does it do?
The InfoPath Integration process wizard allows you to use InfoPath form templates in a process to start workflows and action workflow tasks. Add InfoPath form templates using either the InfoPath Integration process wizard or the InfoPath Client Event wizard, the latter of which displays the InfoPath Integration Process wizard if not already configured.
A view in an InfoPath form template is chosen for each event, which means that one InfoPath form template that contains multiple views can be used for multiple events. Conversely, multiple InfoPath form templates, each with one or more views, can be used in the process for multiple events. This option is useful when a process contains sensitive data or when access to data must be tightly controlled.
Why Use the InfoPath Process Wizard?
Microsoft InfoPath and the Microsoft Office Forms Server are two technologies that organizations can take advantage of to deliver rich forms to their end users to facilitate business processes.
With the Microsoft Office Forms Server, InfoPath forms may be opened with or without the InfoPath client. The Microsoft Office Forms Server renders InfoPath forms inside SharePoint, thus eliminating the need for the InfoPath client for simple forms. The InfoPath client is still required to open InfoPath forms that have complex controls on them and to design forms.
K2 automates the authoring of code behind InfoPath forms via the wizards to integrate InfoPath forms with K2. K2 lets business analysts and other non-developers create these InfoPath forms and workflow interactions with a few clicks, instead of needing a developer skill set and writing code. This empowers users and also reduces the time and effort associated with developing and deploying InfoPath forms inside a SharePoint environment.
Note: InfoPath is a deprecated technology from Microsoft and is not supported with SharePoint 2013 and later. The K2 integration continues to work but there are no new investments in this integration technology.
Information required to make use of this wizard:
- An InfoPath form saved on a shared location
Important considerations when making use of the InfoPath Process Wizard
- A shared location is described as the following:
A network location on a local drive
A shared network location over a network
A SharePoint site
- The InfoPath form used during the wizard configuration is downloaded from the specified shared location and is stored as a local copy in the project location. The wizard configuration makes use of the local project copy of the InfoPath form and does not perform any actions on the original InfoPath form.
- Any changes made in the InfoPath Integration process wizard are applied to the InfoPath Client Event Wizard.
- All the InfoPath project information is saved under the main data source in a _K2 node. It is highly recommended that this folder not be modified.
FTP locations cannot be used as a shared location
When using Forms Server with InfoPath forms, cross-domain access for form templates needs to be enabled.
It is possible to have certain sections of the InfoPath form digitally signed
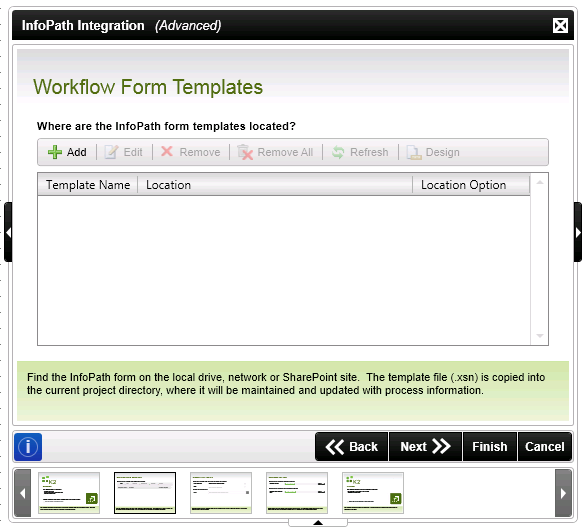
Use the Workflow Form Templates page to add InfoPath forms to be used during the wizard configuration. InfoPath forms used during the wizard configuration are downloaded from the specified shared location and are stored as a local copy in the project location. The wizard configuration makes use of the local project copy of the InfoPath forms and does not perform any actions on the original InfoPath forms.
There are two ways of updating the InfoPath form used in the wizard:
- When the InfoPath form template has changed, the refresh button can be used to refresh the local copy of the InfoPath Form
- The Design button can be used to update the local copy of the InfoPath Form. This, however, does not update the original InfoPath form template located on the shared location
| Field | Description | Notes |
|---|---|---|
| Add | Adds a new InfoPath form template that will be used in the workflow | Click Add to add a new form template |
| Edit | Edits an existing InfoPath form template that will be used in the workflow | Click Edit to edit the form template |
| Remove | Removes the selected form template | Click Remove to remove the selected form template |
| Remove All | Removes all the form templates | Click Remove All to remove all the form templates |
| Refresh | Refreshes the stored InfoPath form with the updates performed on the original InfoPath form templates | Click Refresh to refresh the project copy of the InfoPath form template |
| Design | Opens the selected stored InfoPath form template in InfoPath | Click Design to open InfoPath to edit the form template in InfoPath |
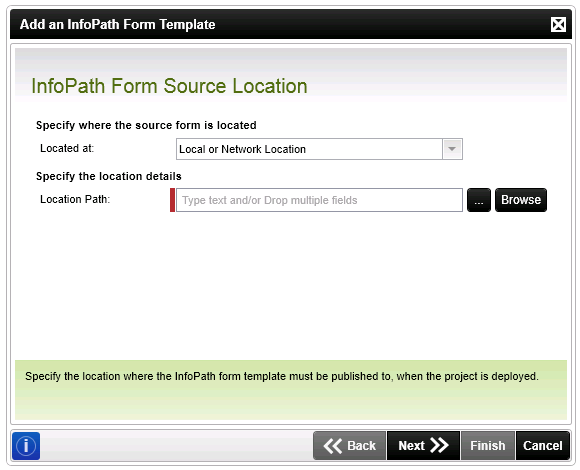
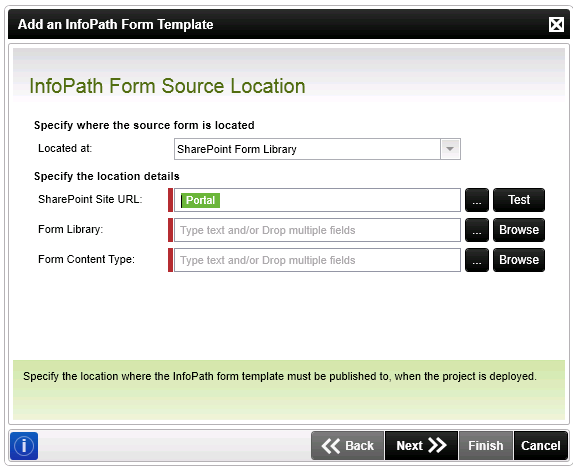
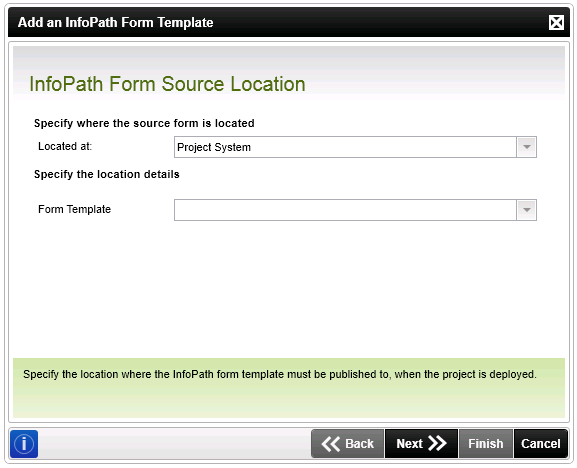
Use the InfoPath Form Source Location page to specify the location of the original InfoPath form template for use in the Workflow. The InfoPath Form Source Location can be located in the following locations:
- Local or Network Location
- SharePoint Form Library
- Project System
Local or Network Location
| Field | Description | Notes |
|---|---|---|
| Located at | The InfoPath form template can either be located on a network or in a SharePoint form library or in a project system | Select whether the original InfoPath form template is located on a network, in a SharePoint Form Library or in a project system by using the drop-down list |
| Location Path | Provides a Browse button to easily locate where the InfoPath form library is situated on the network | Select where the original InfoPath form template is located on the network by clicking on the Browse button and browsing to the location, or by typing in the network location in the text box |
SharePoint Form Library
| Field | Description | Notes |
|---|---|---|
| Located at | The InfoPath form template can either be located on a network or in a SharePoint form library or in a project system | Select whether the original InfoPath form template is located on a network, in a SharePoint form library or in a project system by using the drop-down list |
| SharerPoint Site URL | Stipulates the SharePoint Site URL where the InfoPath form library is located | Type in or browse to the SharePoint Site URL where the original InfoPath form template is located |
| Form Library | Provides a Browse button to locate the SharePoint form library where the InfoPathform template is located | Type in or browse to the SharePoint form library where the original InfoPath form template is located |
| Form Content Type | Adds the InfoPath form template as a content type within SharePoint | Type in or browse to specify the content type |
| Field | Description | Notes |
|---|---|---|
| Located at | The InfoPath form template can either be located on a network or in a SharePoint form library or in a project system | Select whether the original InfoPath form template is located on a network, in a SharePoint form library or in a project system by using the drop-down list |
| Form Template | Displays the available InfoPath form templates | Select the InfoPath form template from the drop-down list |
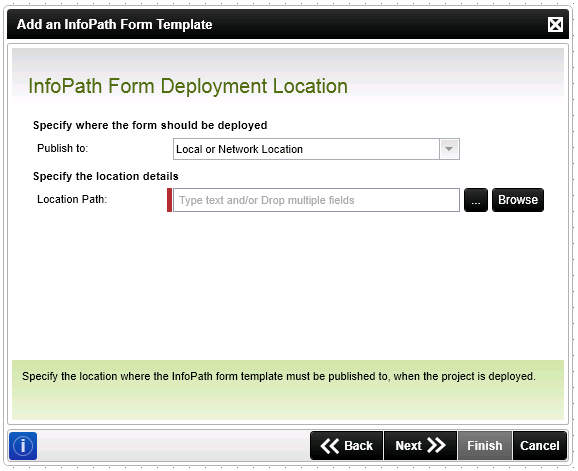
Use the InfoPath Form Deployment Location page to specify the location to where the InfoPath form template is to be published for use in the workflow. The page displays different fields depending on whether the form template is published to a network location or to a SharePoint form Library.
Ensure that all users who may open the InfoPath form template have access rights to the destination location.
| Field | Description | Notes |
|---|---|---|
| Publish to | Specifies the location to where the InfoPath form template is to be published | Select whether the form template should be published to a location on the network or to a SharePoint form library |
| Location Path | Specifies the Location details for publishing the InfoPath form template | Type in or browse to the location on the network to where the InfoPath form template is published |
SharePoint Form Library

| Field | Description | Notes |
|---|---|---|
| Publish to | Specifies the location to where the InfoPath form template is to be published | Select whether the form template should be published to a location on the network or to a SharePoint form library |
| SharePoint Site URL | Specify the SharePoint Site URL where the InfoPath form template is to be published | Type in or browse to the SharePoint Site URL where the InfoPath form template is to be published |
| Form Library | Specify the SharePoint form library where the InfoPath form template is to be published to. Type or browse to the SharePoint form library where the InfoPath form template is to be published | Type in or browse to the SharePoint form library where the InfoPath form template is to be published |
| Add as library template | Adds the InfoPath form template as a library template in SharePoint | Select the Add as library template check box if the InfoPath form template is to be added as a library template |
| Add as content type | Adds the InfoPath form template as a content type in SharePoint | Select the Add as content type check box if the InfoPath Form Template is to be added as a content yype |
| Form Client | Selects how the form should be opened in the SharePoint form library | Select how the form should be opened from the drop-down list |
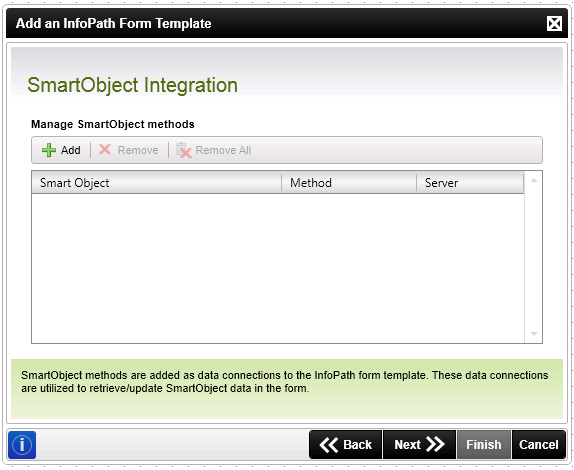
Use the InfoPath Workflow SmartObject Integration page to add SmartObject methods as data connections to the InfoPath form template. These data connections are used to retrieve or update SmartObject information from within the form. When deploying an InfoPath form that has been integrated with SmartObjects, .udcx files are created that can be located in the K2 blackpearl Data Connections library.
| Field | Description | Notes |
|---|---|---|
| Add | Adds a SmartObject method to the process | Click Add to add a new SmartObject method |
| Remove | Removes the selected SmartObject method | Click Remove to remove the selected SmartObject Method |
| Remove All | Removes all the SmartObject methods | Click Remove All to remove all the SmartObject Methods |
For an example of how to use InfoPath with SmartObject integration, see the topic Exchange Meeting Scenarios. This specific scenario is using an out of the box SmartObject, but the same principle applies when using custom SmartObjects created in K2 Studio
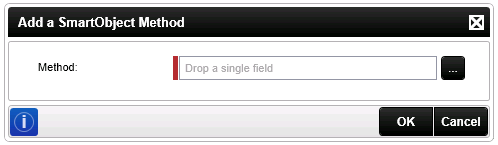
Adding a SmartOject Method
| Field | Description | Notes |
|---|---|---|
| Method | Specify the SmartObject method to integrate with the form | Use the ellipse button to browse to the relevant SmartObject method |
| Add to Main Data Source | Specifies whether the schema should be added to the main data source to allow for repeating inputs | Select the check box |
Adding to a Main Data Source
Multiple inputs for secondary data sources are not available in InfoPath. To be able to have multiple inputs, the schema must be created as part of the main data source. This allows repeating inputs to be created as items and only added at the succeeding rule, so more than one item can be added and the form saved only once. When designing a workflow using the Add to main data source functionality, it is important to note that the method will only be executed when all the values have been added.
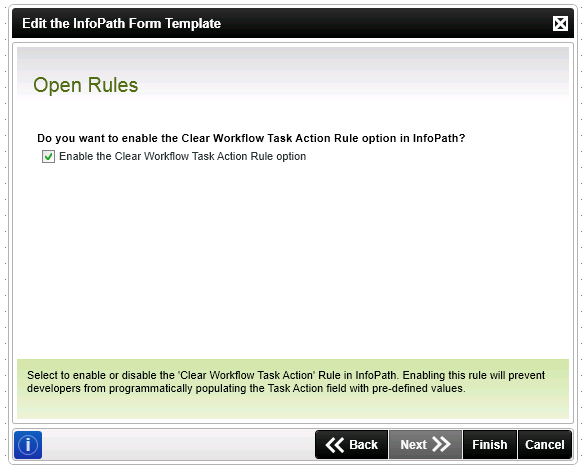
Use the Open Rules page is used to enable or disable the inclusion of the Clear Workflow Task Action Rule in the InfoPath integration. If this rule is enabled, the previous workflow task actions are cleared when the InfoPath form is opened.
The default behavior is to enable the clear workflow task action rule
| Field | Description | |
|---|---|---|
| Enable the Clear Workflow Task Action Rule option | Specifies that the Clear Workflow Task Action Rule should be used and added to the InfoPath form |
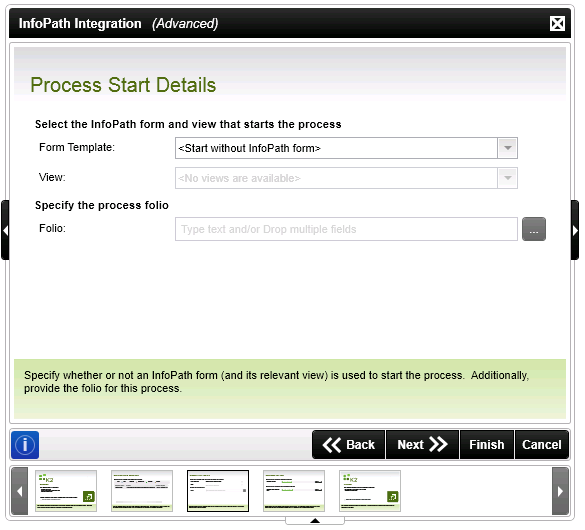
Use the Process Start Details page to specify the steps that should be used when starting the workflow.
| Field | Description | Notes |
|---|---|---|
| Form Template | Selects what template should be used to start the workflow. | Select what template, if applicable, should be used to start the workflow by using the drop-down list |
| View | Defines which view to use as the view for the workflow. This is the first view of the InfoPath form template to use when opening the InfoPath form in the workflow. | Select which view to use as the View for the workflow by using the drop-down list |
| Folio | Selects to what the workflow folio should be set to when the Workflow starts in SharePoint | Select to what the folio should be set to when the workflow starts by either typing in the required setting or browsing to the relevant setting. The folio helps distinguish different instances of the same workflow. |
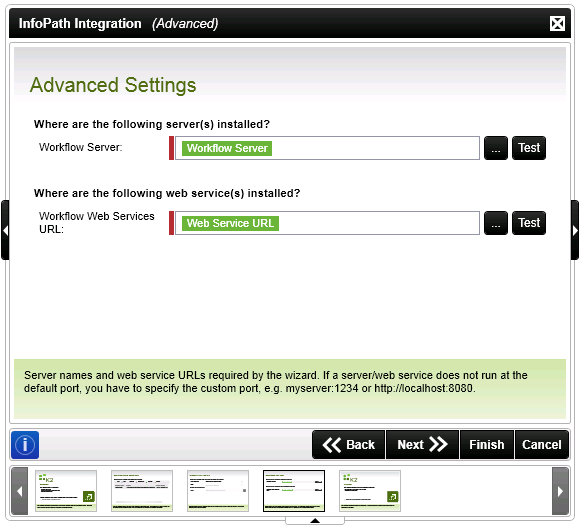
Use the Advanced Settings page to specify the workflow server and workflow web services URL settings. These are typically not necessary to change from the default values.
| Field | Description | Notes |
|---|---|---|
| Workflow Server | Specify the workflow server. | Type a value, or drag a value from the Context Browser such as a pre-configured Data Field, Item Reference or a SmartObject Load method. Note that when a SmartObject Load method is used, an input property is required for the correct data to load. |
| Workflow Web Services URL | Specify the workflow web services URL | Type a value, or drag a value from the Context Browser such as a pre-configured Data Field, Item Reference or a SmartObject Load method. Note that when a SmartObject Load method is used, an input property is required for the correct data to load. |