How To: Configure the Picker control to use another control's data to filter the results
This topic shows you how to configure the Picker control to use another control's data to filter results displayed in the picker. Tying controls together like this results in data that cascades from the first control to the second one, limiting the data shown in the second control. In this example, when you select a value in a Drop-Down List control, the Picker control is filtered to show results based on your selection.
City picker showing filtered results according to value selected in the Country drop-down 
Scenario
You have a view where you show all the cities within a selected country. You use views to create records for the cities and countries and another view to select a country and show its cities.
Steps
In this scenario, you create City and Country SmartBox SmartObjects. You create an association between the City and Country SmartObjects to allow you to filter the data. You create Editable List views based on the City and Country SmartObjects to allow you to add data. You create an item view based on the City SmartObject containing a Picker control and a Drop-Down List control. You configure the Picker control to use the Drop-Down List control's value to filter the results. You configure a rule that disables the Picker control when the view opens, and a rule that enables the Picker control when you select a value in the Drop-Down List control.
Setup Steps
The following steps set up the scenario from start to finish. If you want to skip the setup steps and view the topic step, go to Configure the Picker control.
- From K2 Designer, create the SmartObjects listed below. Use the tables as a guide for adding properties.
Country
This is the SmartObject that stores country information.Property Data Type Key Required Unique ID Autonumber Yes No Yes Country Text No No
No
City
This is the SmartObject that stores city information.Property Data Type Key Required Unique ID Autonumber Yes No Yes City Text No No
No
CountryID Number No
No
No
If you are not familiar with creating a SmartBox SmartObject, see How To: Create A SmartBox SmartObject. - Edit the City SmartObject and add the following associations:
- One-to-many association between the City and Country SmartObjects
- To add the association, right-click the City SmartObject and select Edit.
- On the Associations page click Add. On the SmartObject screen of the Add Association wizard, select the Country SmartObject and click Next.

- On the Association screen, select the options as shown below to create the one-to-many association. Click Next.

- On the Relationships screen, select the CountryID field and click Assign.

- On the Assign property screen, select the ID property of the Country SmartObject from the drop-down and click OK.

- Click Finish on the Relationships screen. You have configured the one-to-many association between the City and Country SmartObjects.

- The association is listed for the City SmartObject. Click Finish to save the SmartObject.

-
In this step, you generate Editable List views for the City and Country SmartObjects. After you generate the City Editable List and Country Editable List views, add at least two records using the City Editable List view and at least three records using the Country Editable List view.
- Right-click the City SmartObject and select Generate Views.

- Check the box below Editable List to create the City Editable List view. The name is populated by default. Click OK.

- Do the same to create an editable list view for the Country SmartObject.
- Run both views and enter at least two records using the City Editable List view, and at least three records using the Country Editable List view. Run the Country Editable List view first because the City Editable List view is dependent on the data you create in the Country Editable List view. To add sample data to the Country Editable List view, right-click the view and select Run. Click Add and type a value in the Country field. Click Add again to add more items. When you are done, click Save.

To add sample data to the City Editable List view, right-click the view and select Run. Click Add, type a value in the City field and select a value from the Country menu. The Country menu shows the data you created in the Country Editable List view because you associated the two SmartObjects. Click Add again to add more items. When you are done, click Save.

- Right-click the City SmartObject and select Generate Views.
-
Configure the Picker control. In this step, you generate an Item view for the City SmartObject and configure the Picker control to use the value you select as the country to filter the cities.
- Right-click the City SmartObject and select Design View.

- In the General tab, name the view
City Item
and keep the Item View type. Click Create.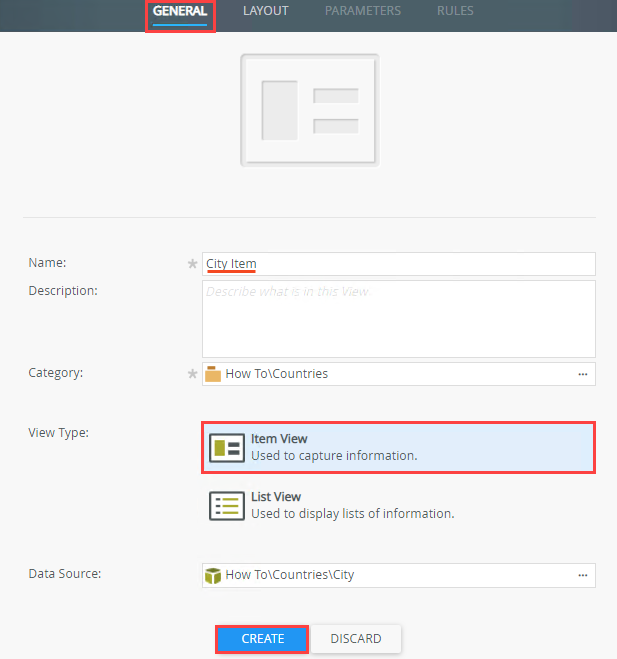
- Drag the CountryID field from the Fields onto the canvas and drop it into a cell. Note the Name in the Detail section of the Properties contains Drop-Down List, and the Country SmartObject is automatically configured as the Data Source for the control. This is because of the association you configured between the City and Country SmartObjects earlier.

- Drag the City field from the Fields onto the canvas and drop it into a cell. Select the control, click the Change Control icon, select Picker from the list, and then click OK.

- Next configure the data source for the Picker control by clicking the ellipsis next to SmartObject in the Data Source section.

- The Configure Data Source dialog opens. Click the ellipsis next to SmartObject.

- Expand the folders where you saved the City SmartObject. Select the SmartObject and click OK.

- Specify SmartObject properties on which you want to search when you type a value in the picker at runtime. Uncheck All next to Filter Properties and then mark the check box next to City.

- Specify the SmartObject property to use when you save values in the picker. You want to use this property to display when you list the countries and cities. Select City from the drop down list next to Identifier.

- Specify the SmartObject property (text) to display at runtime. Keep the City value next to the Display field.

- Next you want to select and configure the control (parent control) to use to filter the City picker's results. Check the box next to Filter the data according to another control's value. Select Country Drop-Down List next to Parent Control and select CountryID as the Child Join Property. The value of the Country Drop-Down List control is used to filter the results for the City control. The Child Join Property is the SmartObject property on the current (City) control that is used to filter the data. This property links the parent data to the child data and needs to match the parent join property. Click OK to save the configuration.

- Uncheck the box next to the Allow Multiple option. You don't want to allow the control to save and load multiple values.

- Right-click the City SmartObject and select Design View.
-
In the next step you edit the When the View executed Initialize rule to disable the Picker control when the view loads and you edit the When CountryID Drop-Down List is Changed rule to enable the Picker control when a value is selected in the Country Drop-Down List control. You do this to prevent people from searching for a city without selecting a country first.
- To disable the Picker control when the view loads, on the Rules page select the When the View executed Initialize rule and click Edit Rule.

- Select the Actions tab, click Disable a control in the Visibility section, and then select City Picker. Click OK to save the rule.

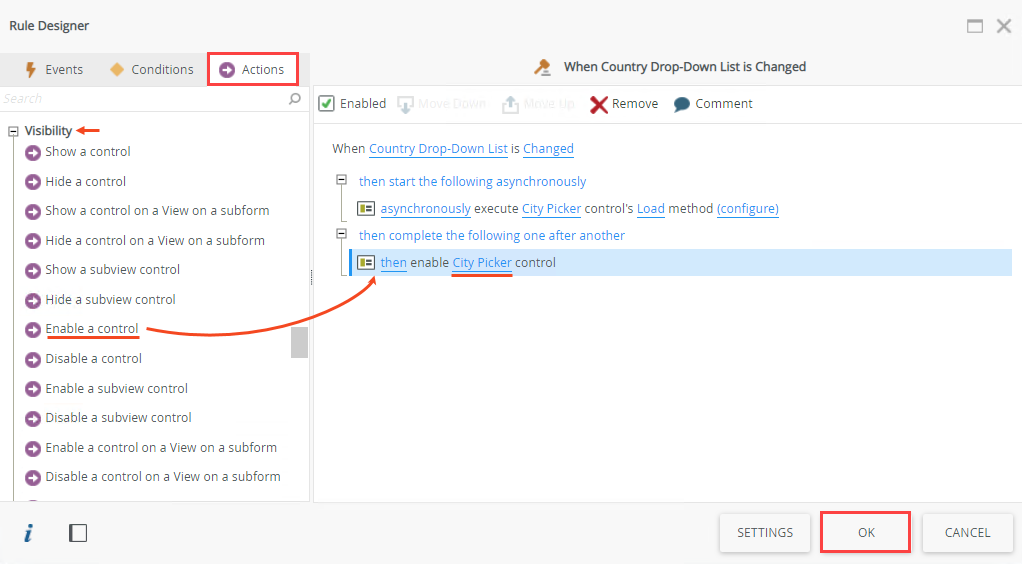
- To enable the Picker control after a value is selected in the Country control, on the Rules page select the When Country Drop-Down List is Changed rule and click Edit Rule.

- Select the Actions tab, click Enable a control in the Visibility section, and then select City Picker. Click OK to save the rule.
- Click Finish to save the view.
- To disable the Picker control when the view loads, on the Rules page select the When the View executed Initialize rule and click Edit Rule.
-
Test your view by running the City Item view. Select a country using the drop-down list and then search for a city using the Picker control. Verify that only cities belonging to the selected country display.
- To test the view, select the City Item view, then click Run.
- Select a value from the Country drop-down list, click the search icon in the City control, and then click the search icon on the Search dialog. Note the results are filtered according to the country you select.

Configure the Picker control
In this step, you configure the Picker control to use the selected value from the Drop-Down List control to filter the results returned by the picker.
Review
Use the Picker control to filter return values according to another control's value. You can use rules to enable and disable a control to ensure people don't search for a value in the Picker control before they select a value in the Drop-Down List control. See Picker control and Using the Picker control for more information about configuring the control and how to use it.