Timer Step
Use the Timer step to pause a path within the workflow for a specific amount of time or until a specified date and time.
Use the Timer step for the following scenarios:
- When part of your workflow needs to wait a specified amount of time before it continues
- To control the flow of a Loop step within the workflow. Example: if you need to query a supply system on a daily basis to see whether a particular item has sufficient stock, you could use a Timer step to repeat every 24 hours
- To schedule or delay actions, for example to publish a document when the policy effective date is reached and the document is approved
Drag the Timer step from the Logic category, Favorites bar, or the Recent category onto the canvas.
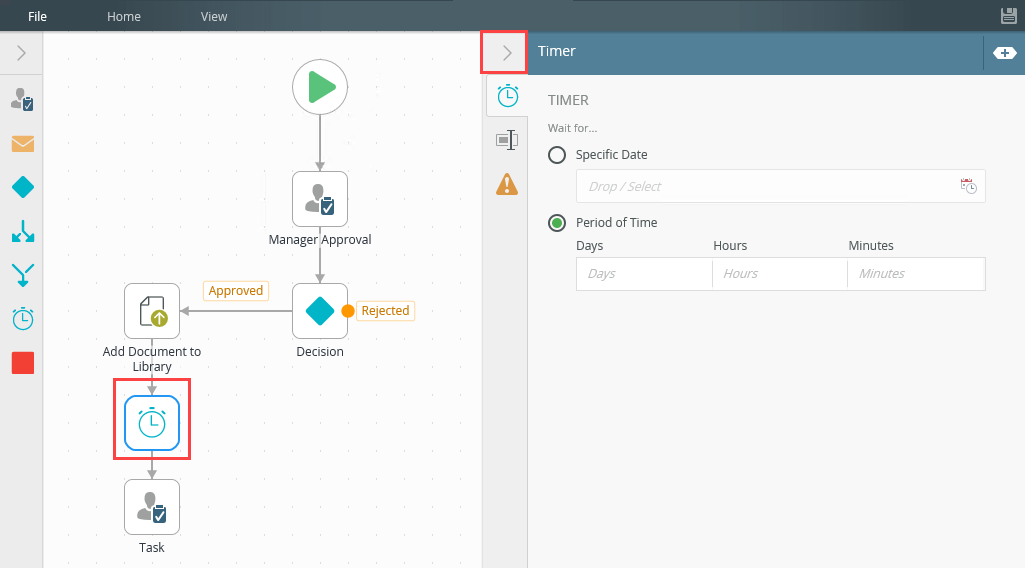
Example of a Timer step in a workflow

- From the Toolbox click the Logic category, and then click and drag the Timer step onto the canvas.

- Select the added step and click the expand / collapse toggle to expand the Configuration Panel. You can also double click the step to expand the panel.

- With the Timer step selected, click on the Timer tab.

- Click the calendar icon to display the date picker. Select a date using the calendar control.
- Drag and drop inline functions and field properties from the Context Browser. into the field to create dynamic functions.
- On the Timer tab select the Specific Date radio button and click on the calendar icon.

- Choose a date from the calendar .

- After you select a date from the calendar, it displays in the field.

- To add inline functions in the Specific Date field, click the expand / collapse toggle to expand the Context Browser.

- Within the Context Browser, select inline functions from the Functions, Fields, SmartObjects and / or Workflow categories to configure your date logic .
- Click and drag the function into the Specific Date field.

- Use the Smartfield Composer and the Context Browser to drag fields and functions to calculate a date.

- To close the Edit SmartField dialog click the Close button. The defined field displays as follows:

- On the Timer tab, select the Period of Time radio button. Enter required values in the Days, Hours or Minutes fields. Values are added individually or in a combination.
Type values or create dynamic values by dragging Functions, Fields, SmartObjects and Workflow-related items from the Context Browser into the fields.

- With the step selected, select the Properties tab.

- Click the Errors tab.

-
Your changes are automatically saved.
There are two options available on the Timer tab:
| Option | Explanation | How to Use |
|---|---|---|
| Specific Date |
Use this option to wait until a specified date. This is the default but must be configured. |
Click the Specific Data radio button to select this option. |
| Period of Time | This option indicates the Timer step waits for a specific set time. | Click the Period of Time radio button to select this option. Enter required values in the Days, Hours, Minutes or Seconds fields. Enter values individually or in a combination. |
For more information on how to use SmartFields, see the Smartfield Composer topic.
For more information on how to use the Functions, Fields and Workflow inline functions, see the Context Browser topic.
The following table explains the options available on this tab:
| Option | Explanation | How to Use |
|---|---|---|
| Title / Name | By default, each step on the canvas has a step title. You can change this title to suit your workflow logic and show it on the canvas by checking the Show Label box. | Enter a value into the Title field. |
| Reset link | Use the link to reset any changes to the title. | Click the Reset link to reset the Title field to default value. |
| Show Label | Allows you to see the step label on the canvas. The label shows the value of the title. | Check the check box to display step label on the canvas. |
| Description | Allows you to add a detailed description for the step. | Enter a value into the Description field. |
| Notes | Allows you to add additional notes for the step. | Enter a value into the Notes field. |
Different types of exceptions can occur on a step, such as:
| Type | Description |
|---|---|
| Known exceptions | Any SmartWizard or standard wizard that has Boolean options for handling known exceptions have these options displayed as check boxes in the Known exceptions section of the Exceptions tab. |
| Unhandled exceptions | Any unknown runtime exceptions. |
The tab contains the following unhandled exception:
| Exception | Explanation | How to Use |
|---|---|---|
| Log Exception | Logs the exception to the error log. | Check the box to log the exception. |
When working with the Timer step keep in mind the following considerations:
- The Timer step cannot be added into a multi-step
- By default, the Timer step has no label. To display the label on the canvas check the Show Label check box on the Properties tab
- The wait time is zero when you don't provide any values, which means the workflow will not wait at all
- When working with the Period of Time option, only three consecutive slots are shown at a time i.e. Days, Hours, Minutes or Hours, Minutes, Seconds. Use the arrow keys to display hidden slots