Set Data Fields Step
Use the Set Data Fields step to update process data fields. You have the option of setting static values manually or setting dynamic values by using inline functions, SmartObject data, and context from the workflow.
You should only store the amount of data required for the workflow, such as using record IDs instead of storing all record data in fields. This helps minimize the amount of data that is stored on the server. You may also want to disable the audit log of data fields in order to further minimize workflow size and server load.
Use the Set Data Fields step in the following scenarios:
- To indicate how long a process has been running
- To map values to the folio
- Update process fields with new data
- Keep an updated count of iterations for a particular step in a workflow
Note that references are often easier to create and reuse than manually storing record IDs in data fields. Drag the Set Data Fields step from the Basic category, Favorites bar, or the Recent category onto the canvas.
Example of a Set Data Fields step in a workflow

- From the Toolbox click the Basic category, and then drag the Set Data Fields step onto the canvas.
 For more information on how to use the error console, see the Error Console topic.
 - Select the added step and click the expand / collapse toggle to expand the Configuration Panel. You can also double click the step to expand the panel.

- Select the Set Data Fields tab. Use this tab to configure the data fields to be set.

- Select which fields to update. This is a required field.

- To add additional fields, click the Add button.

- In the added property field, type a value, use inline functions, or dynamic fields, by clicking on the Add button to expand the Context Browser. Within the Context Browser, select inline functions and fields from the Functions, Fields, SmartObjects and Workflow categories. Click and drag the function into the property field.

- To delete properties, select one and click the Trash bin.

- With the step selected, select the Properties tab.

- Click the Errors tab.

Your changes are automatically saved.
The following table explains the options available on this tab:
| Option | Explanation | How to Use |
|---|---|---|
| Title / Name | By default, each step on the canvas has a step title. You can change this title to suit your workflow logic and show it on the canvas by checking the Show Label box. | Enter a value into the Title field. |
| Reset link | Use the link to reset any changes to the title. | Click the Reset link to reset the Title field to default value. |
| Show Label | Allows you to see the step label on the canvas. The label shows the value of the title. | Check the check box to display step label on the canvas. |
| Description | Allows you to add a detailed description for the step. | Enter a value into the Description field. |
| Notes | Allows you to add additional notes for the step. | Enter a value into the Notes field. |
Different types of exceptions can occur on a step, such as:
| Type | Description |
|---|---|
| Known exceptions | Any SmartWizard or standard wizard that has Boolean options for handling known exceptions have these options displayed as check boxes in the Known exceptions section of the Exceptions tab. |
| Unhandled exceptions | Any unknown runtime exceptions. |
The tab contains the following unhandled exception:
| Exception | Explanation | How to Use |
|---|---|---|
| Log Exception | Logs the exception to the error log. | Check the box to log the exception. |
When working with the Set Data Fields step keep in mind the following considerations:
- The Set Data Fields step has to have at least one incoming line
- A unique name is required when using the Set Data Fields step to create fields. The name cannot be the same as another field
- If a data field is selected and the text box is left blank, the selected field is set with a blank value at runtime
- The Set Data Field step cannot be added into a multi-step and cannot be made into one
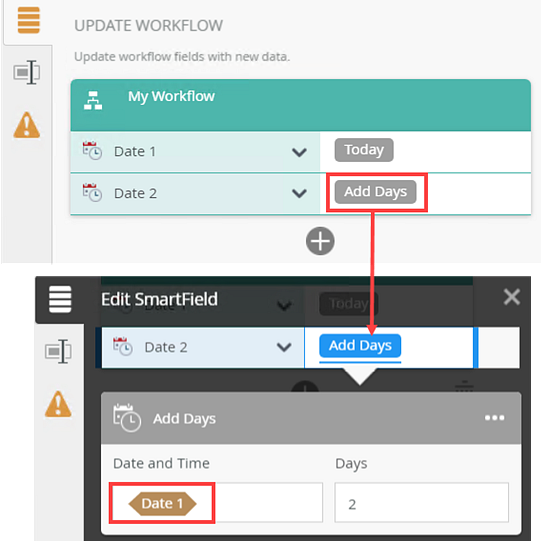
- You can set multiple data fields in a single Set Data Fields step. The data fields are set in serial. For example, you have two date type data fields. The first date data fields is set to today's date and the second one is set to Add Days. You can use the result of the first data field in the second data fields to calculate a value. In this scenario the second data fields is set to show today's date plus 2 days.
