Deploying and Registering Custom Controls
Once your custom control is built you need to deploy the assembly to the SmartForms servers and register the custom control with SmartForms.
- Open a command prompt window and register the assembly using the controlutil.exe utility, using the following syntax:
controlutil.exe register -assembly:"[path to assembly]\[assembly name]"
e.g.
controlutil.exe register -assembly:"%PROGRAMFILES%\K2\K2 smartforms Designer\bin\CustomControl.dll" - In the K2 Designer create a new View.
- In the Toolbox window of the Design View canvas, scroll down the list of groups until you locate the Custom header under which you will find the Custom Control.
- Drag the control onto the View.
- You will now see the result of the RenderContents() function as "Basic Control" is displayed in the design canvas.
- Save and then run the View . You should see the same "Basic Control" text displayed since the RenderContents() function executes regardless of the mode that the View is being run in.
If you do make changes to a custom control, you must rebuild the resulting assembly, register the control again, restart IIS and clear your browser cache to pick up the changes to the control. There is no need to copy the assembly to the servers.
About controlutil.exe
This command line application is used to register a Custom Control dll with the K2 smartforms environment. The controlutil.exe can be found in "%PROGRAMFILES%\K2\Bin" and must be run with Administrator rights.
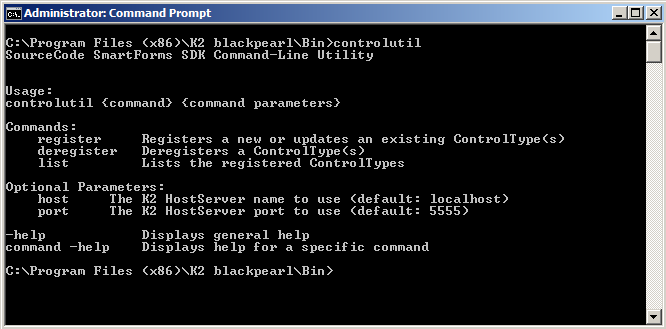
It provides the following command line commands:
- register: Registers a new ControlType from a new assembly or updates an existing ControlType from an existing custom control assembly. Note: You need to run this command whenever the Control Type Definition XML file is changed.
- deregister: Deregisters the ControlType.
- list: Lists the ControlTypes already registered.
- help: Displays information on how to use the different commands. Note that help can only be used as an optional parameter, not a command on its own. You will have to specify the command you need help with first, e.g: controlutil register -help
- host and port optional parameters: you can register a DLL in a distributed environment by specifying the K2 Server host and port in the command line, e.g. controlutil.exe register -assembly:"[path to assembly]\[assembly name]" -host:"K2Hostname" -port:"1234"
–connstr:”this_is_your_connection_string”
The connstr parameter must contain the full connection string to your database. The entire command syntax would be:
controlutil.exe register -assembly:"[path to assembly]\[assembly name]" –connstr:”this_is_your_connection_string”
Your Workflow Server's database connection string can be found in the String Table, see the String Table topic in the K2 User Guide for more information.
Using the controlutil.exe command line application
Open a command prompt window.
Change directories to "%PROGRAMFILES%\K2\Bin\"
At the command prompt enter controlutil to display the following help screen:
Registering a ControlType
The register command uses the following parameter set:
controlutil register -assembly:{assemblyfilepath} -support-assemblies:{assemblyfilepath,assemblyfilepath..}
Deregistering a ControlType
The deregister command uses the following parameter sets:
controlutil deregister -control:{controltypename}
controlutil deregister -assembly:{assemblyfilepath}
If the control is already used on Views and Forms, then use the replaceWith command to deregister it as it will not be deregistered unless it is being replaced with another:
controlutil deregister -control:{controltypename} [-replaceWith:{controlName}]
controlutil deregister -assembly:{assemblyname} [-replaceWith:{controlName}]