Contact List (wizard)
This tutorial describes how to create a contacts management list (like an address book) using the List Collaboration application wizard. The application you will create with this wizard stores contact information, which you can share with other users. You will learn how to select a template to begin, then customize it by adding, editing, and deleting list properties. This application does not contain a workflow component.
You will create a contact list to manage your personal and business contacts. This contact list is a simple address book that you can share with other users. To build the contact list, you will start with a template of default properties, then add two additional properties to customize the list. To test the application, you will add, edit, and delete contacts from the list. This application does not have a workflow component.
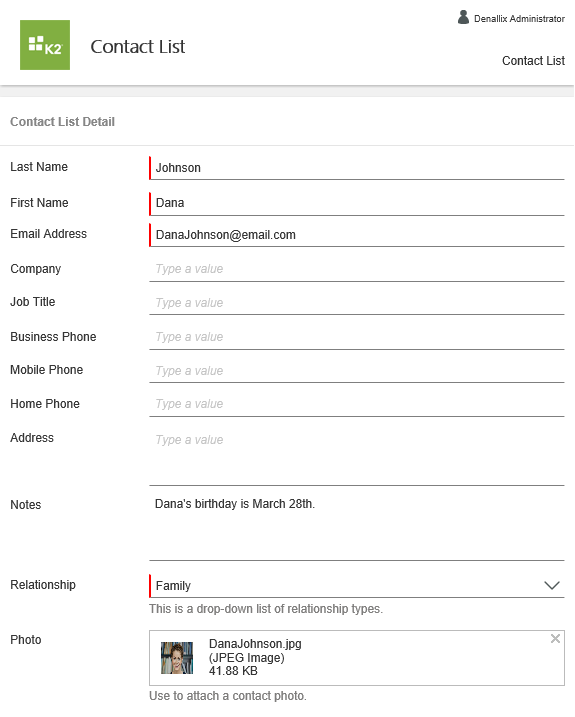
The Contact List form you will generate
Apps are accessible through Workspace. Workspace is your personal dashboard for managing tasks assigned to you, viewing reports, managing personal settings (such as out-of-office and login credentials), and launching applications.
- Launch WorkspaceIf you are unsure of how to launch the Workspace site, see Accessing Sites.
-
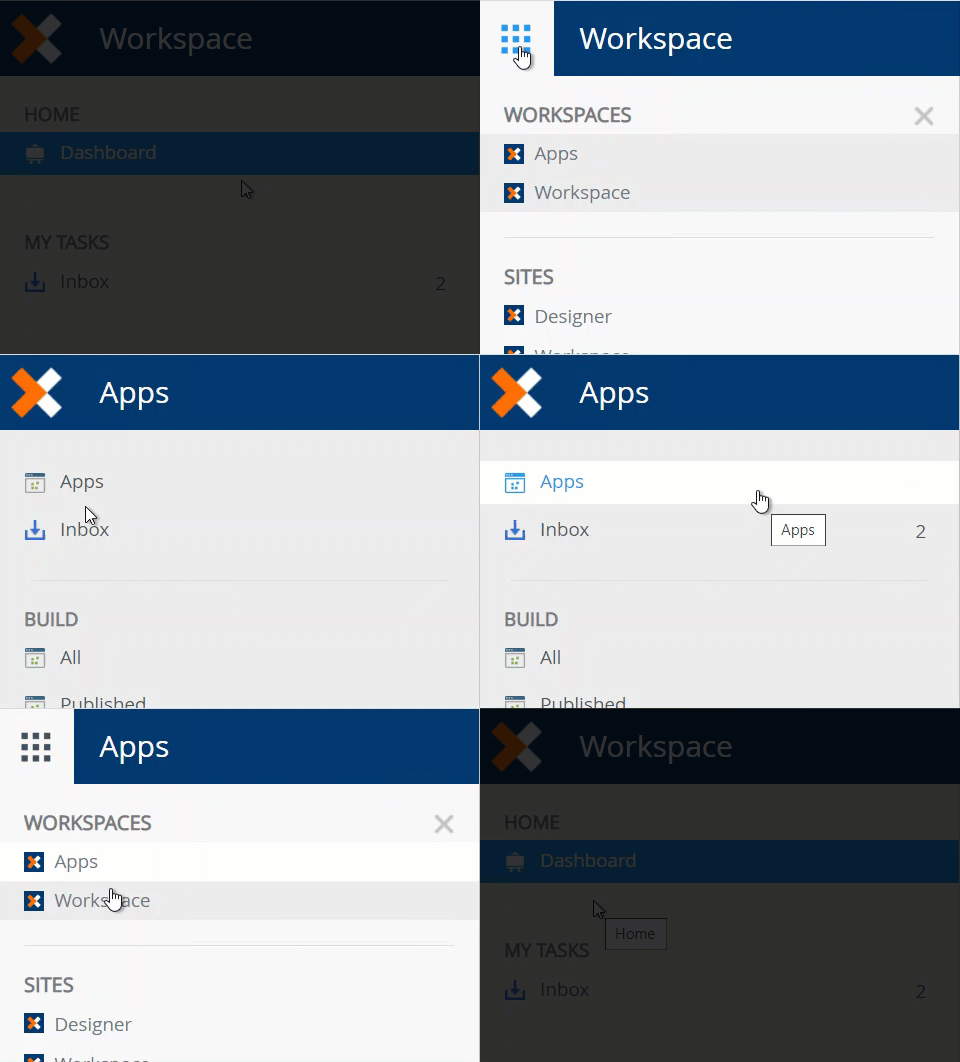
The Workspace launches. You may see a welcome dialog which you can exit. If time allows, explore the Workspace features first, then launch the Apps workspace. To launch the Apps workspace, click the Nintex icon to expose workspace options. Click the Apps link to launch the Apps workspace.
- Workspace launches. In some environments, you will see a welcome dialog box.If you see the welcome dialog and would like to explore its contents, click START. Click NEXT on each screen until you reach the end, then click DONE. Otherwise, exit the dialog.

- You should now see the Workspace dashboard. The left-side column provides access to the workspace features. If time allows, take a few minutes to explore the Workspace. HOME
- The Home button provides quick access to the workspace landing page, or dashboard.
- The Inbox contains a display of tasks currently assigned to you. If the task was not configured to send a task notification email, you will not see it here. Clicking a task opens the associated form where you can complete the task.

- The My Forms page displays the forms (SmartForms) available for you to use.
- The Process Overview report provides a summary of process instances that you are associated with. For example, processes you started, or processes containing a task you actioned.
- The My Overview report displays a summary of your active and completed tasks. From this report, you can action tasks from the Active Tasks list.

- Here you can set your out-of-office controls, set-up auto logins, and set your default workspace.

- Click the Nintex icon to expose other workspace options. Click the Apps option to launch the application wizards menu.
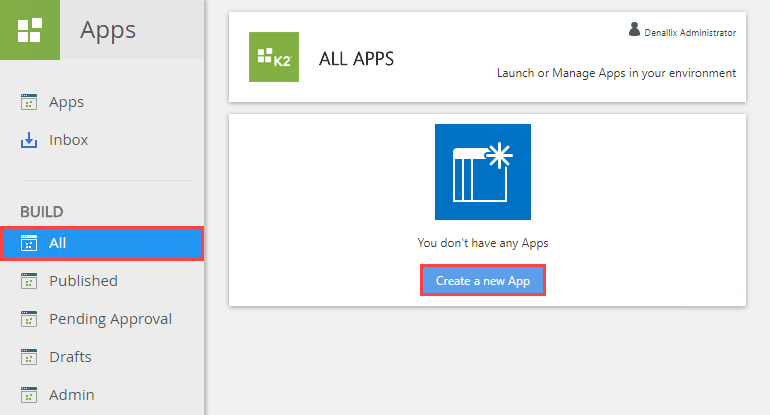
You may not have any apps just yet...
- Workspace launches. In some environments, you will see a welcome dialog box.
-
After launching the Apps workspace, navigate to the Build > All > All Apps landing page. Create a new App. Select the List Collaboration application wizard. Name the new application Contact List, then enter your own content for the description. Choose the Contact List template.Each application title must be unique. You will see an error if you try to duplicate application titles. Consider adding your initials to the title so that you can easily determine which apps are yours. For example, Contact List [YourInitials] , like Contact List KL.
Duplicate name error
- In this step, you create a new application based on the Contact List wizard. After accessing the Apps workspace, click the Build > All link. In the All Apps screen, click the Create a new App button. If you already have apps displayed, click the New button.
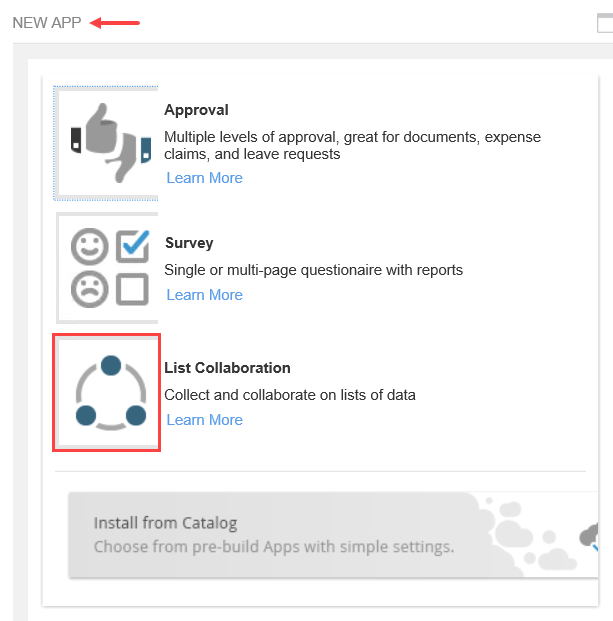
- You are on the New App screen. Here, you can select the app type you want to generate or you can select the option to install an app from the catalog. (See the Install from Catalog tutorial for instructions on how to use this option.) For this tutorial, click the List Collaboration option.
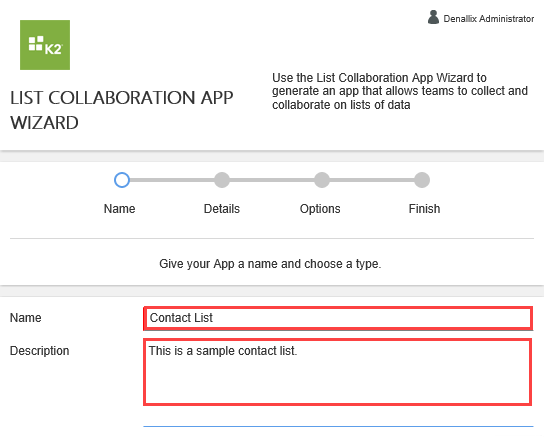
- You see a screen with general settings. At the top of the screen is a time-line that displays your wizard progress. Below that is a section where you can name your new application and give it a description.
Name the new application
Contact List
then for the Description, enter
This is a sample contact list.Each application title must be unique. You will see an error if you try to duplicate application titles. Consider adding your initials to the title so that you can easily determine which apps are yours. For example, Contact List [YourInitials], like Contact List KL.
Duplicate name error
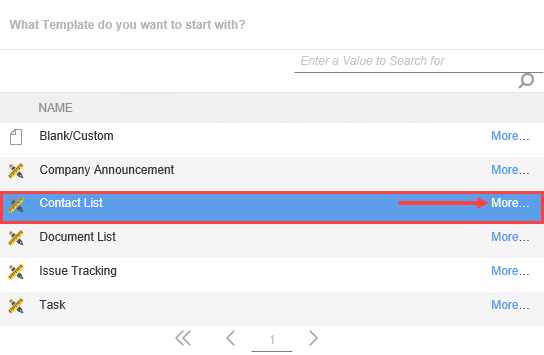
- Scroll down until you see the templates section. Here, you will find a display of list-type templates you can choose from. Select Contact List. To learn more about each template, you can open the template details to view the default overview and data objects structure for the template. Click More.
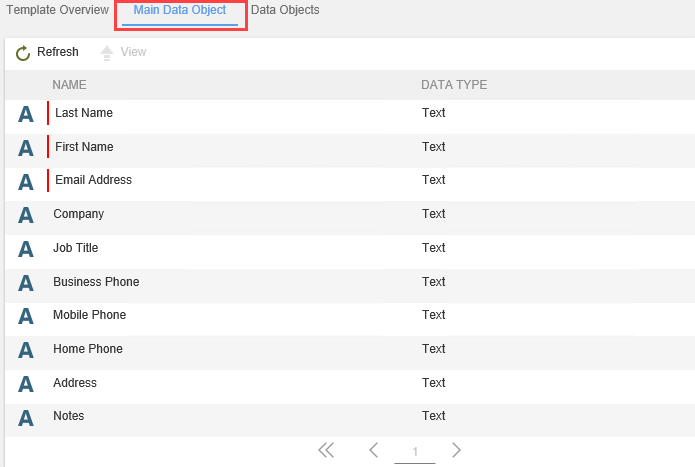
- The details for this template type open in a new browser window. On the Template Details screen, take a minute to explore the details available for the Contact List template type. The Template Overview screen displays the survey template name and description. The Main Data Object screen displays the default properties for a contact list. You can add, edit, and delete properties to customize this list for your own needs. Close the Template Details browser window.
- Click Next (Primary Detail) to continue.
- In this step, you create a new application based on the Contact List wizard. After accessing the Apps workspace, click the Build > All link. In the All Apps screen, click the Create a new App button. If you already have apps displayed, click the New button.
-
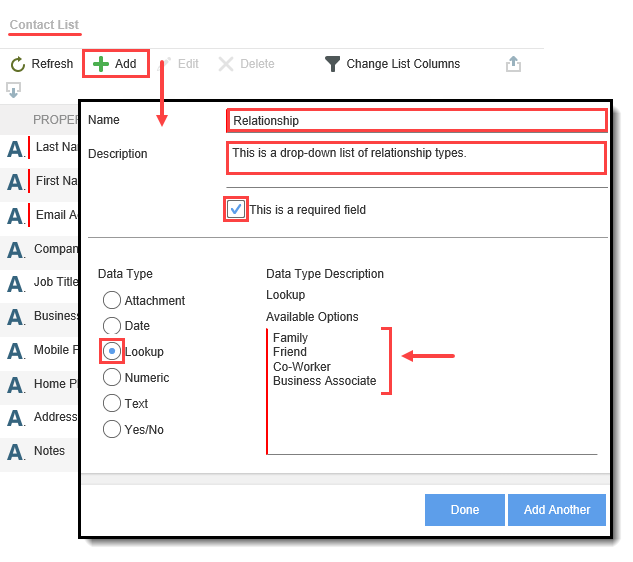
You are going to add two additional properties to the list. Add a new lookup property called Relationship. For the lookup options, enter: Family, Friend, Co-Worker, and Business Associate.
Add a new property called Photo. For the Data Type, select Attachment. For the Data Type Options, select Image.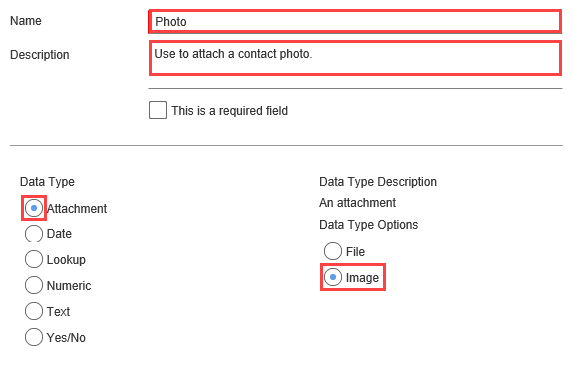
There are no additional settings, so click next until you can generate the app.- Next, you will add the first of two new properties to the contact list. The Relationship property is a lookup data type with a drop-down list.
In the Contact List section, click Add. Name the new property
Relationship
then for the Description, enter
This is a drop-down list of relationship types.
Require this property. Under the Data Type heading, select Lookup. Under the Available Options, enter
Family
Friend
Co-Worker
Business Associate
then click Done.
- The second property, Photo, is an image data type which you can use to upload a contact photo. Once again, click Add. For the Name, enter
Photo
then for the Description, enter
Use to attach a contact photo.
Under the Data Type heading, select Attachment. Under the Data Type Options heading, select Image. You do not need to require this property. Click Done
- On the Contacts Lists property page, click Next (Additional Options).
- There are no Additional Data Objects, so click Next. On the summary page, click Generate App. Depending on the number of properties added to a list, it may take several minutes to create the application.
When the application generation process completes, you are on the Contact List landing page. (This may take a few seconds to redirect. Wait until K2 redirects you to the Contact List Survey landing page before continuing.)
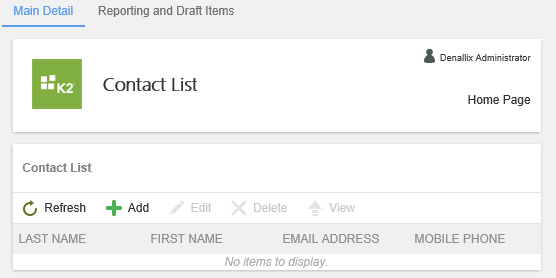
- Next, you will add the first of two new properties to the contact list. The Relationship property is a lookup data type with a drop-down list.
-
You are now on the Contacts List landing page and are ready to put your contact list to use! Add at least three new contacts to the list. Edit a contact. Delete a contact.
- You are now on the Contact List landing page. You can add new contacts to your list. Click the Add icon. Enter the last name, first name and email for your new contact. Enter any other details you like, then select a relationship. Click Submit.To add a contact image, click inside the Photo text box. Browse to your photo, then click Open. (If you are working on a K2-provided VM and want to add photos, copy one or two photos from your own computer, then paste them to the VM desktop. This make it easier to browse to them.)
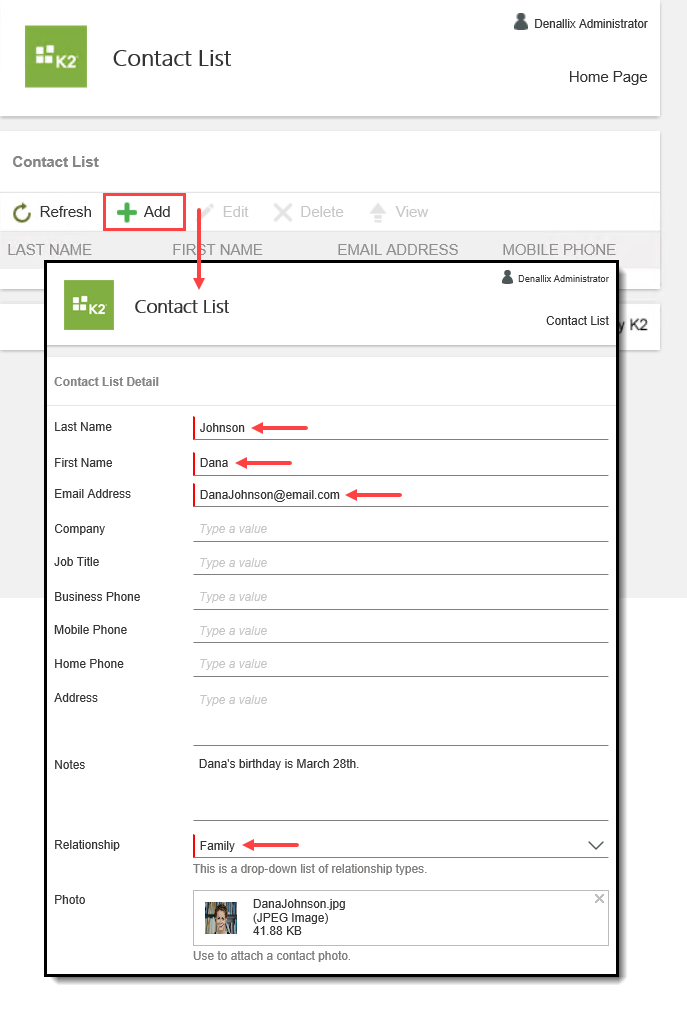
- Add at least two more contacts to your list. (Your screen may not reflect the same contact entries shown below.)
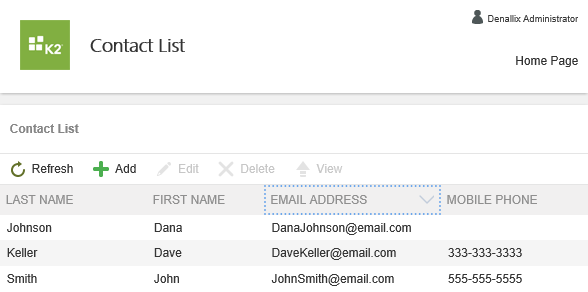
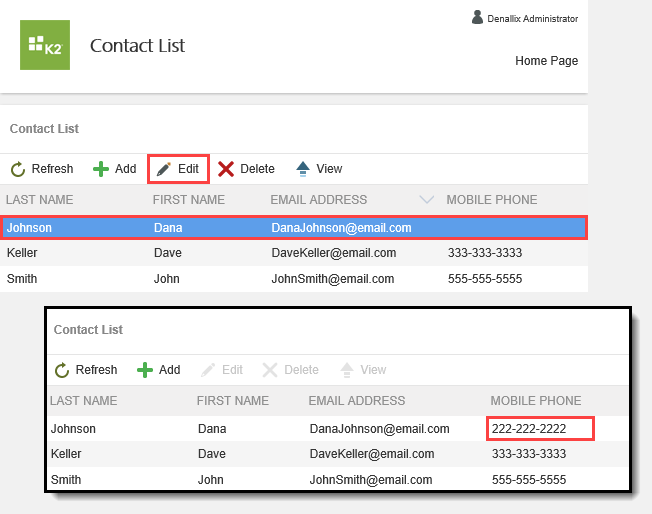
- Now that you have added a few contacts, you will continue testing by editing a contact and finally, deleting a contact. Begin by editing one of your contacts. After selecting a contact, click the Edit button. Edit the record. Save the contact. In the image below, we added a mobile phone number to the first record. If you are not redirected back to the Contact List landing page after clicking Save, click the Cancel button to close the edit window. Just be sure to save your edits first.
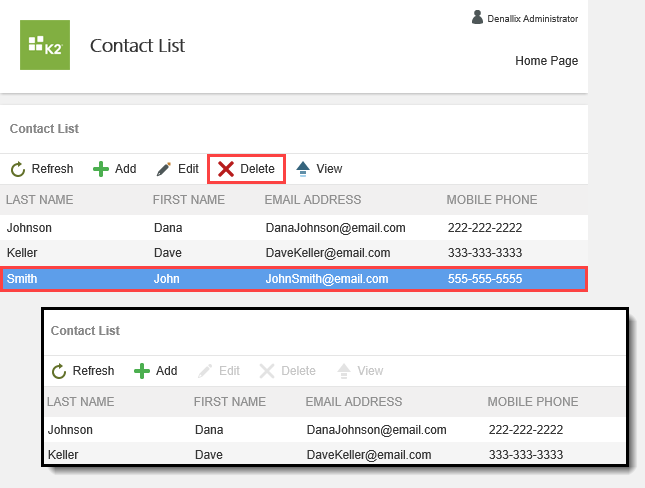
- Delete a contact. Select one of your contacts. Click the Delete button in the toolbar. Click OK when you see the confirmation dialog.
- You are now on the Contact List landing page. You can add new contacts to your list. Click the Add icon. Enter the last name, first name and email for your new contact. Enter any other details you like, then select a relationship. Click Submit.
- The Contact List application has one reporting option: Export to CSV. This report allows you to export data in a CSV format so that you can work with the data in software such as Excel.
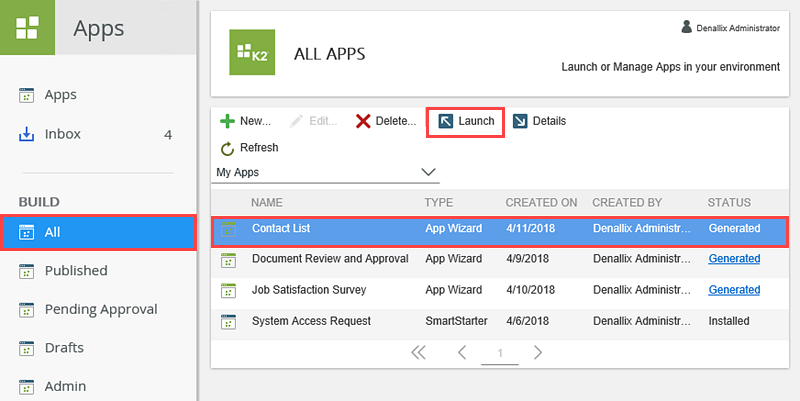
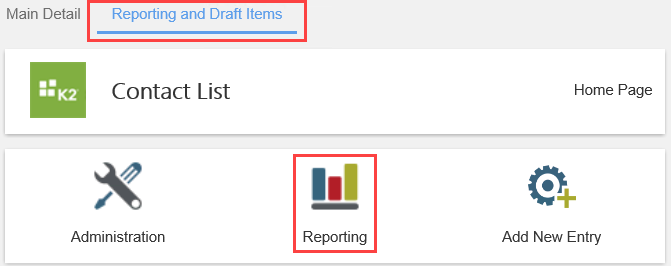
From the Contact List landing page, click the Reporting and Draft Items tab in the toolbar. Click Reporting.- If the Contact List is not already open, click the BUILD > All link from the Apps landing page. From the ALL APPS screen, select the Contact List in the central pane, then click Launch.
- Click the Reporting and Draft Items tab in the toolbar. Click Reporting.
- If the Contact List is not already open, click the BUILD > All link from the Apps landing page. From the ALL APPS screen, select the Contact List in the central pane, then click Launch.
- Export your contact list to CSV format. View the raw data in the reports.
- Click Export to CSV.

- You have several options on the data you export. You can include or exclude column names or export data created by you or by all users. You can include the full report on a single worksheet, or you can break the reports up into one worksheet per data object. For this application, keep the default settings, then click Export. After K2 generates the report, a link appears in the results section.
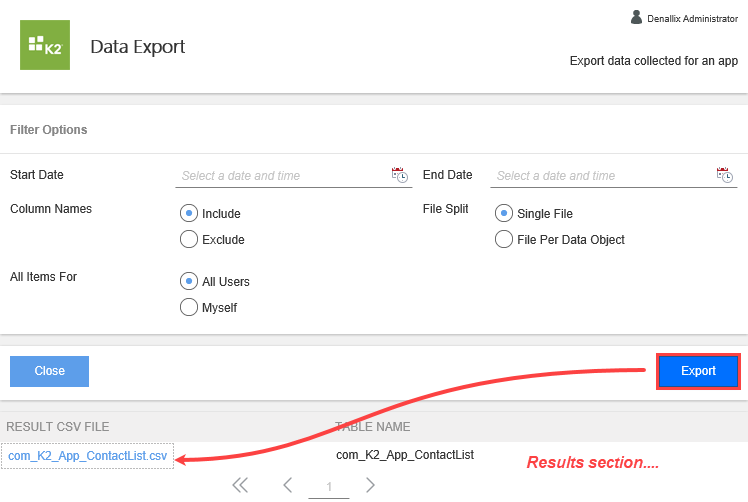
- Open the report and review and output. Close the spreadsheet. Click Close on the Data Export page to return to the Contact List landing page.
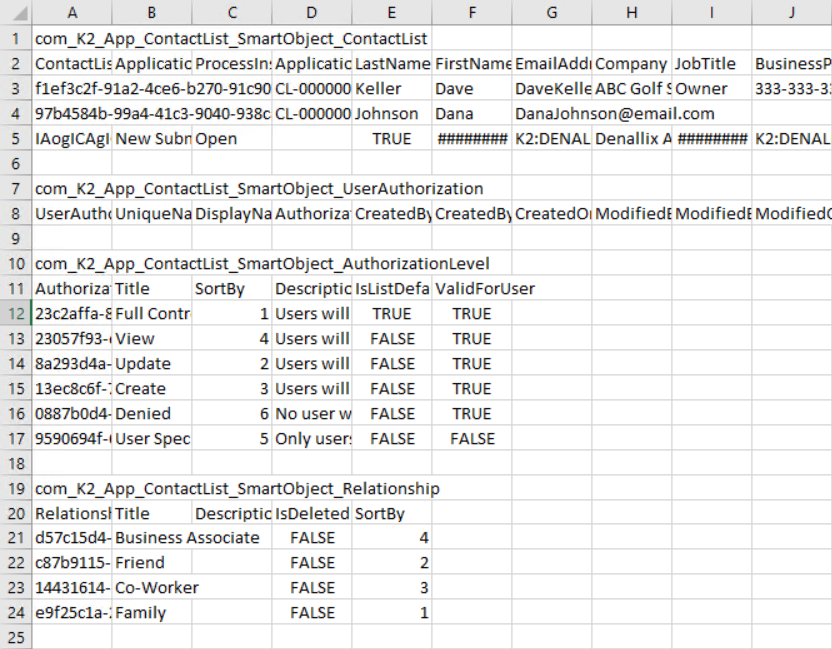
- Click Export to CSV.
- There are three areas of administration for the Contact List application: Authorization, Lookup Settings, and Administrators and Settings. Authorization allows you to set the default access you want for your list. Lookup Settings allows you to edit choices for lookup data fields. Administrators and Settings allows you to invite others to share your list and add others as list administrators. This section covers Authorization.
From the Contact List landing page, click the Reporting and Draft Items tab. Click Administration.- Use the BUILD > All link in the Apps workspace to launch the Contact List if it is not open already. From the ALL APPS screen, click Reporting and Draft Items. Click Administration.
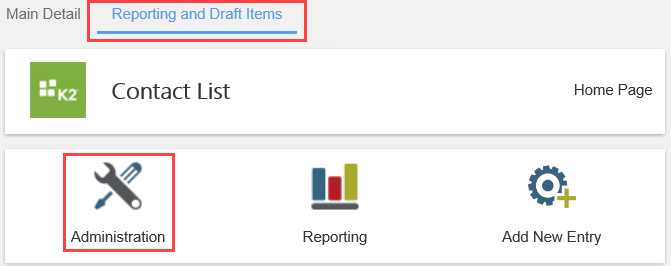
- Use the BUILD > All link in the Apps workspace to launch the Contact List if it is not open already. From the ALL APPS screen, click Reporting and Draft Items. Click Administration.
- By default, all users have full control over list applications. This means all users can add, edit, and delete list items. You can change this setting, for example, allowing all users to view your list, but not make any changes. You can also add users as exceptions, then assign them specific permissions. In this step, you will change the default access to view only, then add Bob as a list administrator.
Make sure the Authorization tab is active. Change the default authorization to View. Add Bob Maggio as a full control user.- Begin by setting the default access for all users. In this case, you want all users to be able to view your list, but not make any changes. In the Application Default Authorization Level section, select View. Click Set As Default Authorization. All users have view-only permissions to your list.
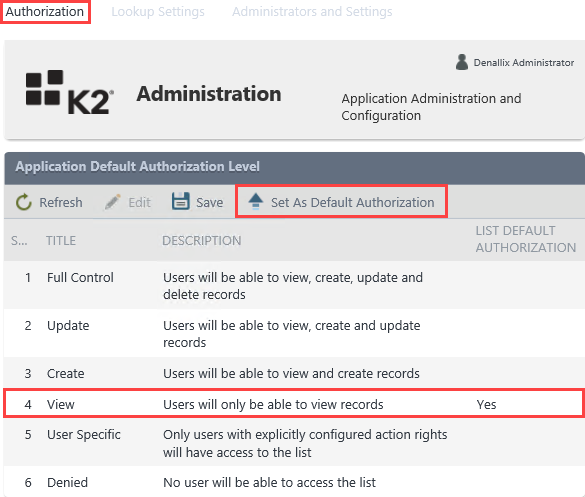
- In the User Specific Authorization section, add Bob Maggio to the list and grant him full control. Begin by clicking the Add button. Enter
bob
into the name box, the click the resolve icon. Select Full Control from the Authorization Level drop-down list. Click Save. If working in your own environment, enter a user that can help you test.
- Begin by setting the default access for all users. In this case, you want all users to be able to view your list, but not make any changes. In the Application Default Authorization Level section, select View. Click Set As Default Authorization. All users have view-only permissions to your list.
-
To complete this section, you will test permissions for Bob and another user (Codi). Bob can edit the list, while Codi can only view the list.
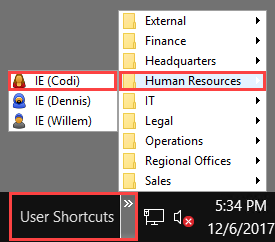
Begin by launching K2 Workspace for Bob and Codi. Use the User Shortcuts to open instances of IE, then launch K2 Workspace. Launch from start menu: (Start > K > K2 > K2 Workspace) for both users. Launch from URL: https://[K2Environment]/workspace. For example, https://k2.denallix.com/workspace.- First, you will open separate browser instances for Bob and Codi. Click the User Shortcuts link in the lower right corner of your screen. (If you are working in your own environment, you need to work with users that can help you test your application.) Click Human Resources, then IE (Codi) to launch an instance of Internet Explorer in Codi's name.
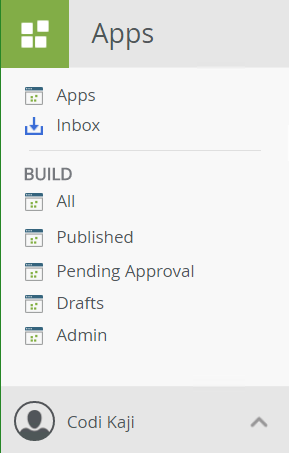
- With Codi's IE active (on top of all other windows), launch a new instance of K2 Workspace from the start menu (Start > K > K2 > K2 Workspace). Click the K2 Logo to change the workspace to the Apps workspace.
- Repeat this step and launch K2 Workspace for Bob Maggio. Bob is in the Finance group (User Shortcuts).
- First, you will open separate browser instances for Bob and Codi. Click the User Shortcuts link in the lower right corner of your screen. (If you are working in your own environment, you need to work with users that can help you test your application.) Click Human Resources, then IE (Codi) to launch an instance of Internet Explorer in Codi's name.
-
Now you can test the permissions for Bob and Codi. Confirm that Codi can only view the list, while Bob can edit the list.
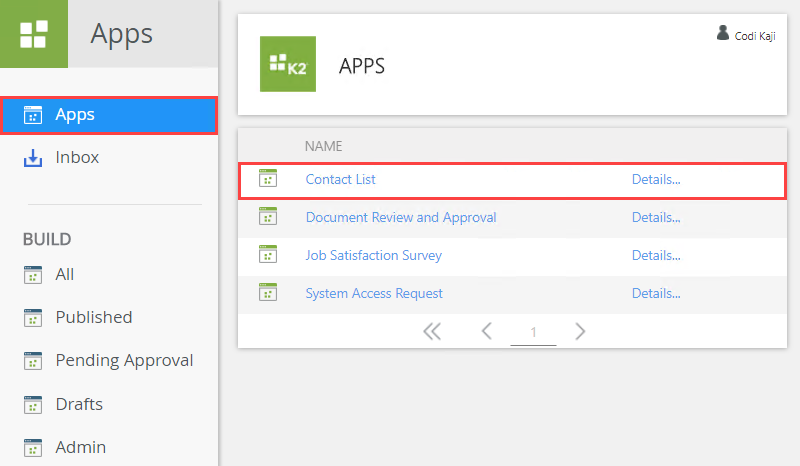
- Select Codi's browser so that it is the active browser. Because Codi did not create this application, it will not appear in any of her BUILD menus. Instead, click the Apps link. Any applications that Codi has access to appear in the central pane. Click the Contact List row.
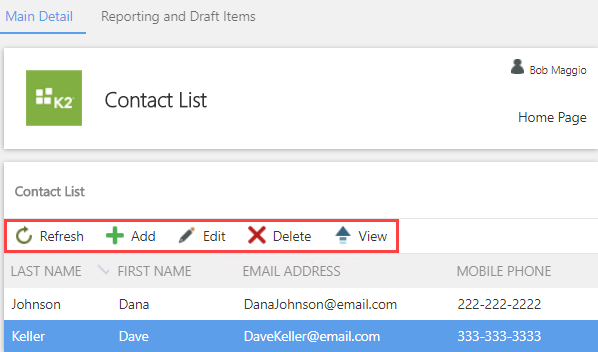
- The Contact List opens. Select a list item and confirm that Codi cannot edit the list item. Note that the Add, Edit, and Delete buttons are not visible.
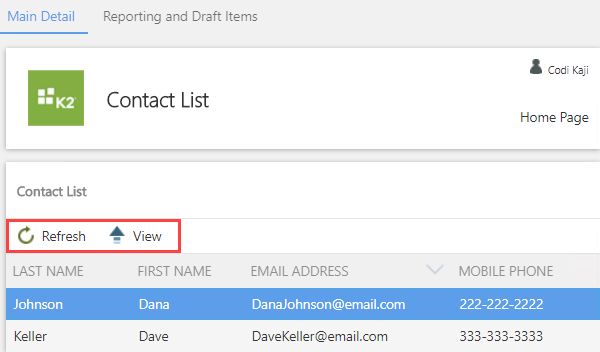
- Switch to Bob's browser. Open the Contact List from Bob's workspace. Note that the Add, Edit, and Delete buttons are now visible. Edit one of the list items to confirm Bob has full control on the list.
- Select Codi's browser so that it is the active browser. Because Codi did not create this application, it will not appear in any of her BUILD menus. Instead, click the Apps link. Any applications that Codi has access to appear in the central pane. Click the Contact List row.
Review
In this tutorial, you created the Contact List application from the List Collaboration application wizard. You used the Contact List template. Templates provide predefined data fields that you can customize by adding, editing, and deleting data fields. You use the application by adding, editing, and deleting contacts. There is one report for the list application: Export to CSV. The Export to CSV report exports list data to a CSV format, which you can open in software such as Excel. Finally, you learned how you can administer this application by changing the default authorization level for all users and granting different authorization to one specific user.
-
(Optional) In this step, you delete the Contact List application from your Workspace environment. For example, if you are working in a shared environment where there are multiple builds of the same application, you may want to delete your applications after use to keep the environment neat and tidy.
From the Build > All > All Apps screen, delete the Contact List application.- In K2 Workspace, click Build > All to open the All Apps screen.
- Select the Contact List application and click the Delete button. Click OK for the confirmation.
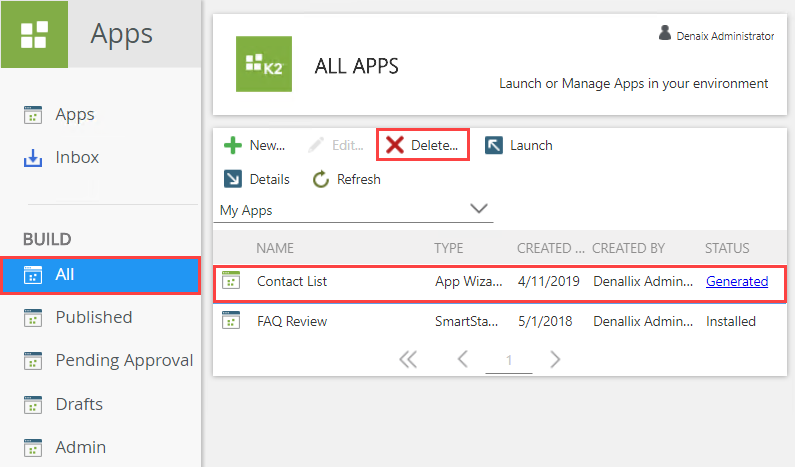
- If the app doesn't immediately disappear, you may see the status change to Pending Delete. Wait a few minutes and click the Refresh button. The application is no longer displayed in the All Apps list.