7. Create the Expense Claim Header (Item) View
In this step, you begin building the user interfaces for your Expense Claim application. For this application, we will have one form with three views on it (views are logical sections of a form, allowing the user to interact with the application and data). This application has three views: the header (used to capture the 'main' expense claim information), details (used to capture the 'line items'), and finance processing (used by the finance processor to complete their workflow task). You will build the header and details views from their respective SmartObjects (Expense Claim Header and Expense Claim Details), and later on you will build the finance processing view from scratch, and apply rules for workflow integration.
Let's begin by designing the Expense Claim Header View, using the Expense Claim Header SmartObject as the starting point.
-
The Expense Claim Header View contains the basic information for each expense claim, such as Employee Name and Submit Date. This view is bound to the Expense Claim Header SmartObject.
Begin designing a new view from the Expense Claim Header SmartObject.- First, you will design a new view from the Expense Claim Header SmartObject. Right-click the SmartObject and select Design View.

- First, you will design a new view from the Expense Claim Header SmartObject. Right-click the SmartObject and select Design View.
- Now, you will name the new view and set up the basic configuration. Use the table below as a guide for the view's settings. If a setting is not shown, you can assume the default value.
Setting Value Notes Name Expense Claim Header View The name for the new view. Category K2 Learning\Expense Claim\Views Because you are designing this view directly from a SmartObject, the category defaults to SmartObjects. Change this to the Views category so your artifacts are organized by type. View Type Item View This view will display a single record, so we use 'item view' Next screen: Create Labels and Controls Screen Columns 2 You will not customize the layout of the view. Fields Select all fields except ID and Workflow ID. The fields you select become the view's controls. The two ID fields are for record identification, so you don't need them as controls. Display Only Employee Name
Submit Date
Total Amount
Request StatusFor the base configuration, you will make these controls read-only. Other controls are read-only as well, which you will configure at the state level. The state-level configurations take place after you create the workflow. Label Position Left You will place the label to the left of the control. The default position is on top of the control. Colon suffix CHECKED This adds a colon to the end of each label. Buttons Do not check any of the buttons. You will manually add buttons at the form level. 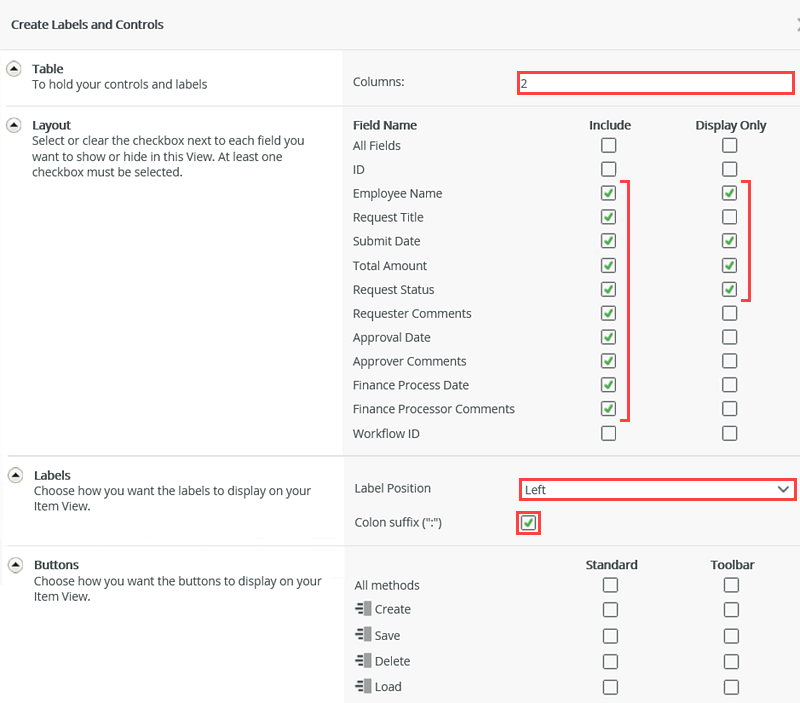
- Configure the view's general settings. On the GENERAL settings page, Name the new view
Expense Claim Header View
then move it to the K2 Learning\Expense Claim\Views Category. (By default, the view location is the SmartObjects category since you created the view from a SmartObject. You will move it so that your artifacts remain organized by type.) Confirm the View Type is Item View. This view displays content from a single record, so you don't need a list view. Click CREATE.
- Click Create Labels and Controls. With this option, a basic layout table is created and applies the controls you will select in the next step. The other option is to create a layout table only which does not apply any controls. In that case, you drag the controls you want manually, one-by-one. The first option saves you a few steps.

- On the Create Labels and Controls screen, make the following configurations, then click OK:
- Columns = 2
- CHECK all the fields except the ID and Workflow ID
- CHECK Display Only for: Employee Name, Submit Date, Total Amount, and Request Status
- Label Position: Left
- Colon suffix: CHECKED
- Do not check any buttons. You will manually add buttons at the form level.

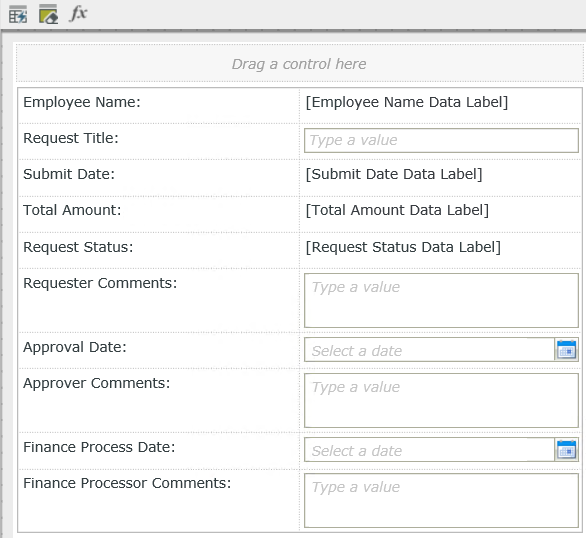
The generated Expense Claim Header View should look something like the image below.
- Configure the view's general settings. On the GENERAL settings page, Name the new view
-
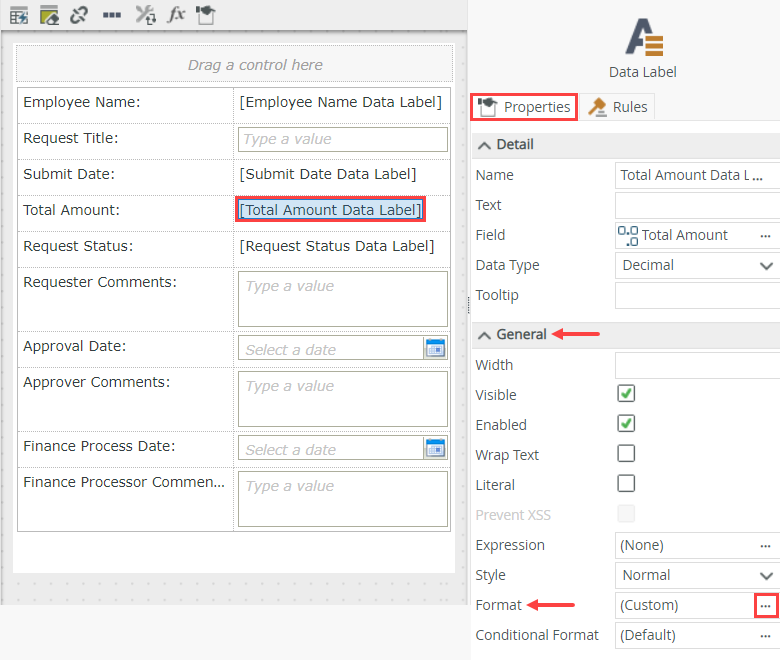
Next, edit the styles for the Total Amount Data Label. Because this is a dollar amount, you want to make sure it has two decimals and is right-aligned.
Edit the Format for the Total Amount Data Label. Set the decimals to 2. Switch to the Font tab and right-align the data label.- Select the Total Amount data label to begin editing its look and feel. In the Properties pane, locate the Format option under the General heading, then click the ellipses to open the editor.
- On the Format screen, enter
2
for the Decimal Places value. Switch to the Font tab. Click the right-align icon under the Alignment heading.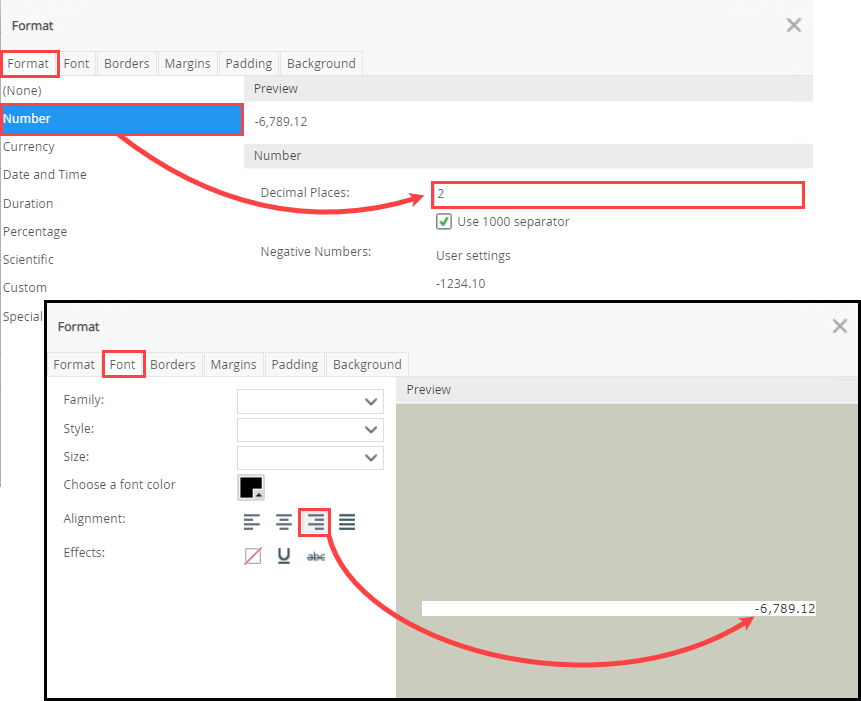
- Select the Total Amount data label to begin editing its look and feel. In the Properties pane, locate the Format option under the General heading, then click the ellipses to open the editor.
- Now you will set the default value of the Submit Date Data Label to use the current date.
Add an expression to the Submit Date Data Label and set the value to System Values > Current Date > Date. Name the new expression Current Date.- Let's set the default value of the submit date to the current date. Select the Submit Date Data Label. In the Properties pane, click the Expression ellipses to launch the expression editor.
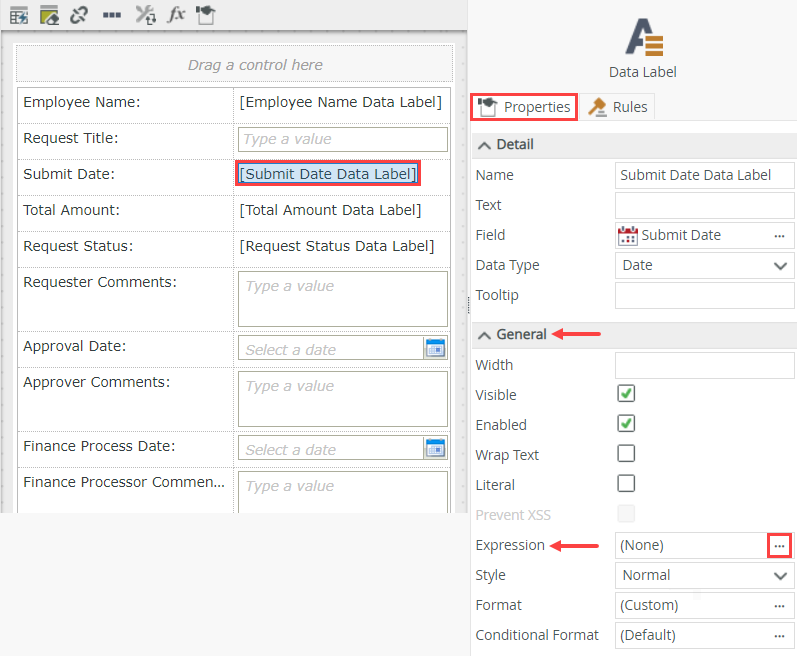
- Click Add. Name the new expression
Current Date
then drag the Systems Values > Current Date > Current Date variable into the Expression Details text box. Click OK. Click OK once again to save the new expression.
- Let's set the default value of the submit date to the current date. Select the Submit Date Data Label. In the Properties pane, click the Expression ellipses to launch the expression editor.
- Before moving on, you will add a rule that populates the Employee Name with the current user's display name. Use the table below to set the new rule. If you need help, expand the "Show me how..." section.
Setting Value Notes New Rule
When the View executes a methodEvent: When the View executed Initialized - Actions: Transfer data
- System Values > Current User > Display Name to Expense Claim Header View > Controls > Employee Name Data Label.
- You will use a system value as the default Employee Name. At runtime, the system value is replaced with the display name of the user that opened the form.
Click the RULES tab. Click Add Rule.
- With the Events tab active, click When the View executes a method to add it to the rule definition pane. Click the select method link and select Initialized. This means we want the rule to run when the view loads.

- Switch to the Actions tab. Search for
transfer
then click Transfer data to add it to the rule definition pane. Click (configure).
- Now, you will add the user's display name system variable as the default value for the Employee Name. In the Context Browser, drag the System Values > Current User > Display Name into the Employee Name Data Label text box. Click OK and then OK again.

- Click FINISH (near the upper right corner of your screen) to save and exit this view.
- Actions: Transfer data
Review
In this step, you designed a new view from the Expense Claim Header SmartObject. You selected the fields you wanted as controls, then set several of them to display only because some fields we do not want the user to change. You edited the styles for the Total Amount Data Label and set it for two decimal places, and right-aligned the field because it displays currency. Finally, you set up a rule to populate a label with the current user's display name.
In the next step, you will design the Expense Claim Details View used to enter and display expense claim line items.