How to: Save information to multiple SmartObjects by clicking a button
You can configure a rule that will save data to multiple SmartObjects at the same time. For example, you may have a form with two tabs, each of which contains a view based on a different SmartObject. When you click the Submit button on the form, you want to save data for both of the SmartObjects.
This example uses a Product form with views for Quote Details and Quote Items. The views are placed on separate tabs on the form. The Quote Details Item view contains editable fields for Client Name, Client Surname, Client Email and Client Address. The Quote Items view contains a Product Name field and a drop down with data from the Products SmartObject.
At the bottom of the form is a Submit button to save the data from both views to the Quote Details and Products SmartObjects.
The solution includes another form called Admin with views for Quote Details and Quote Items with a similar layout to the Products form. You use the Admin form to display and manage the test results.
Runtime example of the Product form
The Quote Details tab show client information captured on the Products form.
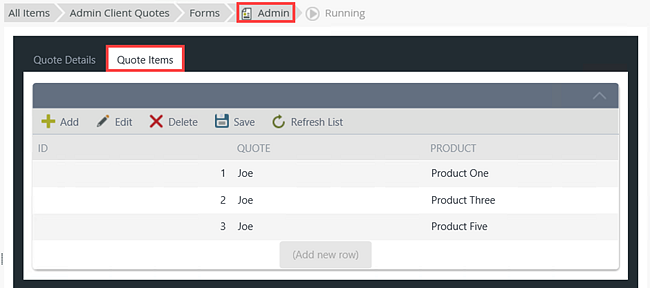
The Quote Items tab shows the product information you added using the Products form.
Scenario
As part of gathering client information, your company captures the client and product details on a form. You manually add the information such as Client Name, Client Surname, Client Email and Client Address, and then add products by selecting them from a drop down. Quote Details and Quote Items are views on separate tabs, but the Submit button you click to save the data is located on the form and visible to both views.
Steps
In this scenario, you begin by building three SmartObjects called Quote Details, Quote Items and Product that stores quote and product details. Next, you create an association between the Quote Items and Product SmartObjects and between the Quote Items and Quote Details SmartObjects. You use the Quote Details SmartObject to create an item view, the Quote Items SmartObject to create an editable list view. You also create the Products form containing the item and editable list views.
On the Quote Details Item view you remove the ID field and the Create, Save, Delete and Load buttons. On the Quote Items Editable List view you remove the ID and Quote columns. Next, you add a Submit button to the Product form. This button saves the data from both views to the Quote Details and Product SmartObjects. You add a rule to the form to execute the create method for all items added to both the Quote Details Item and Quote Items Editable List views when the Submit button is clicked.
Finally you add data to the Product SmartObject and generate a form to use when you test the solution.
Setup Steps
The following steps set up the scenario from start to finish. If you want to skip the setup steps and view the topic step, go to Add and configure a button to the form.
-
Create SmartObjects three SmartObjects called Quote Details, Quote Items and Product.
- From the K2 Designer, create the Quote Details SmartObject as shown below.

- Do the same and create the Quote Items and Product SmartObjects as shown below.


If you are not familiar with creating a SmartBox SmartObject, see How To: Create A SmartBox SmartObject.
- From the K2 Designer, create the Quote Details SmartObject as shown below.
-
Create an association between the Quote Items and Product SmartObjects and between the Quote Items and Quote Details SmartObjects.
- From the K2 Designer, right-click the Quote Items SmartObject and select Edit.

- Select the Associations tab and click the Add button.

- On the SmartObject tab of the Add Association page, browse to the Product SmartObject. Select it and click Next.

- On the Association tab, make sure you define the associations as shown below. Click Next.

- On the Relationships tab, select ProductID and click the Assign button.

- On the Assign property page, select ID from the drop down and click OK.

- The Bound To field shows the association between ProductID and Product: ID. Click Finish.

- Click Add to add another association to the Quote Items SmartObject.

- On the SmartObject tab of the Add Association page, browse to the Quote Details SmartObject. Select it and click Next. On the Association tab, make sure you define the associations as shown below. Click Next.

- On the Relationships tab, select QuoteID and click the Assign button.

- On the Assign property page, select ID from the drop down and click OK.

- The Bound To field shows the association between QuoteID and QuoteDetails:ID. Click Finish.

- Click Finish to close the Quote Items SmartObject.

- From the K2 Designer, right-click the Quote Items SmartObject and select Edit.
-
Use the generate function to create the following:
- an item view for the Quote Details SmartObject
- an editable list view for the Quote Items SmartObject
- a Products form containing the item and editable list views
- From the K2 Designer, select the category that contains the SmartObjects. In this example, it is the SMO category. Multi-select the Quote Details and Quote Items SmartObjects and click Generate Views.

- On the Generate Options page, in the Views section, make sure that the views are generated in the correct category. In this example they are generated in the Views category. Check the Item check box for the Quote Details SmartObject and the Editable List check box for the Quote Items SmartObject. In the Form section, make sure that the form is created in the Forms category. Type Products in the Form Name field and then click OK.

- The views and form show in the Views and Forms categories.

If you are not familiar with creating views, see How To: Create an Item View and a List View.Use the auto-generate function to generate a form and multiple views at the same time. The views are automatically created as individual tabs on the form.
-
Edit and remove the ID field and the Create, Save, Delete and Load buttons from the Quote Details Item view. Also rearrange the fields.
- From the K2 Designer, right-click the Quote Details Item view and select Edit.

- On the Layout tab, select the ID text box and press Delete on your keyboard.

- On the Dependencies page, select the Remove all dependencies radio button and click OK.

- Select the ID label and press Delete on your keyboard.

- Select the Create button and press Delete on your keyboard.

- On the Dependencies page, select the Remove all dependencies radio button and click OK.

- Use the same steps to delete the Save, Delete and Load buttons from the layout.

- Rearrange the labels on the left side of the layout and the text boxes on the right by dragging them to the positions shown below.

- Click Finish to save the view.
- From the K2 Designer, right-click the Quote Details Item view and select Edit.
-
Edit and remove the ID and Quote columns from the Quote Items Editable List view layout. Also rename the remaining column header.
- From the K2 Designer, right-click the Quote Items Editable List view and select Edit.

- On the Layout tab, select the ID column and press Delete on your keyboard.

- Select the Quote column and press Delete on your keyboard.

- Select the Product column change the header name to Product Name.

- Click Finish to save the view.
- From the K2 Designer, right-click the Quote Items Editable List view and select Edit.
Add and configure a button to the form
In this scenario, you add a button called Submit to the Product from. This button saves the data from both views to the Quote Details and Product SmartObjects. To do this, add a rule to the form to execute the create method for all items added to both the Quote Details Item and Quote Items Editable List views when the Submit button is clicked.
-
Add and configure a button to the form
- From the K2 Designer, select the Products form and click Edit.

- On the Layout tab, change the view title to Quote Details.

- Select the Quote Items tab and change the view title to Quote Items. Click Save.

- From the Toolbox, click and drag a Button control from the Action section onto the form.

- In the Detail section of the Properties pane change the properties of the button control as shown below.

- Select the Rules tab and click Add Rule.

- Select the Events tab. Select the When a control on the Form raises an event.

- Click the select control link and select Submit Button.

- On the Rule Designer page, select the Actions tab. In the search field type view, locate the SmartObject Interaction section, and select Execute a View Method.

- Click the select view link and select Quote Details Item.

- Click the select method link and select Create.

- The rule shows as follows.

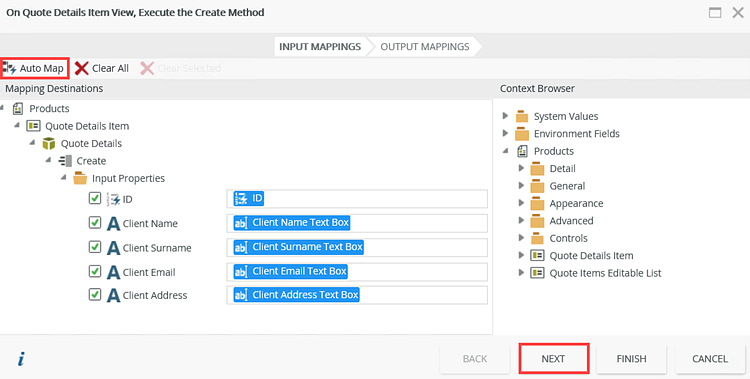
- Click the configure link. On the On Quote Details Item View, Execute the Create Method page click the Auto Map button. Click Next.

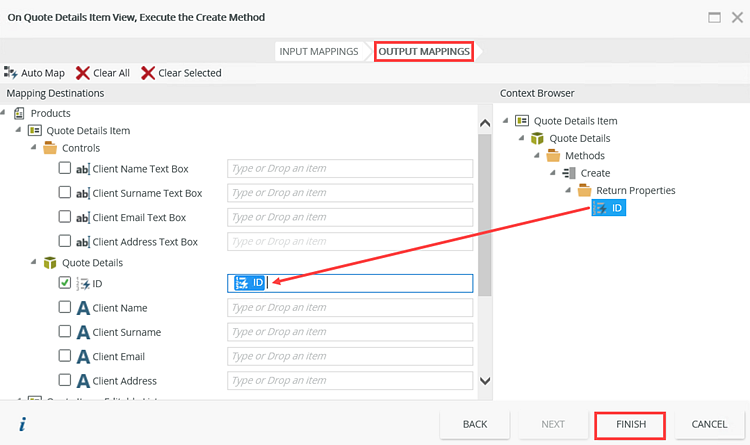
- On the Output mappings, expand the Quote Details node in the Context Browser. Select and drag the ID property into the Quote Details ID field. Click Finish.

- On the Actions tab, in the search field type view, locate the SmartObject Interaction section, and select Execute a View method for items that are in a specific state.

- Click the select view link and select Quote Item Editable List. Click the select method link and select Create. Click the select item state link and select Added. The rule shows as follows.

- Click the configure link. On the On Quote Items Editable List View, Execute the Create method for all the items that have been Added page, expand the Quote Details SmartObject in the Context Browser. Click and drag the ID property into the QuoteID field.

- Expand the Quote Items SmartObject in the Context Browser, click and drag the ProductID property into the ProductID field. Click Finish.

- The rule shows as follows. Click OK.

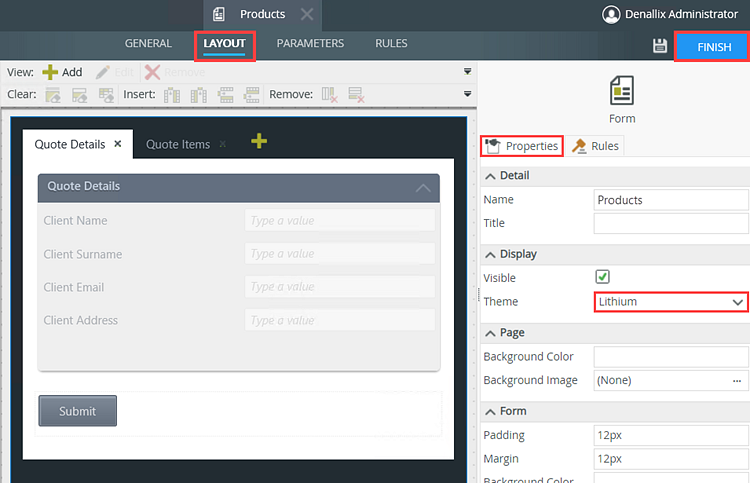
- Select the Layout tab, and on the Properties tab change the form theme to Lithium. Click Finish.

- From the K2 Designer, select the Products form and click Edit.
-
Generate an editable list views for the Product SmartObject and then use the editable list view to add sample data to the SmartObject.
- From the K2 Designer, right-click the Product SmartObject and select Generate Views.

- On the Generate Options page, make sure that the editable list view is generated in the Views category. Check the Editable List check box and then click OK.

- From the K2 Designer, locate the Product Editable List and click Run.

- Click the Add button and add data as shown below.

- To view the data run the Products form. Select the Quote Items tab and click Add.

- The products show in the Product Name drop down menu.

- From the K2 Designer, right-click the Product SmartObject and select Generate Views.
-
Use the generate function to create the following:
- an editable list view for the Quote Details SmartObject
- an editable list view for the Quote Items SmartObject
- an admin form containing both the editable list views
You use the admin form to display and manage the test results.
- From the K2 Designer, select the category that contains the SmartObjects. In this example, it is the SMO category. Multi-select the Quote Details and Quote Items SmartObjects and click the Generate Views button.

- On the Generate Options page in the Views section, make sure that the views are generated in the Views category. Check the Editable List check boxes for both the Quote Details and the Quote Items SmartObjects. Change the names as shown below.

- In the Form section, make sure that the form is generated to the Forms category. Type Admin in the Form Name field and then click OK.

- The generated views and form show in the Views and Forms categories.

- From the K2 Designer, locate the Admin form and click Run.

-
Test the solution by running the Products form and adding some client and product information using the Quote Details and Quote Items tabs. After submitting the information, run the Admin form. The information you added on the form shows in the admin form.
- From the K2 Designer, locate the Products form and click Run.

- On the Quote Details tab, add client data as shown below.

- On the Quote Items tab, click Add and add product data as shown below.

- On the Quote Details tab, click Submit.

- From the K2 Designer, locate the Admin form and click Run.

- The Quote Details tab show client information captured on the Products form.

- The Quote Items tab shows the product information you added using the Products form.

- From the K2 Designer, locate the Products form and click Run.
Review
You learned how to create a form with two tabs, each of which contain a view based on a SmartObject. When you click the Submit button on the form (visible from either tab), data is saved to each SmartObject.