How To: Disable Button on Click
This topic illustrates how to configure rules to disable a button when it's clicked to prevent a person from submitting duplicate content by mistake. For example, you may have a form that requires a person to submit content. As part of your form you want to prevent people submitting duplicate content by mistake by clicking the submit button twice or double clicking the button.
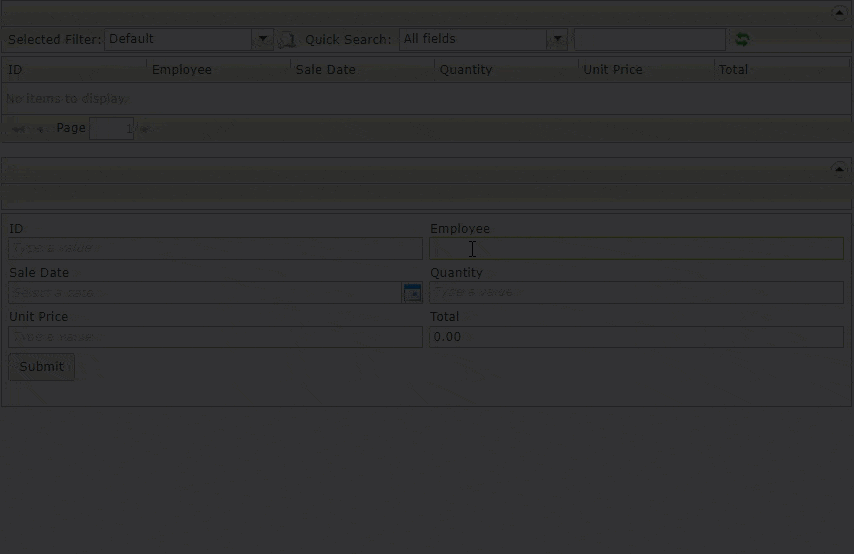
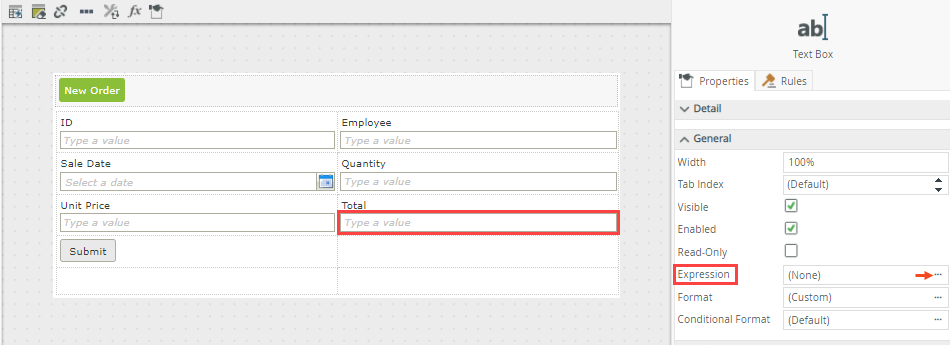
Runtime example of submitting a purchase order
Scenario
Your organization uses a form to capture purchase order information. To make it easier to complete the form and prevent people from duplicating information by mistake, you want to disable the submit button when it is clicked. If the person wants to capture a new order, he clicks a New Order button. This configuration ensures that no duplication of content can happen as the person has to click the New Order button, allowing you to configure rules to clear the view and enable the Submit button.
Steps
In this scenario, you build the following:
- A SmartObject called Purchase Order.
- An item view to capture content.
- A list view to show the content created.
- A form to contain the views.
The SmartObject stores the purchase order details. You use the Purchase Order SmartObject to create an item view, list view, and a form. You configure a rule on the item view to validate if the Quantity and Unit Price text boxes contain values, and then execute the Create method, disable the Submit button, and show the New Order button. You edit the form and add an action to hide the New Order button when the form initializes. Then add a rule to clear the view and enable the Submit button when the New Order button is clicked. Finally, add some data to the Purchase Order SmartObject and test the solution.
Setup Steps
The following steps set up the scenario from start to finish. If you want to skip the setup steps and view the topic step, go to Configure the view and form rules.
-
From the Designer, create the SmartBox SmartObject (and properties) listed below.
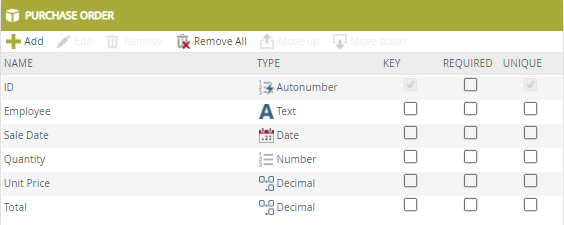
Purchase Order: The Purchase Order SmartObject stores purchase order details. Property Name Data Type ID Autonumber Employee Text Sale Date Date Quantity Number Unit Price Decimal Total Decimal - In the Designer, create categories to keep your work organized (optional).
- Create the SmartBox SmartObject and name it
Purchase Order
then add the following properties:
Employee (Text)
Sale Date (Date)
Quantity (Number)
Unit Price (Decimal)
Total (Decimal) - Your SmartObject should look like the image below. Click Finish to save and exit the SmartObject.
Now that you have your SmartObject, the next step is to generate views and a form. In the next step, you generate an item view, list view and a form based on the SmartObject.
-
Generate an item view, list view and a form based on the Purchase Order SmartObject.
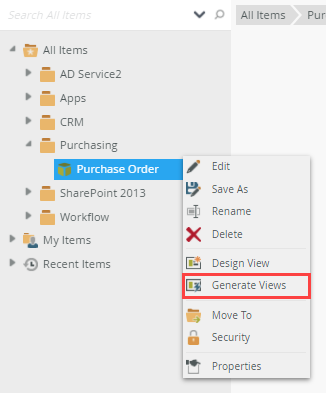
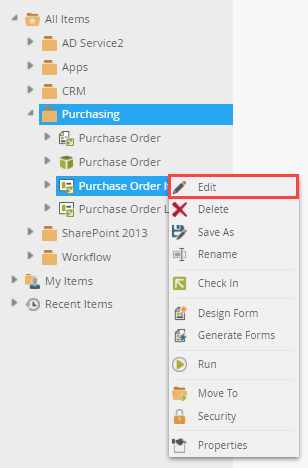
- From the Designer, right-click the
Purchase Order SmartObject and select
Generate Views.
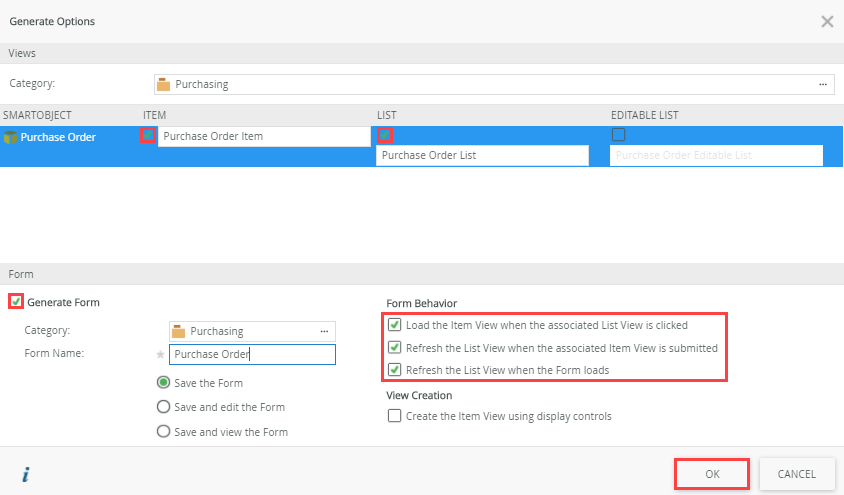
- Check the box below Item, List and next to Generate Form. Keep the defaults selected for the form behavior. Click
OK.
- From the Designer, right-click the
Purchase Order SmartObject and select
Generate Views.
-
You now edit the item view and update the buttons you want to use. You want to use the Submit and New Order buttons on your view.
- Right-click the
Purchase Order Item view and select
Edit.
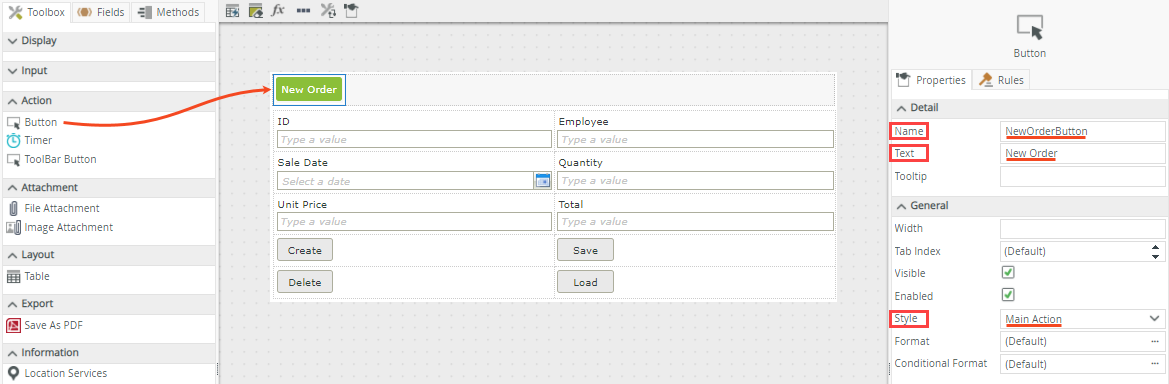
- On the Layout page, drag the Button control onto the canvas and then update the following control properties:
- Name - NewOrderButton
- Text - New Order
- Style - Main Action
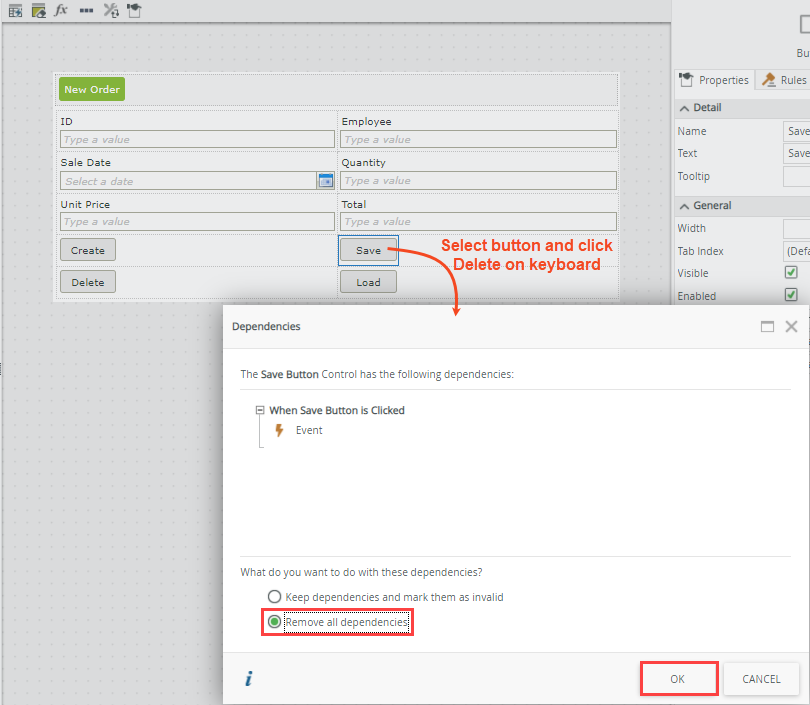
- Next you delete the Save, Load and Delete buttons. Select the Save button and click Delete on your keyboard. Select Remove all dependencies on the Dependencies dialog and click OK. Do the same for the Load and Delete buttons.
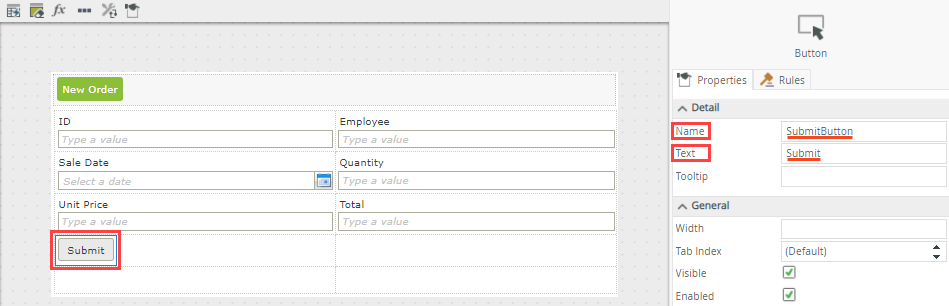
- Click the Create button and update the following control properties:
- Name - SubmitButton
- Text - Submit
- The next step is optional. In this step, you create an expression to calculate the value for the Total control. If you do not want to work through the next step, continue to step 5.
- Right-click the
Purchase Order Item view and select
Edit.
-
(Optional) In this optional step, you add an expression that multiplies the unit price by the quantity and enters the calculated value into the Total control.
- Select the Total control and then click the ellipses next to Expression.
- Click Add. Name the expression
Calculate Total
then click the Operators tab on the lower right side of your screen.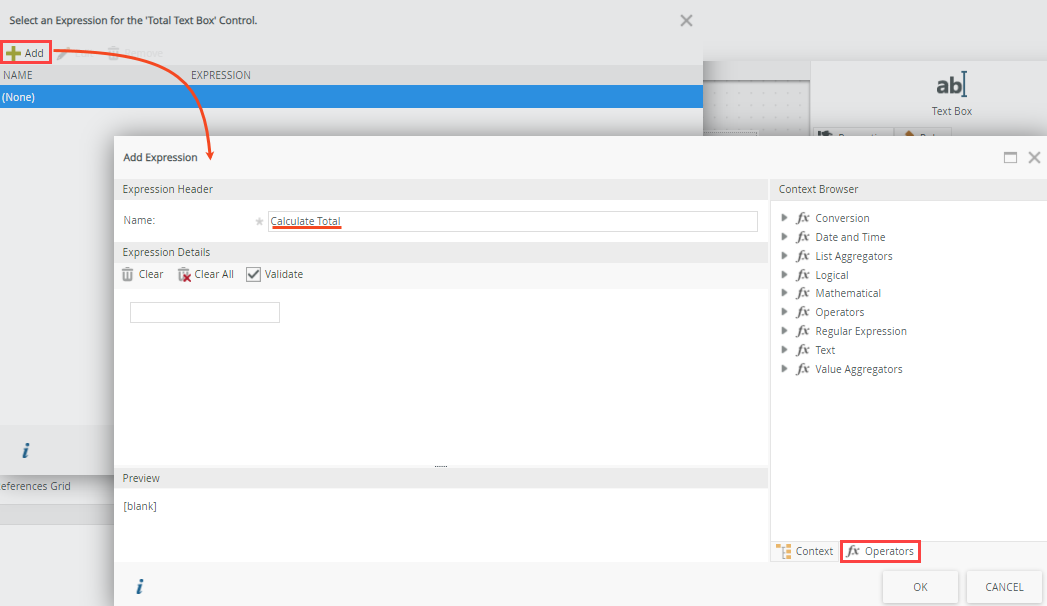
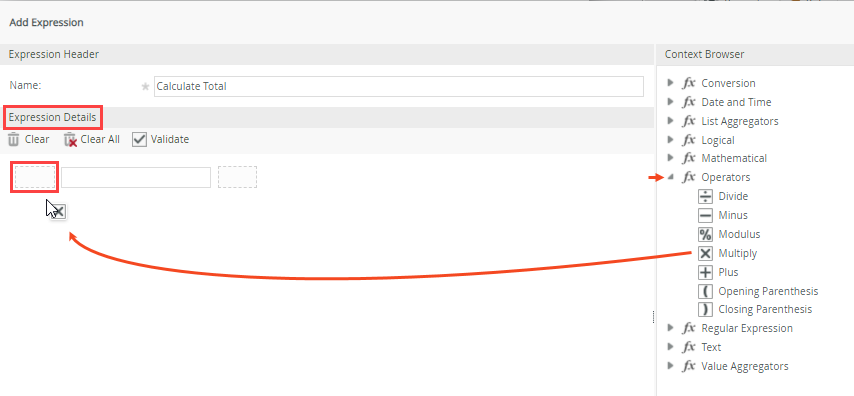
- Expand the Operators node. Drag the Multiply operator into the Expression Details pane. As you drag the operator into the pane, several placeholders appear. Drop the operator into the left placeholder. You are now ready to add the left and right parameters.
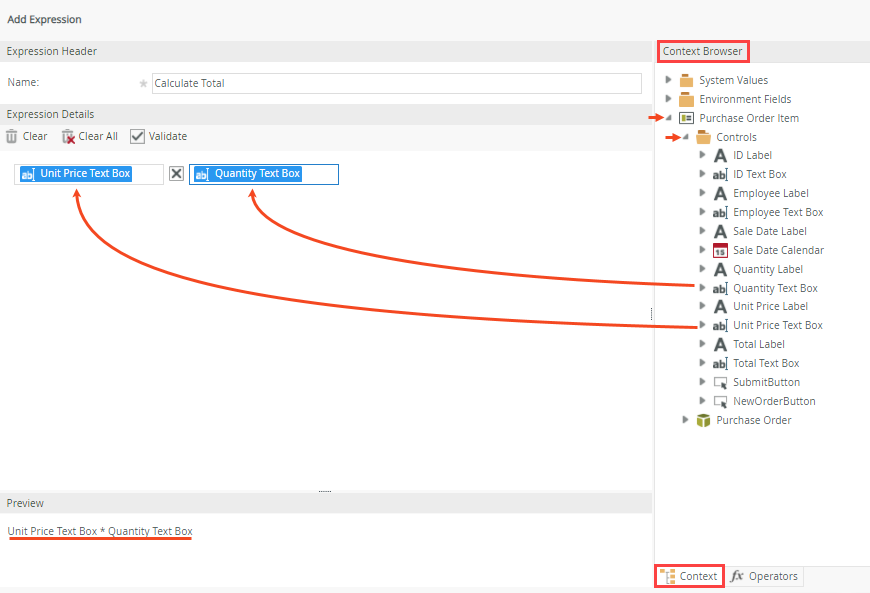
- Switch to the Context tab in the lower right side of your screen. Expand the Context Browser > Purchase Order Item > Controls nodes. Drag the Unit Price Text Box control into the left parameter box. Drag the Quantity Text Box control into the right parameter box. Note the Preview section shows the expression Unit Price Text Box times Quantity Text Box. Click OK to save the expression settings. Click OK to save the expression and OK again to apply the expression to the control.
- Select the Total control and then click the ellipses next to Expression.
-
Before you add rules to your view, it is a good idea to delete the rules that are no longer required.
- From the Rules tab, delete the rules below by selecting the rule and clicking Remove Rule. Click OK when asked if you want to continue and remove the selected rule.
- When Saved Button is Clicked
- When Delete Button is Clicked
- When Load Button is Clicked

- From the Rules tab, delete the rules below by selecting the rule and clicking Remove Rule. Click OK when asked if you want to continue and remove the selected rule.
Configure the view and form rules
With the views and form complete, you now work with rules to implement the necessary operations to interact with the view and form. First, you edit the Submit rule. The rule checks if the Quantity and Unit Price text boxes contain values, and then execute the Create method, disable the Submit button, and show the New Order button. Then, you edit the form initialize rule and add an action to hide the New Order button. Last, you create a rule to clear the view and enable the Submit button when the New Order button is clicked.
-
Configure the view rule. Configure the Submit rule to check if the Quantity and Unit Price text boxes contain values, and then execute the Create method; disable the Submit button; and show the New Order button.
- From the Rules tab, select the When SubmitButton is Clicked rule and then click Edit Rule.

- Events define when the rule should run, such as when a button is clicked, or when the form loads. (Events are optional, you can define "event-less" rules that you can call from other rules.)
- Conditions define whether the rule should run. If the criteria are true, continue the rule, and if the criteria are not met, stop the rule. For example, a condition might evaluate a form to confirm that required fields have content. (Conditions are optional - not all rules will require conditions.)
- Actions define what the rule should do. For example, show a message, start a workflow, or enable a form field. Rules can contain multiple actions that are run in sequence or in parallel.
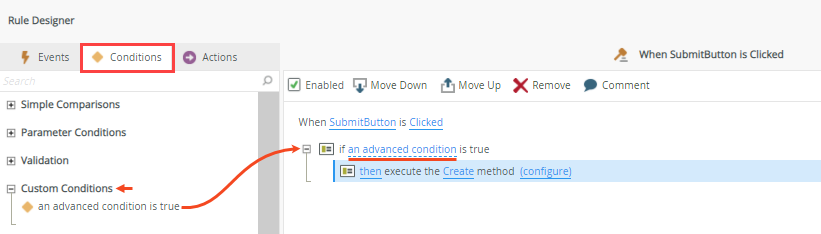
- Click the Conditions tab and then click an advanced condition is true to add it to the rule definition pane. Click the dotted line to configure the condition.
- Click Add and then specify conditions containing a value on the left, operator, and a value on the right. You can type a value or use the Context Browser to drag and drop a value. Expand the Context Browser > Purchase Order Item > Controls nodes and drag the Quantity Text Box into the value on the left. Select Is Empty from the Operator menu.
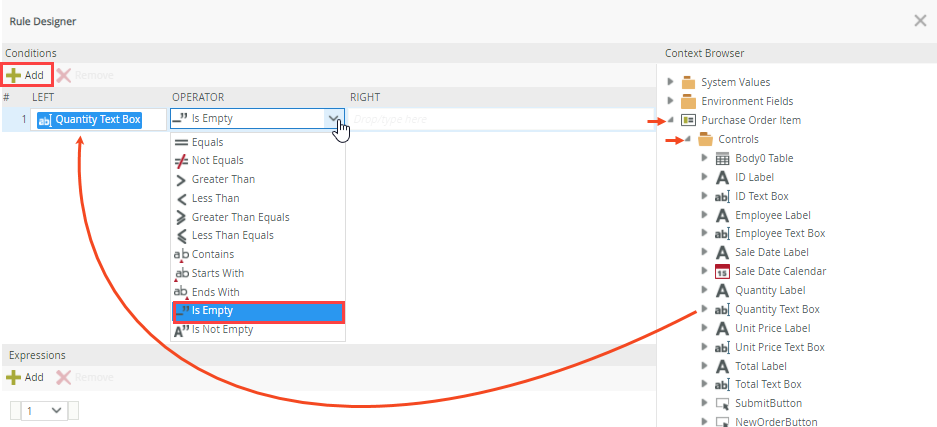
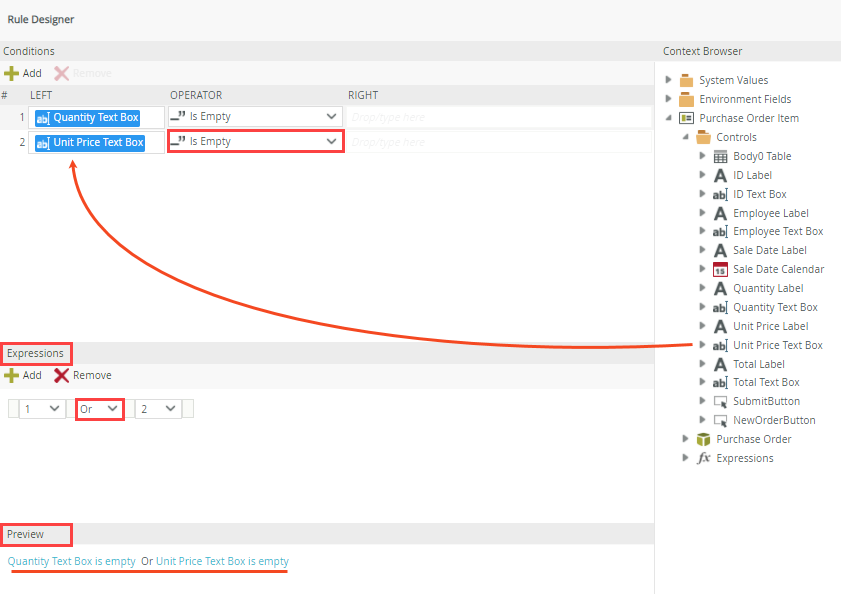
- Click Add again to add another condition. Drag the Unit Price Text Box into the value on the left and select the Is Empty operator. Select the Or logical operator in the Expressions section. Note the Preview section shows the expression Quantity Text Box is empty Or Unit Price Text Box is empty. Click OK to save the advanced condition.
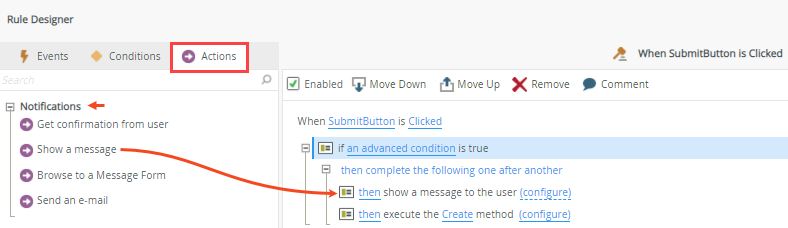
- Select the Actions tab and click Show a message.
- Select the Conditions tab and click Else.
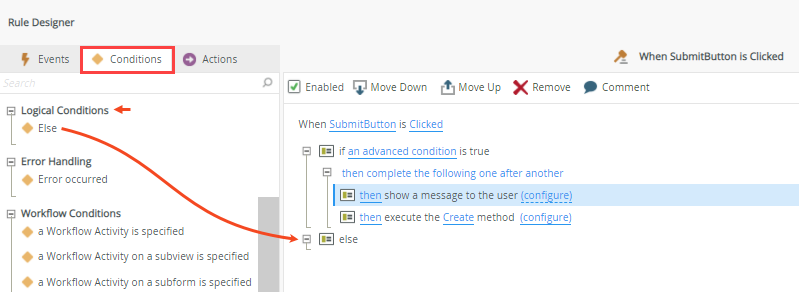
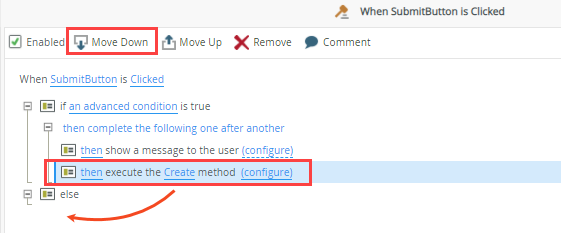
- Select then execute the Create method and then click Move Down twice. You want to move the Create action into the else statement.
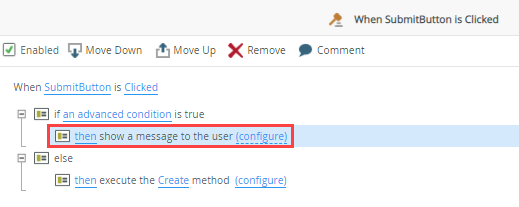
- You can now configure the message to display when the advanced condition is true. Select then show a message to the user and click the dotted line.
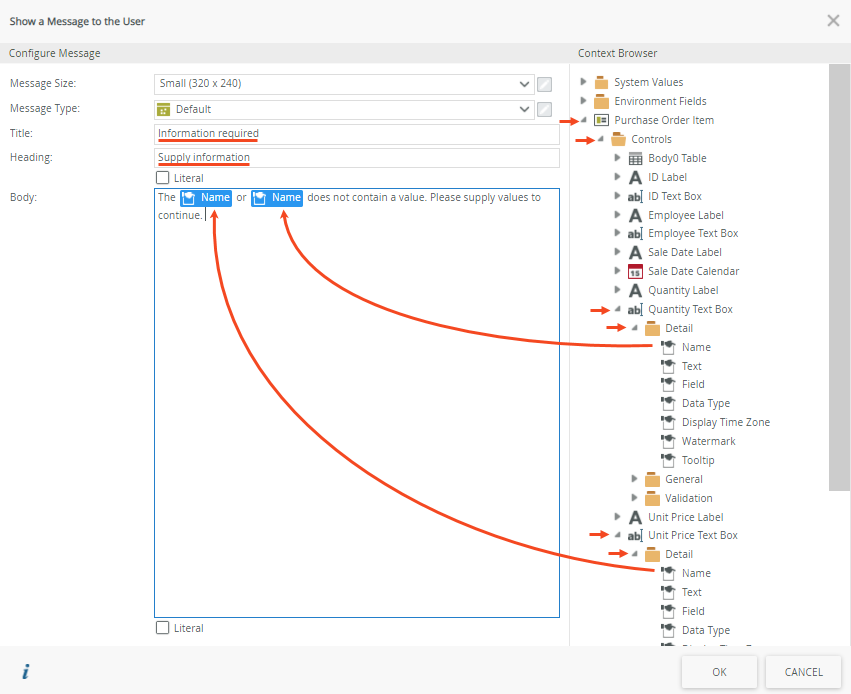
- Update the following fields:
- Title - Information required
- Heading - Supply information
- Body - Type the text as shown in the image below and then drag the controls from the Context Browser
- Select the Actions tab and click Disable a control. Click select control and select SubmitButton.
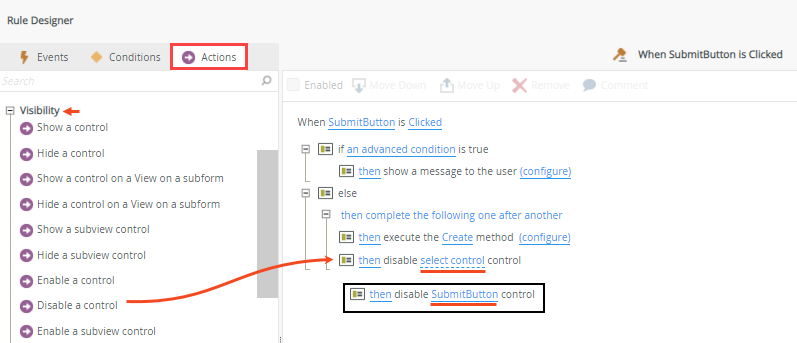
- Now click Show a control. Click select control and select NewOrderButton.
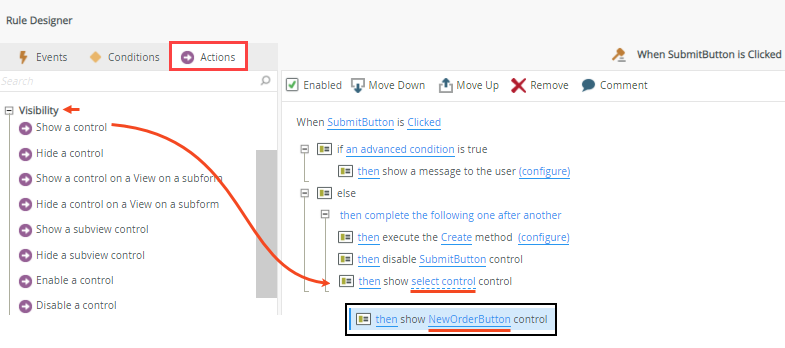
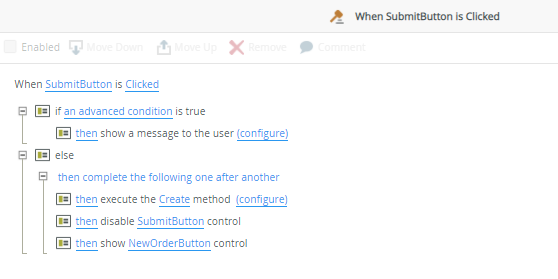
- Your view rule is complete. When the Submit button is clicked, a check is done to see if the Quantity Text Box or Unit Price Text Box is empty. If any of the boxes are empty, a message is shown. If none of the boxes are empty, the data is created and then the Submit button is disabled and the New Order button is shown. The order of execution of the statements within the rule is very important to ensure an efficient user experience. Ensure your rule looks like the image shown below. Click OK to save and exit the rule. Click Finish to save and exit the view.
Rules consist of events, conditions and actions. A valid rule contains at least one action. - From the Rules tab, select the When SubmitButton is Clicked rule and then click Edit Rule.
-
Configure the form rules. Configure a rule to hide the New Order button when the form initializes. Then add a rule to clear the view and enable the Submit button when the New Order button is clicked.
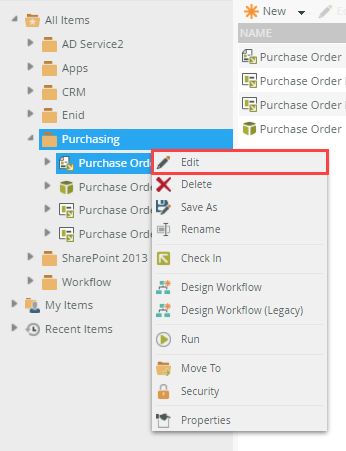
- Right-click the
Purchase Order form and select
Edit.
- On the Rules page, edit the When the Form is Initializing rule.
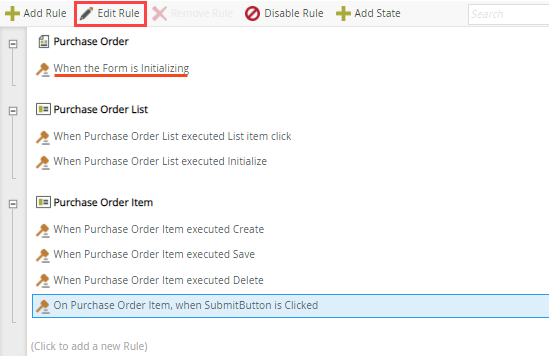
- Select the Actions tab then click Hide a View control. Select the Purchase Order Item, view and NewOrderButton control. When the form opens, the New Order button will be hidden and only shown when the Submit button is clicked. Click OK to save and exit the rule.
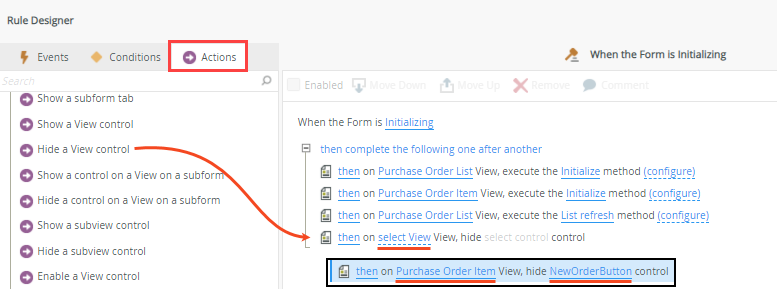
- Click Add Rule to add a new rule to execute when the New Order button is clicked.
- In the Events tab, click When a control on a View raises an event. Select the Purchase Order Item, view and NewOrderButton control, then select Clicked.
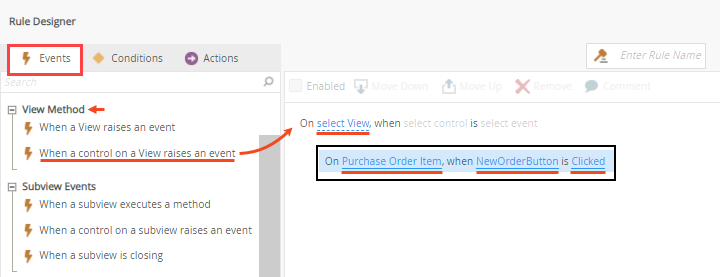
- In the Actions tab, click Execute a View method. Select the Purchase Order Item view and Clear method.

- Click Enable a View control. Select the Purchase Order Item view and SubmitButton control. This rule executes when the New Order button is clicked to clear the Purchase Order Item view and enable the Submit button. Click OK to save and exit the rule.
- Your form rules are complete. Click Finish to save and exit the form.
- Right-click the
Purchase Order form and select
Edit.
-
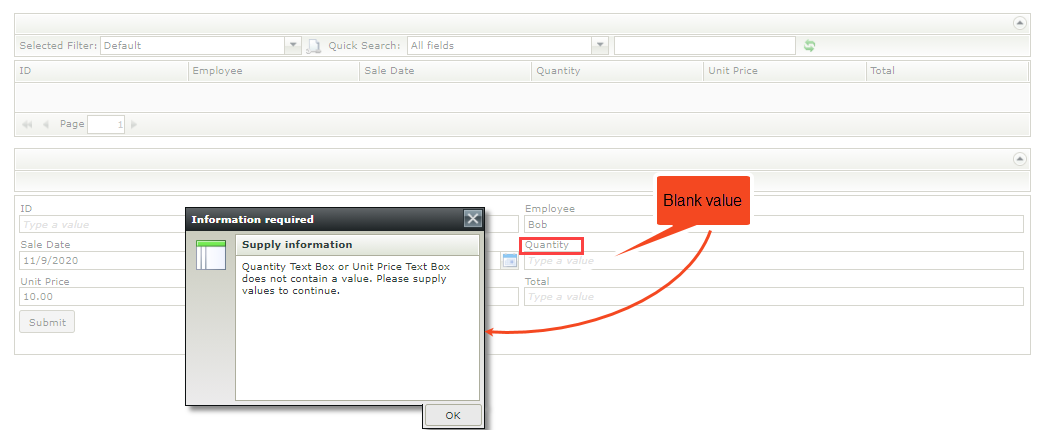
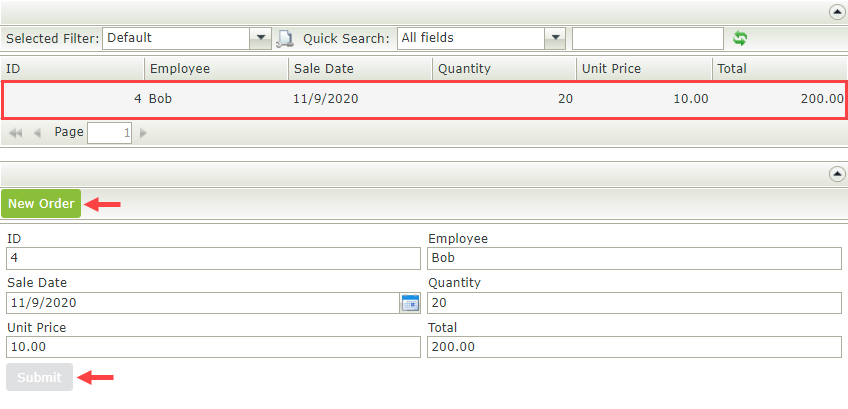
Test your scenario. Open the Purchase Order form using the Runtime URL. Capture some data in the Purchase Order Item view on the form but leave the Quantity text box blank. Click Submit and note the message. Now type a value in the Quantity Text Box and click Submit. Note the Submit button is disabled, the New Order button is shown and the data has been created and is shown in the Purchase Order List view.
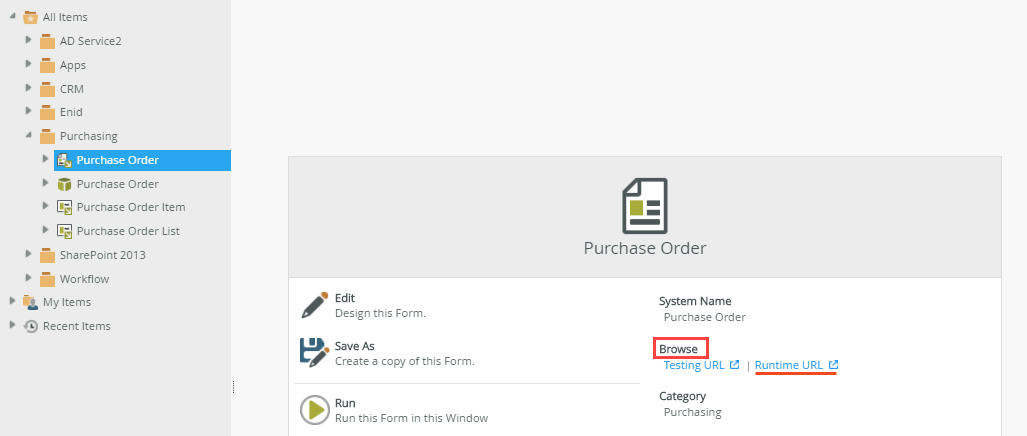
- Select the Purchase Order form and click the Runtime URL in the central pane. The Runtime URL opens the form in a new browser tab.
- Notice the New Order button does not show. Add some data to the Purchase Order Item view on the form but leave the Quantity text box blank. Click Submit and note the message.
- Now type a value in the Quantity text box and click Submit. Note the Submit button is disabled, the New Order button is shown and the data is created and shows in the Purchase Order List view.
- Select the Purchase Order form and click the Runtime URL in the central pane. The Runtime URL opens the form in a new browser tab.
Review
You can use view and form rules to enhance the user experience when capturing data in a view or form, for example hide a button and only show it when it is required. Another example is to disable a button when it's clicked to prevent a person from double clicking the button and creating duplicate data by mistake. Once configured, the rules execute without any further intervention.