How To: Exclude a Previous Approver from a Task
A maker-checker authorization model consists of a two-person approval flow, where one person initiates a transaction and a second person completes it. The key principle in a maker-checker model is that the first and second task participants cannot be the same person.
Consider a workflow with two task steps. You use a role (of approvers) for the first task's recipients. For the second task step, you configure the TaskAllocationRoleMethods SmartObject > Get Role Peers method to return a list of same role members but without the member who responded to the first task.
Calling a SmartObject method for a task recipient

Scenario
You work in a financial institution that uses the maker-checker authorization model for checks and deposits. For security reasons, one person initiates (makes) a transaction and a second person completes (checks) it. For the task recipients, you use a role consisting of staff members authorized to make and check transactions.
Steps
In this scenario, you create a role of transaction approvers. You create a workflow consisting of two task steps (Maker Step and Checker Step). You use the role for both task's recipients. However, for the second task, you call a system SmartObject method that removes the first task's role member from the list of approvers. In this way, the same role member cannot approve both tasks.
Setup Steps
The following steps set up the scenario from start to finish. If you want to skip the setup steps and view the topic step, go to Call a SmartObject Method for a Recipient Value.
- From the Management site, create a role called Maker Checker Approvers and add three members that are available to help you test the application. For this scenario we are using Codi Kaji, Bob Maggio, and Denallix Administrator as the role members.You may need to make some adjustments (such as role members), so they are specific to your environment.
- Launch the Management site.If you do not know how to access the Management site, see Accessing Sites.
- Expand the Users node, then click Roles. You see a list of current roles in the central pane. Click the New icon. (Your list of roles may not match the image below.)A role is a group of users for a specific use. For example, you may have a role of approvers for workflow tasks or perhaps a group that has custom permissions.

- Name the role
Maker Checker Approvers.
- Add the first member to the role. In the search box, enter
Codi
then click the Search button. Select Codi's name after you see it in the results pane and click Add. Codi is now listed as a role member.
- Repeat the step above and add Bob Maggio and Denallix Administrator. There are now three members in your role. Click OK to save and exit.

- Launch the Management site.
- Launch the Designer in a new tab. Create a new workflow called Maker Checker Workflow. (Optional: Add categories to keep your work organized. For example All Items > How To > Maker Checker Sample.)
- Open a new browser tab and launch the Designer. On the designer landing page, click Browse.
- To keep your work organized, add categories (folders). Expand the All Items node. Right-click All Items and click New Category. Name the new category
How To.
Add another category to How To and name it
Maker Checker Sample.
- Right-click the Maker Checker Sample category and select New Workflow.
- Name the workflow
Maker Checker Workflow
and click Create.
You see a Welcome screen with an interactive panel. You can click the right and left arrows to learn more about the workflow designer. Click Close to proceed to the design canvas.

-
Add a Task step to the empty placeholder. Use the table below as a guide for configuring the step. Add a Decision step and connect it to the Task step.
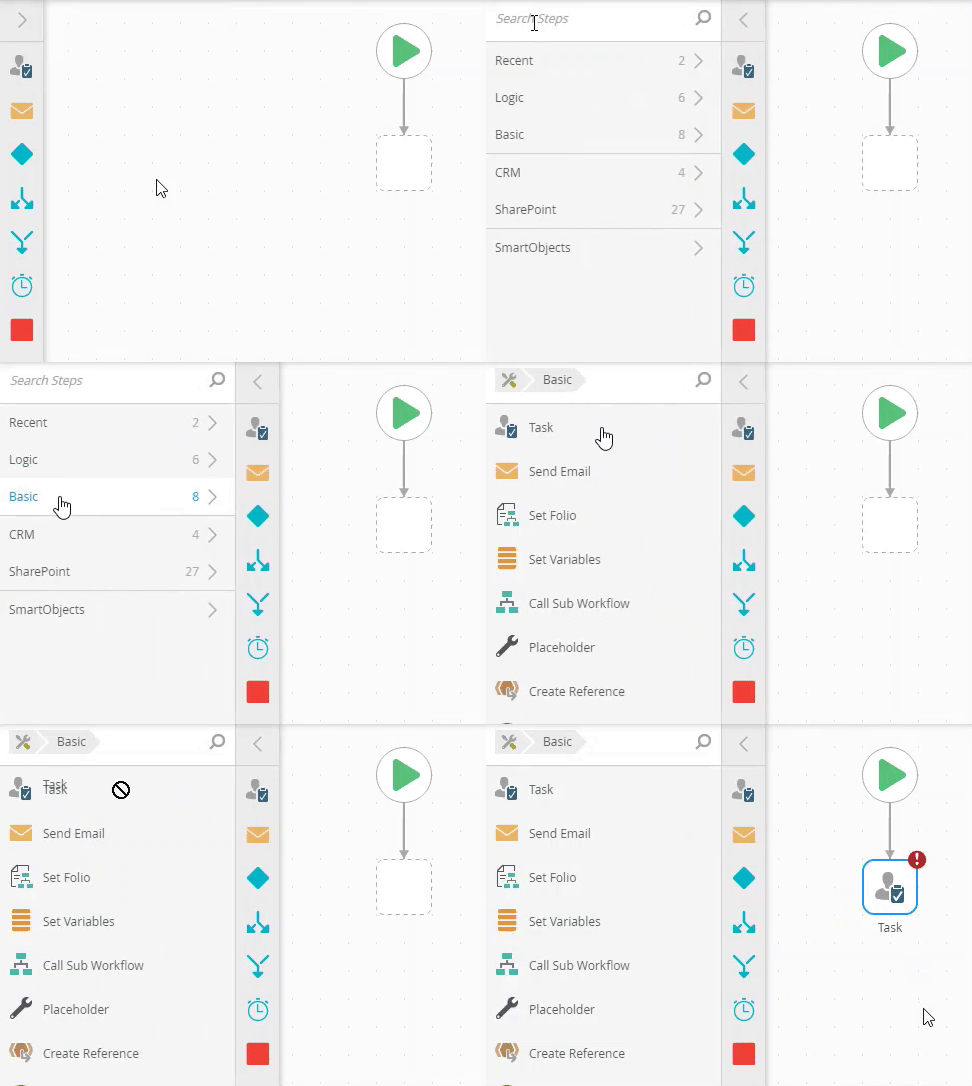
Property Value Notes Task Tab Action Transaction Created There is only one action for this demonstration. Recipients Tab Recipient Maker Checker Approvers You assign the task to the Maker Checker Approvers role, which creates a task for each role member. After one member actions the task, the remaining assigned tasks are removed. Properties Tab Name Maker Step - Expand the Toolbox > Basic node, then drag a Task step into the empty placeholder below the Start step. (The Start step has the green triangle.)
- With the Task step selected (selected steps have a blue border), expand the Configuration Panel.
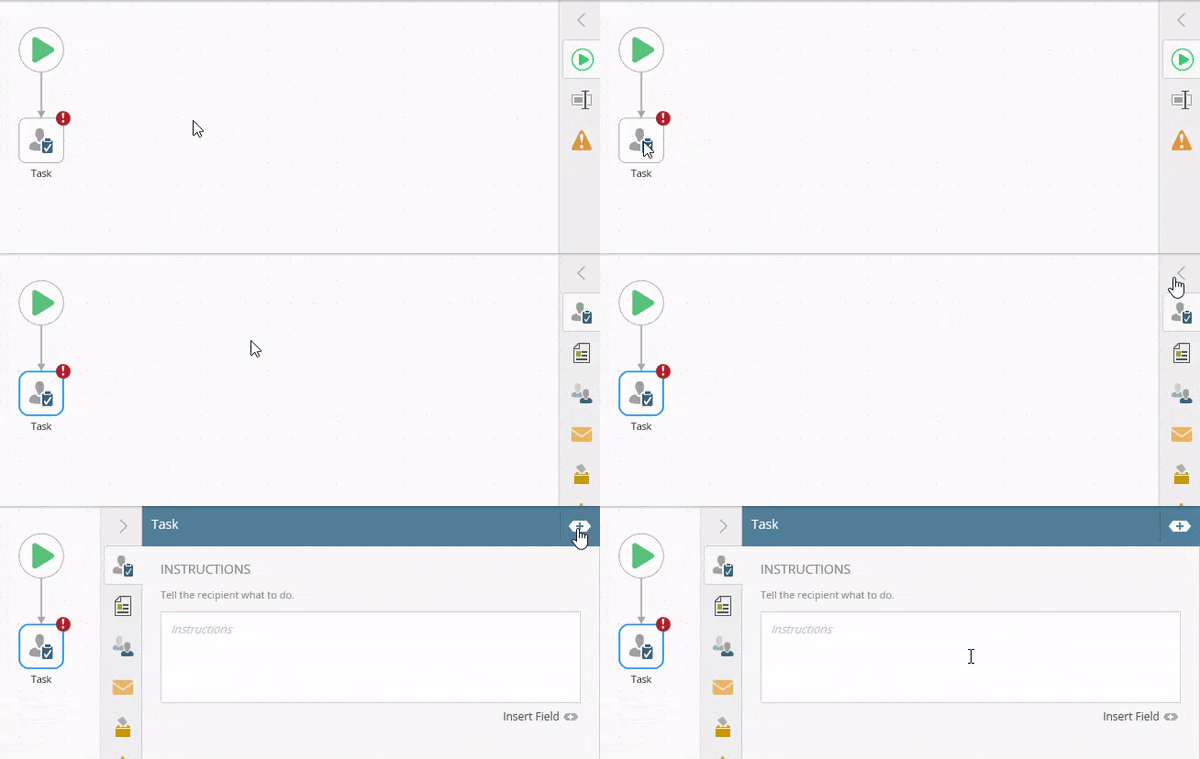
- Begin with the Task tab active (if it is not already). Locate the Actions section and click the Add (+) icon. Enter
Transaction Created.
This is the only decision option for the task recipient. (Typically, you would have more than one option such as Approve and Reject.)
Click the Recipients tab. The default recipient is Originator. However, you want to assign the task to the Maker Checker Approvers role. In this case, a task is created for each member of the role. After one member actions the task (completes it), the remaining tasks assigned to the other members are removed. Click the Originator bar and select Browse.

- In the Select User search box, enter
maker
then select the Maker Checker Approvers role when you see it. Click OK.
- Click the Properties tab. Rename the step
Maker Step
then collapse the Configuration Panel by clicking the slider.
- From the Toolbox > Logic node, add a Decision step below the Maker Step. Connect the two steps. The Decision step generates outcome lines for each task action. In this case, there is only one action, Transaction Created, resulting in one outcome line. (The Decision step allows you to configure decision rules as well, in addition to generating outcome lines.)To return to the Toolbox main menu, click the Toolbox icon in the breadcrumb bar.
 To connect two steps, hover over a border on the first step until you see a handle. Click and drag the handle into the second step. Click the design canvas to set the line.
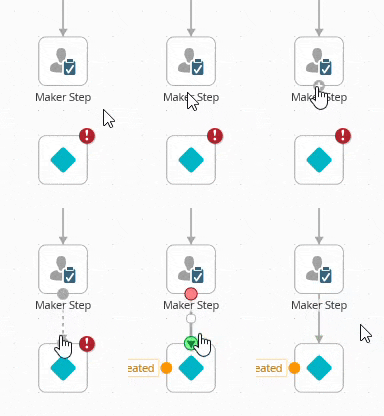
Notice the red warning badge on the Task step. This badge indicates there are required settings in the Configuration Panel. When you expand the panel, you see the same badge next to the required settings.Your workflow should look like the image below.

- Expand the Toolbox > Basic node, then drag a Task step into the empty placeholder below the Start step. (The Start step has the green triangle.)
-
From the Toolbox > Basic node, layer a Set Variables step with the Maker Step. From the Configuration Panel create a new Variable named PreviousApprover for the Pick Variable value. Map the system Workflow > Task User > FQN property to the PreviousApprover variable.
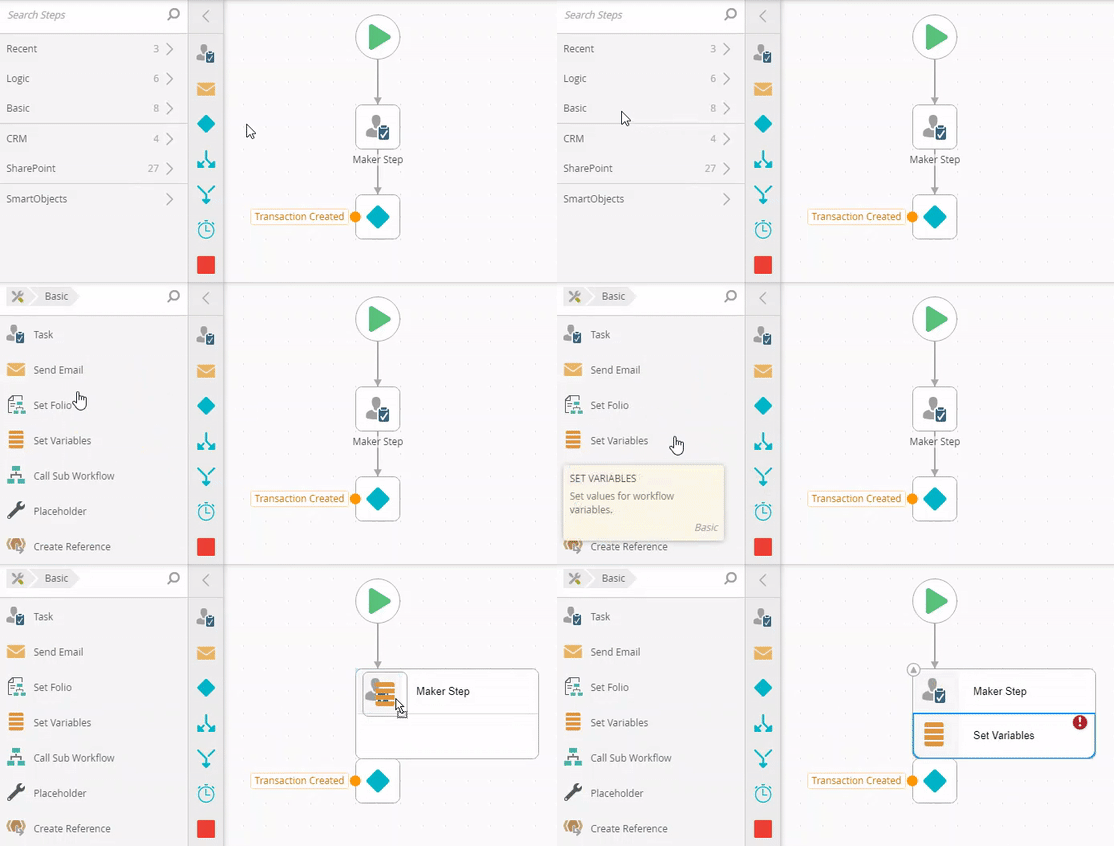
Next, you add a set variable step that stores the responding role member's name. This variable contains the name you want to remove from the role member list for the second task. (Remember the maker-checker model states the same person cannot action both tasks.) The key to adding this step is to layer (or stack) it with the Maker Step. In this way, system variables from the task step (such as the Fully Qualified Name (FQN) of the responding role member) are exposed to the set variable step.
- From the Toolbox > Basic node, drag a Set Variables step and drop it on top of the Maker Step, so that the two steps are layered.
- With the Set Variables step selected, expand the Configuration Panel. Click the Pick Variable drop-down and select Create New.

- Name the variable
PreviousApprover
and click OK.
- Next, map the system property containing the name of the task user to the PreviousApprover variable. Begin by expanding the Context Browser.
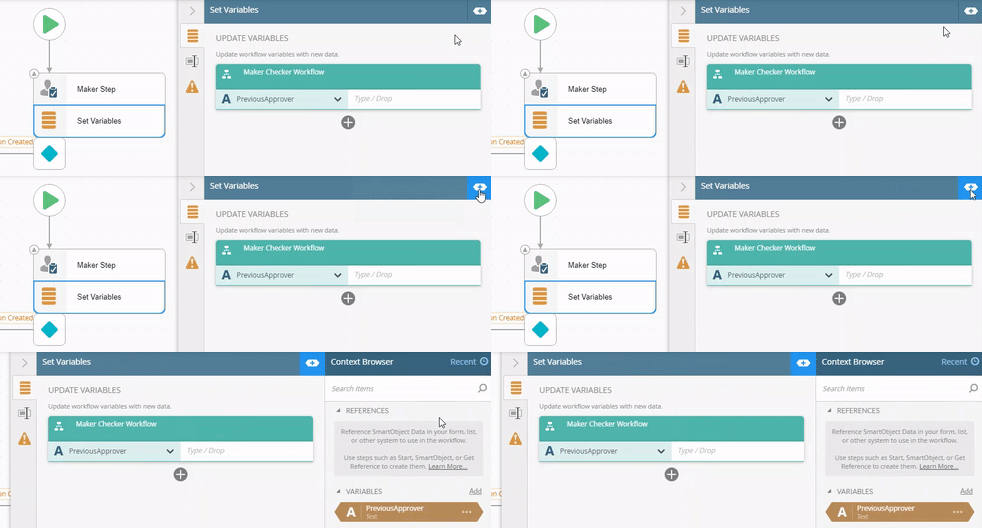
- Click the Workflow tab near the bottom right of your screen. Expand the Task User node. Drag the FQN property (Fully Qualified Name, such as [Label]:Denallix\Bob) into the variable text box.The Workflow tab contains system variables for active steps. Since you layered the Set Variables step with the Maker Step, system variables for the task step are exposed to the variables step. If you do not layer the steps, the task step variables are hidden and unavailable for use.

- Collapse the Configuration Panel. Collapse the layered steps by clicking the arrow in the upper left corner of the steps.

- From the Toolbox > Basic node, drag a Set Variables step and drop it on top of the Maker Step, so that the two steps are layered.
- (Optional) Add a Toolbox > Basic > Send Email step that contains the PreviousApprover variable in the message body. During testing, you can see the value passed from the system Task User > FQN property to the PreviousApprover variable. This value is the FQN of the role member who actioned the Maker Step task.
- From the Toolbox > Basic node, drag a Send Email step so that it aligns with the Transaction Created outcome. Connect the outcome to the step. Make sure the step is active and expand the Configuration Panel.

- With the Send Email tab active, keep the default To value, Originator. For the Subject line, enter
Previous Approver Value
and for the message Body, enter
Task User > FQN:
- Expand the Context Browser. Click the Fields tab. Drag the PreviousApprover variable into the message Body. At runtime, the variable is replaced with the actual FQN value of the Maker Step approver. Collapse the Configuration Panel.

- From the Toolbox > Basic node, drag a Send Email step so that it aligns with the Transaction Created outcome. Connect the outcome to the step. Make sure the step is active and expand the Configuration Panel.
Call a SmartObject Method for a Recipient Value
The next step describes how to add a task step, then call a SmartObject method for the recipient value. The system SmartObject method you use requires two input properties: Role Name and User Name. You manually enter the role name, then use the PreviousApprover variable for the user name. When executed, the method returns a list of role members and removes the member matching the variable. The second task is assigned to the remaining role members. In this way, you are blocking the first task's responding role member from participating in the second task.
-
Add a Task step to the design canvas and connect it to the email step. For the recipient, call the TaskAllocationRoleMethods > Get Role Peers SmartObject method. For the Role Name, enter Maker Checker Approvers. Use the PreviousApprovers variable for the User Name value. Make sure the Recipient scope is User. Rename the step Checker Step. Add and connect a Decision step.
- From the Toolbox > Basic node, drag a Task step below the Send Email step. Connect the two steps.

- Select the Task step and expand the Configuration Panel. With the Task tab active, add the following action:
Transaction Complete
- Click the Recipients tab. The default value is Originator, which you replace with a call to a SmartObject method. Click the Originator bar and change it to Type/Construct my own.

- Remove the default value. (Click to the right of the variable and backspace until it disappears.)

- Expand the Context Browser. Click the SmartObjects tab. Expand the Task Allocation > TaskAllocationRoleMethods > Get Role Peers node. Drag the User Name method into the recipient text box.
- The Edit SmartField pane opens. This method requires two parameters for it to execute. For the Role Name, enter
Maker Checker Approvers
and for the User Name, switch to the Fields tab and drag the PreviousApprover variable into the text box.
- Change the call scope from First item where... to All items as a collection. You want to return a list of all role members, not just the first member. Click the Exit icon to continue.

- The last configuration for the Recipient is to make sure the scope is set to User. Click the scope icon on the recipient bar. Select User. This returns a list of all role members separated by a delimiter. A task is assigned to each role member defined. Selecting Group or Role results in a workflow error when using the method call.

- Click the Properties tab. Change the name to
Checker Step
then collapse the Configuration Panel.
- Next, from the Toolbox > Logic node, add a Decision step and connect it to the Checker Step.

- The last workflow configuration is to add a final Send Email step. This provides an end to the workflow process and lets you know the workflow completed without error. From the Toolbox > Basic node, drag a Send Email step onto the design canvas and connect it to the Decision step.

- Select the Send Email step and expand the Configuration Panel. Enter your own content for the Subject and message Body. Collapse the Configuration Panel.

- From the Toolbox > Basic node, drag a Task step below the Send Email step. Connect the two steps.
- Deploy the workflow.
Before you can use the workflow, you must deploy it. Deploying the workflow publishes it and makes it available for use. If you make any changes to the workflow, you must deploy it again so that the changes are updated on the server.
- Click File > Deploy. When you see the success dialog, click Hide to close the dialog. You are ready to begin testing!
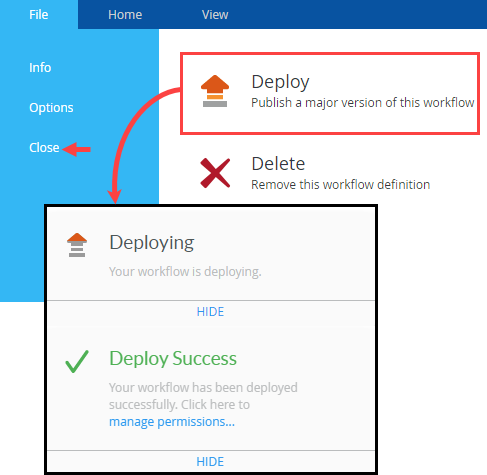
- Click File > Deploy. When you see the success dialog, click Hide to close the dialog. You are ready to begin testing!
-
Start an instance of the Maker Checker Workflow from the Management site. Confirm each Maker Checker Approvers role member receives a task notification email for the Maker Step. Action one member's task. (You can do this using their Workspace or from their task email.) Confirm the remaining role members receive a task notification email for the Checker Step. If successful, the first task respondent should not receive another email for the second task.
To test this application, you need access to each role member's Workspace site or their email. The images below are specific to the environment used for this scenario and will not match your environment details.
For testing you should have the following environments accessible:- Role member 1's Inbox on Workspace
- Role member 2's Inbox on Workspace
- Role member 3's Inbox on Workspace
- A role member's email client
- Begin by starting a new instance of the Maker Checker Workflow. You should still have the Management site open. From the Management site menu, expand the Workflow Server > Workflows node. Navigate to the Maker Checker Workflow. (Your menu structure may be different than the image below depending on your category names.) Select the workflow, then click the Start New button in the central pane.

- You can leave the default values as is, or you can change the Folio to a more meaningful instance name. Click Start. Click OK for the confirmation dialog.

- Switch to Administrator's Workspace. Click the Refresh icon at the bottom of the page. Confirm there is a task notification email for the Maker Step.

- Click on Codi's Workspace. Click the Refresh icon. Confirm you see the same email as Administrator's.
- Click on Bob's Workspace. Click the Refresh icon. Confirm you see the same email as Administrator's. Note that all three role members have a task assigned to them from the Maker Step task.
- Return to Administrator's Workspace. Click the email title to open the task in the central pane. Use the Action drop-down to select Transaction Created. Click Submit. Click OK for the confirmation dialog. You (as Administrator) are the role member taking action on the first task (Maker Step).

- If you included the Send Email step, switch to Administrator's email client. Locate the email with the title Previous Approver Value and review the message. Notice the Task User > FQN system variable returned.
- Switch to Codi's Workspace and click the Refresh icon. Notice the first task, Maker Step, is no longer there. You now see a task notification email for the second task, Checker Step. (Remember, Codi and Bob are the remaining role members; both are assigned the task.)

- Refresh Bob's Workspace Inbox. You should only see the second task email, Checker Step.
- Refresh Administrator's Workspace Inbox. There are no tasks. The demonstration is complete as Administrator is not returned as a role member for the second task.
The workflow is now on the first task step. Recall that the task recipients are all the Maker Checker Approvers role members. Each member should have a task notification email for the Maker Step.
To review the workflow process at this point, Administrator responded to the first task (Maker Step). This task is removed from the remaining role members. The next step in the workflow is the optional Send Email step. This step contains the value of the PreviousApprover variable as part of the message body.
Review
The maker-checker authorization model is one option for providing extra security to transactions, particularly in a financial environment. One key point of this principle is that the same person cannot make and check the same transaction. Use the TaskAllocationRoleMethods system SmartObject to call a list of role members. You can configure this method to remove a previous task recipient from the list, allowing you to use the same role for multiple tasks in a maker-checker workflow.