Configuring my Worklist
The K2 Workspace Home page presents the user with the K2 Worklist and work items associated with workflow processes designed in K2. You can filter the worklist by configuring various filters.
- To access the K2 Workspace open a browser and navigate to K2 Workspace. The log in page will display.
- Enter your User Name and Password and click Log In.
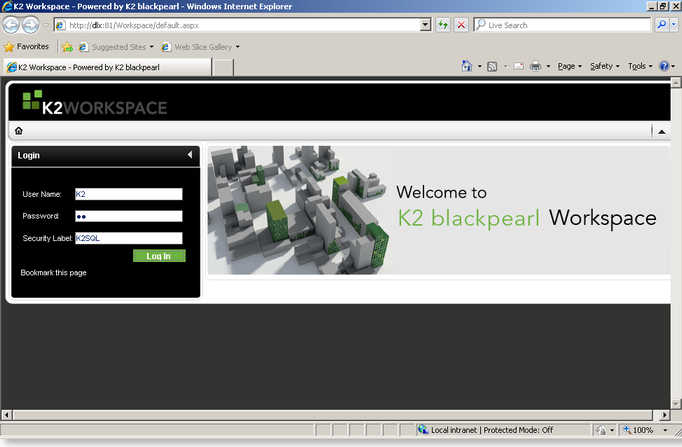
Use Internet Explorer as the suggested browser.
In order to action items on a worklist, you need at least View Participate rights on a workflow.
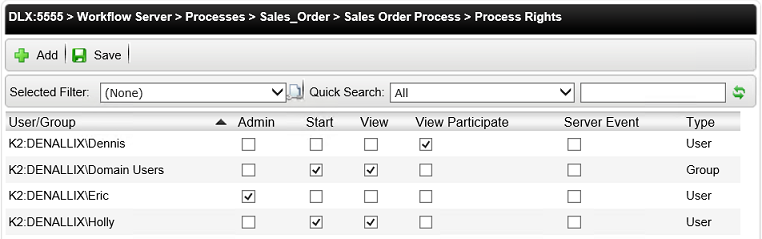
The table below explains the available Process Rights:
| Process Right | Explanation |
|---|---|
| Admin | Allows you to Start and View a workflow. You need to be granted Admin rights to manage the workflow from the Management Console. |
| Start | Allows you to Start a workflow. Without it you will receive an error if attempting to start a workflow. |
| View | Allows you to View any process instance of the workflow. You can draw any report on the workflow from the K2 Workspace without being a participant in the workflow. |
| View Participate | Allows a workflow participant, i.e. the user defined as the destination user for one of the workflow activities, to View the details of the workflow instance. You will only be able to access process reports and the activity instance once it has reached the activity for which you are a destination user. |
| Server Event | Asynchronous server events wait for a call-back from the external system to finish the server event. The user account used by the external system must be granted Server Event Permissions for it to be allowed to finish the server event. |
Process Rights can be assigned to Active Directory Users or Groups. In addition, process rights can be assigned to SharePoint Groups which contain Active Directory Groups and Users.
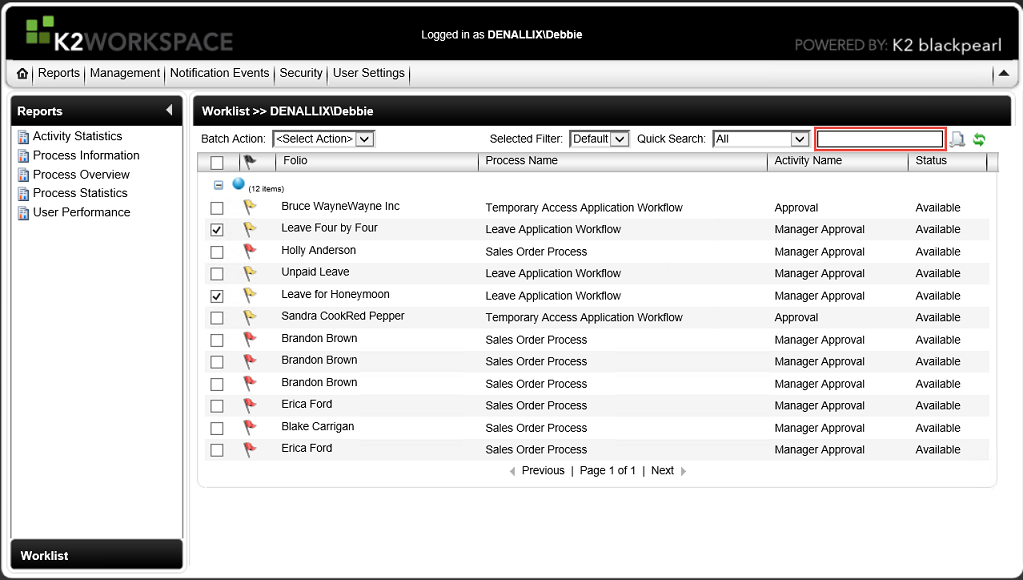
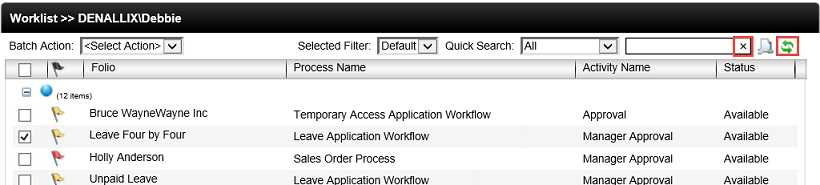
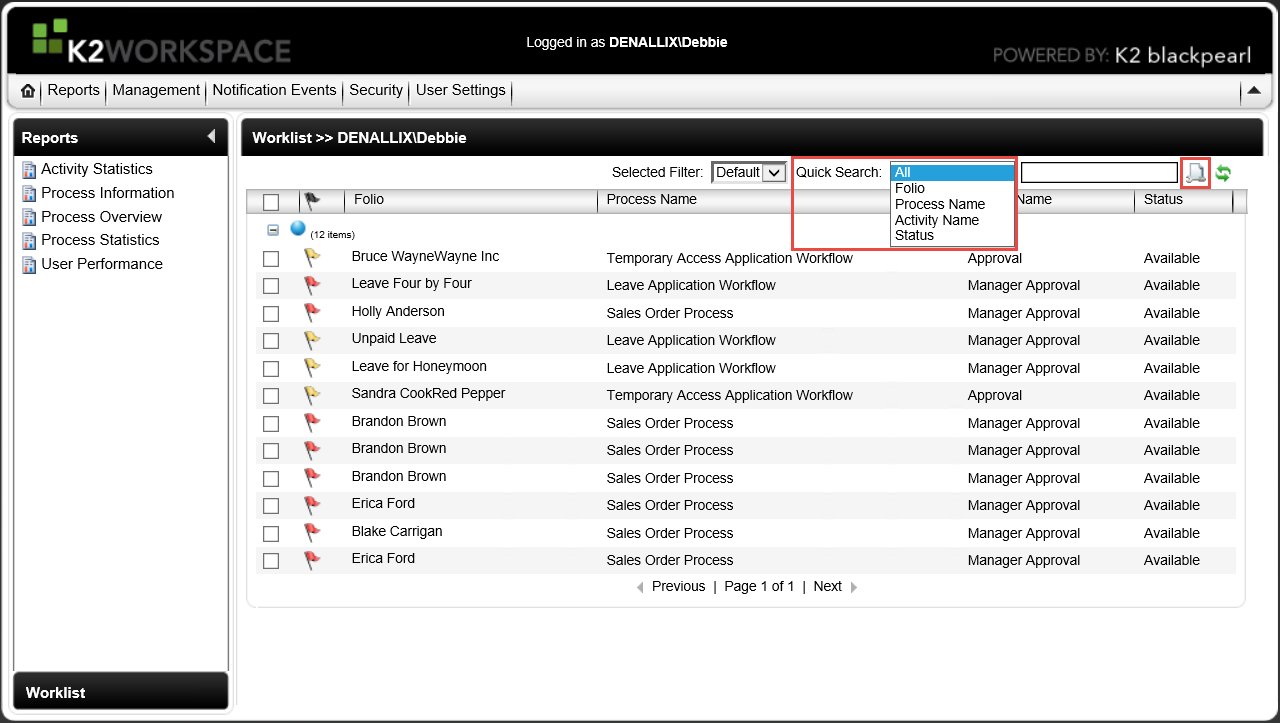
Make use of the search utility to locate specific information on the entire worklist or specified column headers. The search utility consists out of two features, the Quick Search drop down menu and a search field. Worklists can become cluttered with tasks, and the search utility will assist to easily find specific items on the fly.
- From the K2 Workspace Worklist, locate the Search utility.
- To search on the entire Worklist enter a specific search value in the search field. The search will automatically start and search the entire worklist according to the value that is entered.
- Tasks matching the entered search criteria will display in the worklist. To return to the full worklist, clear entered values by clicking the X in the search utility field and then click the Refresh button.
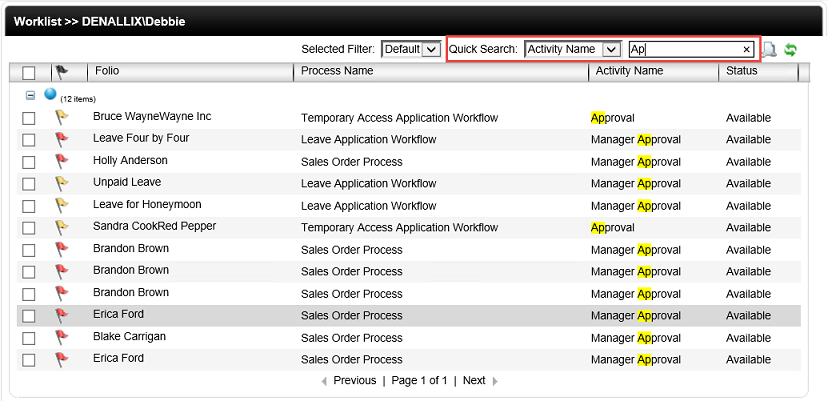
- For a more defined search locate the Quick Search drop down menu.
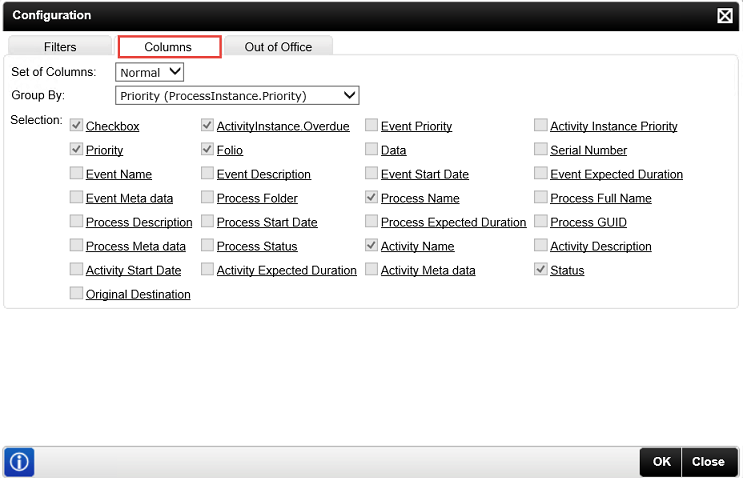
- The drop down menu contains a list of predefined column headers to search on. This list corresponds with the displayed columns in the worklist area. This list can be customized, to do this click on the Configuration button.
- Click the Columns tab to display all available column headers. From here select required columns to display in the worklist area as well as in the Quick Search drop down menu list.
- Small - Checkbox, Priority, Folio, Activity Name and Status.
- Normal - Displays Checkbox, Priority, ActivityInstance.Overdue, Folio, Process Name, Activity Name and Status.
- Detail - Displays Checkbox, Event Name, Original Destination, Priority, ActivityInstance.Overdue, Folio, Event Start Date, Process Full Name and Status.
- Custom - Select required Column Headers.
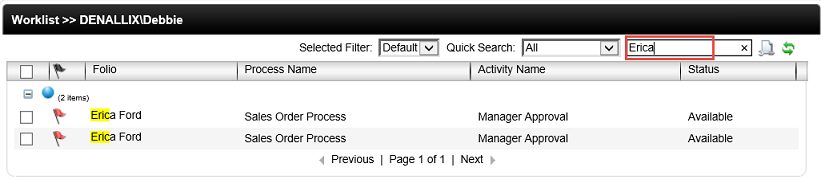
- Select a predefined option from the drop down menu list and enter a value in the Search field. The search will run on the selected column header only.
- To return to the full worklist, clear entered values by clicking the X in the search utility field, selectAll from the Quick Search drop down menu and then click the Refresh button.
The table below explains the available fields:
| Feature | Description | Sample Value |
|---|---|---|
| Set of Columns |
The drop down menu contains the following predefined column settings: The default is set to Normal. |
Select required set of columns to display from the drop-down menu. Click OK to apply configuration settings. |
| Group By | Use the drop-down menu to select a Column Header to sort the Worklist on. The items will display according to the selected option. The default is set to Priority. | Select required group by option from the drop down menu. |
| Selection |
Displays all available column headers to add to the Worklist area. By default this option is grayed out. |
From the Set of Columns drop down menu select the Custom option. Select required column headers checking the relevant check box. Click OK to apply configuration settings. |
If no items display on your worklist, check the configuration settings as well as selected options in the Quick Search drop down menu.
Make use of the filter utility to create custom defined filters to apply on the worklist.
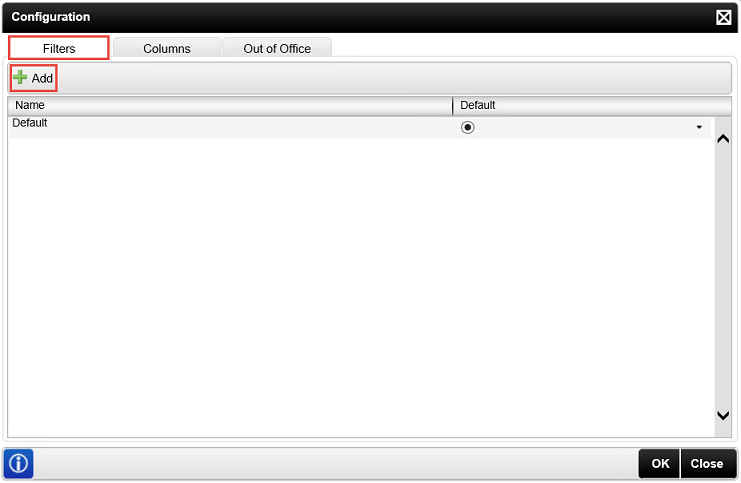
- From the K2 Workspace Worklist, locate the Filter utility.
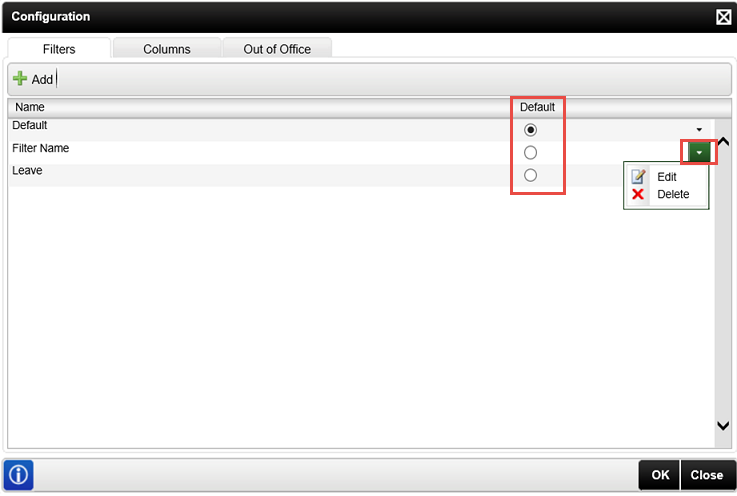
- The drop down menu contains a list of custom created filters, which will display the worklist area according to the selected filter. To create a filter click ck on the Configuration button.
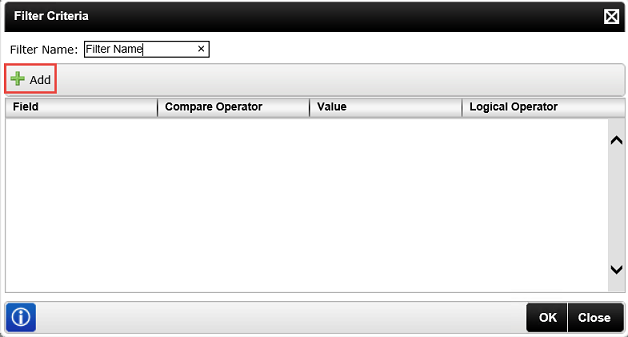
- Click the Add button.
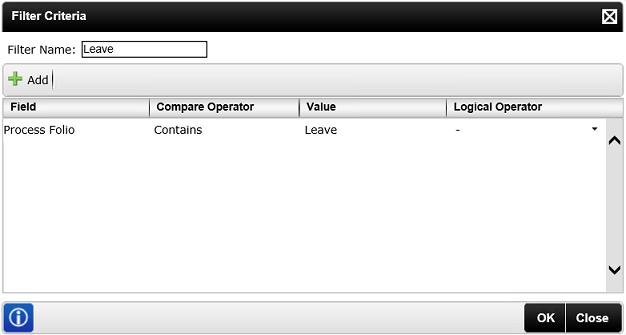
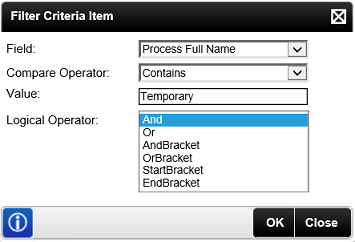
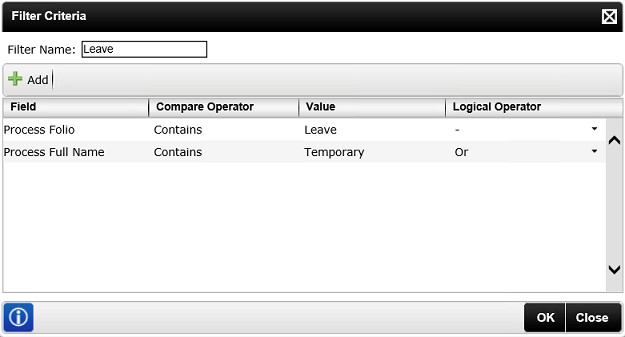
- Enter a name for the custom filter in the Filter Name field. Click on the Add button.
- Contains / Not Contains
- Equals / Not Equals
- Click OK to add the filter.
- Multiple filters can be added. Click on the Add button and make use of the Logical Operator drop down menu to differentiate between filters or combine filters.
- Click OK add additional filters (if required).
- Select a default filter with the relevant Default radio button. This will ensure that the selected filter loads automatically to filter the worklist. To edit or delete an existing filter click on the arrow next to the filter line, select Edit or Delete.
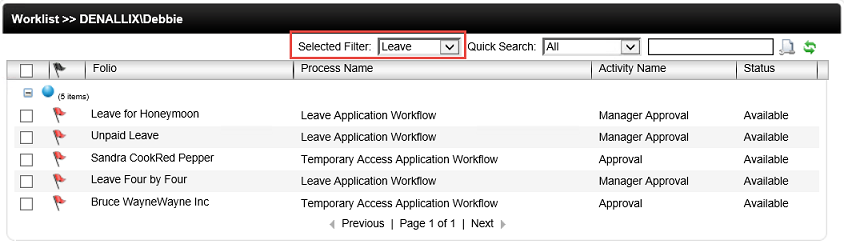
- Click OK to save the filter. From the selected filter drop down menu select a Custom Filter.

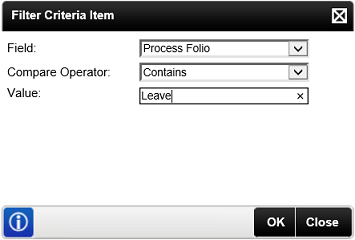
Define the criteria using available fields and filter types. The table below explains the available fields:
| Field | Description | Sample Value |
|---|---|---|
| Field | A specific field can be selected from the list for the Filter being added. Keep in mind that the available options in this list will differ depending on the process you have selected to filter on. | From the list select the required field to filter on. |
| Compare Operator | From this select an operator to compare the Field Name with the Value. Keep in mind that the available options in this list will differ depending on the process you have selected to filter on. | From the list select the required operator to apply as a filter. |
| Value | This is the value used in conjunction with the Field Name and the Compare Operator to filter the report. This is a required field and has to contain a value. | Type a value to filter on. |
The text type filter can be applied. The table below explains the available filters:
| Filters | Description | Sample Value |
|---|---|---|
| Text filters |
Use text type filters for specific text related queries. Available Compare Operators: |
Select the field name from the list. Select a Compare Operators and enter the required text value in the Value field. Example: Exclude a specific activity name from the report. Use the Not Contains or Not Equals Compare Operator, enter the text to exclude in the Value field. |
If no items display on your Worklist, check the Configuration settings as well as selected option in the Quick Search / Selected Filter drop-down menu.
The K2 Workspace Out of Office feature enables you to share specific, or all your K2 worklist items with other users. For more information on how to set up your Out of Office see the Out of Office topic.
- K2 Worklist items with either Sleep or Allocated status will not be reflected in the worklist as a result of the default filter being applied. Should you wish to view these, edit the default filter to include these statuses.
- A user with administrative rights on the K2 Server will be a K2 Out of Office administrator as well.
- It is not necessary to delete the Out of Office settings when returning to the office. Simply select In the Office. The settings will be saved and should the need arise to activate the Out of Office feature again, the same forwarded user information will apply. Should you wish to change the settings, the current information can be edited and will apply as soon as the setting changes to Out of Office again.