
This topic describes how to integrate Office 365 with Nintex Drawloop DocGen® for Salesforce. Office 365 integration enables you to retrieve templates and store documents on SharePoint sites.
Tip: You can also create a DocGen Package that uses Nintex Forms. This type of DocGen Package enables Salesforce1 uses to save data to Salesforce or Office 365. For more information, see Nintex Forms for Salesforce1 integration
Set up Office 365
You can integrate multiple Office 365 accounts with Nintex Drawloop DocGen® for Salesforce.
To add an Office 365 integration
-
From the Force.com app menu, select Nintex DocGen, and then click DocGen Admin.
Tip: You can also select this from Lightning with the
 App Launcher.
 -
Under Configuration, click Third-party Integrations.
-
From Add Service, select Office 365.
-
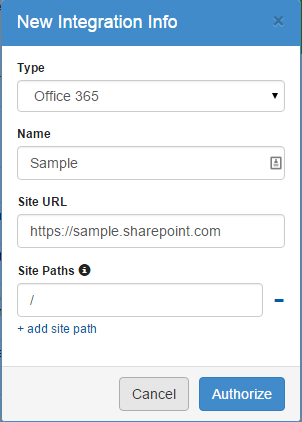
Enter a name. You can use any descriptive text you like. This name appears in the Select Files section of a DocGen Package.
-
Enter a Site URL. This is the base URL for SharePoint.
-
Enter a Site Path. You can limit users access to SharePoint by adding site paths.
Tip: Use the backslash character / to indicate access to the root directory.
-
(Optional) Click + add site path to enter another site path. Additional site paths enable you to fine tune access to only the Office 365 resources you want to make available to users.
-
Click Authorize. A prompt appears for credentials.
-
Enter the credentials for Office 365. Another prompt appears requesting permissions.
-
Click Accept.
Manage Office 365 integration
You can edit or delete Office 365 integrations.
To edit an Office 365 integration
-
From the Force.com app menu, select Nintex DocGen, and then click DocGen Admin.
Tip: You can also select this from Lightning with the
App Launcher. -
Under Configuration, click Third-party Integrations.
-
Click Edit for the Office 365 integration you want to work with. The Edit Integration Into dialog box appears.
-
Edit Name or Site URL as required.
-
Click + add site path to enter another site path. Click the - (at the end of the Site Paths box) to delete a site path.
-
Click Authorize.
To delete an Office 365 integration
-
From the Force.com app menu, select Nintex DocGen, and then click DocGen Admin.
Tip: You can also select this from Lightning with the
App Launcher. -
Under Configuration, click Third-party Integrations.
-
Click delete for the Office 365 integration you want to work with. A prompt appears for confirmation.
-
Click OK. A success message in the Integration Info dialog box confirms deletion.
You can use Office 365 to store DocGen Package output files to document libraries.
Store files on Office 365
You can store copies of documents you deliver to Office 365 using Store As on a Delivery Option. If you set Store As to Office 365 using the DocGen Package Wizard, you must edit the DocGen Package after you finish the wizard to set the endpoint for Office 365.
To store files on Office 365
-
From the Force.com app menu, select Nintex DocGen, and then click DocGen Packages.
Tip: You can also select this from Lightning with the
App Launcher. -
In Delivery Options, click New Delivery Option. The Select Delivery Option Type screen appears.
- From Type of new record, select any of the following Delivery Options and click Continue.
Email
Download
Attach
Document Queue
LOOP
SMTP
HTTP Service
-
Fill out all required fields.
-
Under Attach Options, select Allow Document Storage or Require Document Storage. (Skip this step if you selected an Attach Delivery Option.)
-
From Store as, select Office 365.
-
Click Save. The Delivery Option Detail page appears.
- From Storage Location, click [Change] to set the endpoint and (optionally) store the file in location different than the default location. The Delivery Option Edit page appears.
- From Endpoint, select the SharePoint endpoint where you want to store the file.
In Storage Folder, enter a folder name.
Tip: You can use a tag to have the DocGen Package dynamically generate a folder name. For example, you could enter <<Account_Name>> and the output file will be stored in a folder with the same name as the account.
For more information, see Delivery Options.