Create Template Mappings
To begin setting up template mapping in eSign Dynamics Simple Solution, a Simple Setup template needs to be created within your Nintex eSign account. Additionally, in order to create the template mapping, certain permissions in Dynamics and permission for the template in Nintex eSign are required.
-
To create a new template mapping, you must select the template mapping tab and click on the new button.
-
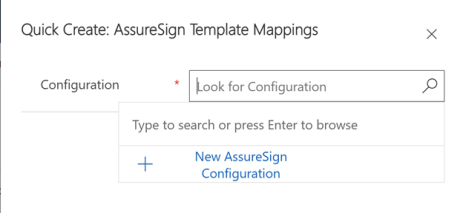
The quick create window will display for you to look up the configuration. For configuration setup please refer here. Select a configuration and click Save and Close.
-
Next, provide a name to best describe the template mapping. Then, select the entity to which the template mapping will be assigned from the dropdown. Next, select the template that was created in your Nintex eSign account.
The template listed on the template name field only displays if the configuration user has created templates in Nintex eSign. If you do not have any templates setup yet, please see our documentation here and return back here after you create a template.
-
Click Save on the template mapping.
-
A window will popup like the one shown below. it is recommended to auto-populate the sender input field to the template mapping. Click OK.
After you click okay, the system automatically populates a view below where you entered information for Name, called "Mapping between CRM fields, Sender Inputs, and JotBlocks". If this is not showing Sender Inputs, click the Populate button.
If you see a field you wish to map already in the view, you can map it by clicking on the checkbox next to the Name Column and selecting Edit to begin the mapping process:

If you do not see an item you wish to map, you can choose to add fields to the template mapping by selecting the ‘New eSign Fields Mapping’ button.
To map sender inputs from the eSign template to the CRM field you must specify the direction of the mapping process.
The Direction field under template mapping allows you to specify how the data should flow between Nintex eSign and Dynamics.

The Direction dropdown has three options:
-
From CRM: This option will present the data from a specific field in Dynamics to the signer.
-
To CRM: This will allow the signer to push data back to a specific field in Dynamics
-
Both (From CRM and then back to CRM): This option presents data to the signer and allows the signer to update the data back to Dynamics.
Depending on which option is selected for the Direction Dropdown, different subsequent fields will become available presented below the initial section.
Scroll down to the Dynamics 365 view.
First, select whether this input should be mapped to an entity other than the entity the template mapping is for. If you select no, your view has the following options:
-
Select Lookup Field: Toggle this on if the data is stored on an entity other than the entity mapped. Example: If Signer 1 Name is on Contact, but the template mapping is for the Account Entity.
-
Field Name: The name of the field stored on the entity the template mapping is also for.
-
Field data type: This field will change dynamically based on the field selected and is not editable.
-
Convert Option Set to text: Toggling this on converts an option set from numeric (0,1,2,3) to text (One, Two, Three).
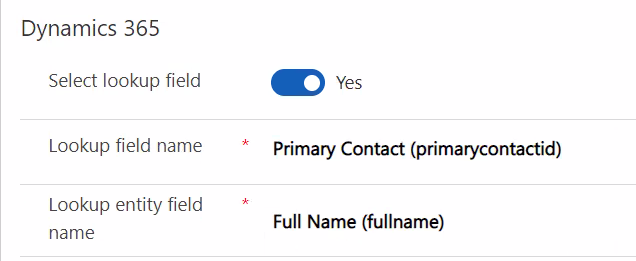
If you select yes, your view changes to include two additional fields, Lookup field name and Lookup entity field name:
-
Lookup field name: The name of the field on the entity that contains the lookup field.
-
Lookup entity field name: The name of the field on the original entity
Once these settings are configured, please review the section Configuring the Additional Template Mapping tabs.
When "To CRM" is Selected
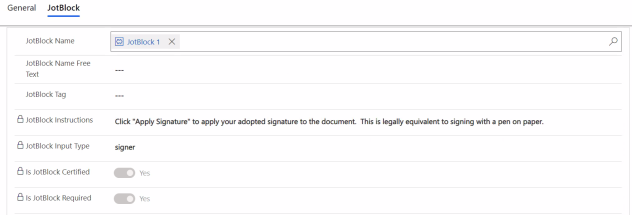
When "To CRM" is selected, a Jotblock tab will enable next to general. Please click on Jotblock next to General and select the Jotblock applicable for this mapping.
Once these settings are configured, please review the section Configuring the Additional Template Mapping tabs.
When "Both (From CRM and then back to CRM)" is Selected
Both the Sender Input and JotBlock tabs become enabled.
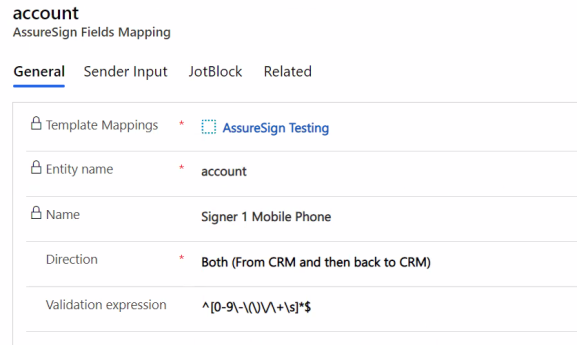
Follow the instructions for When "From CRM" is selected, and then the instructions for When "To CRM" is selected.
Once these settings are configured, please review the section Configuring the Additional Template Mapping tabs.
Configuring the Additional Template Mapping tabs
After the Direction options are configured, scroll back to the top of the view configure the additional settings for the template mapping:
-
The Assignment Tab
-
The Document Parameters Tab
-
The Envelope Parameters Tab
The Assignment tab
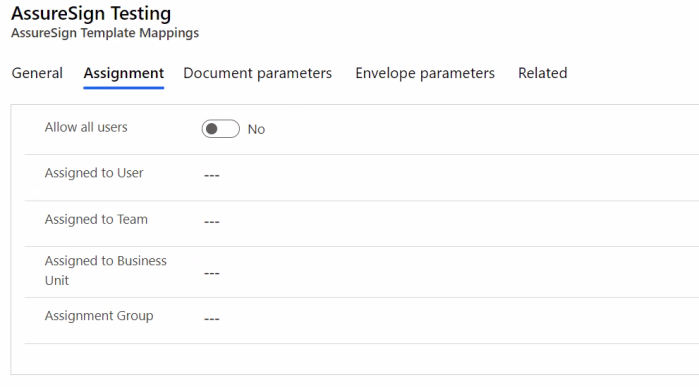
The Assignment tab specifies which users in your Dynamics organization have access to use the mapping.
-
Allow all users: Setting this to yes allows all users in your dynamic instance to use the mapping.
-
Assigned to User: Use this field to assign this template mapping to a specific user.
-
Assigned to Team: Use this field to assign this template mapping to a specific team
-
Assigned to Business Unit: Use this field to assign this template mapping to a specific business unit.
-
Assignment Group: Use this field to assign this template mapping to a specific group
The Document parameters tab
The Document parameters tab contains document specific settings.

-
Block adding manual Documents to sign: When enabled this prevents the originator from adding extra documents to sign in an envelope.
-
Allow removing Documents to sign: When enabled this allows the originator to delete documents before submitting the envelope.
-
Automatically add Documents to Sign: All files will be added automatically as documents to Sign.
-
Block adding manual Addendums: When enabled this prevents the originator from adding extra Addendums to the envelope.
-
Allow removing Addendums: When enabled this allows the originator to delete Addendums before submitting the envelope.
-
Automatically add Addendums: All files will be added automatically as addendums.
-
Automatically add notes from products: Enabling this automatically adds all files from Product Notes as Addendums.
-
Save received Documents to: This specifies where to save signed documents
-
Add date to file name: Enabling this will append the date to the file name when the document is downloaded
-
Add envelope unique id to file name: Enabling this will add the eSign envelope ID to the file name when the document is downloaded.
The Envelope parameters tab
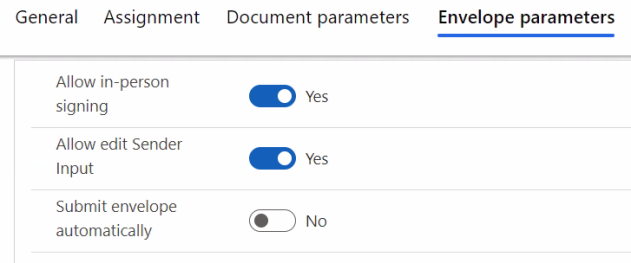
The Envelope parameters tab allows envelope specific settings to be modified.
-
Allow in-person signing: Generates a link to sign a document in-person. We refer to this process as immediate presentment.
-
Allow edit Sender Input: Allows the originator to edit sender input values for the envelope.
-
Submit envelope automatically: Submits the envelope automatically when it is selected. This can allow you to create a "1 click" send from the user interface, and this will allow you to use the template mapping to create automated process flows that submit envelopes.