Installation and Setup
Downloading the Solution
The Nintex eSign simple managed solution may be installed from the Microsoft AppSource portal here.
Installation
The steps for installing Nintex eSign simple solution are like installing any managed solution within Dynamics CRM.
If you are installing the solution directly outside of the appsource installation - for example if you have been provided the solution directly by Nintex eSign support - then you may follow these installation instructions:
-
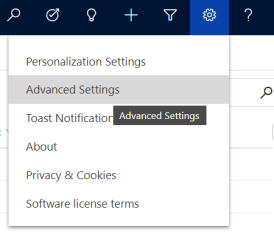
Using the unified interface with Dynamics CRM, click the setting gear on the ribbon and select Advanced Settings from the dropdown menu.

-
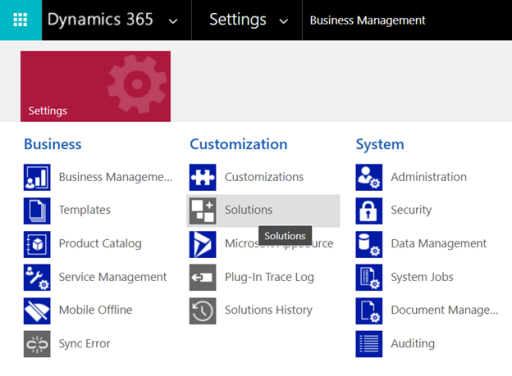
This will redirect you to another window within your browser. In the new window select Settings in the Dynamics CRM ribbon and select Solutions from the components under the Customization heading.

-
Next, you will need to import the solution using the Nintex eSign manage solution zip file. To import the solution, select Import from the function bar on the Solutions page.
-
This will pop up a window that will allow you to select the zip file and guide you through the wizard to the completion of the installation.
Nintex eSign Dynamics Simple Solution Configuration
Nintex eSign Simple Solution works with our V3 REST API methods. The V3 REST API methods are compatible with Simple Setup templates.
To configure the solution in Dynamics, you will need to complete the following steps:
-
Create an API User
-
Setup a Configuration user in Dynamics CRM Simple Solution
-
Create a Simple Setup Template
-
Setup Template Mapping for Nintex eSign dynamics Simple Solution
Creating an API User
To begin setting up a configuration user in your Dynamics CRM instance, you will need to ensure that you have created your API username and generated your API key. Please follow the steps here for creating API users.
Setup a Configuration user from Dynamics CRM Simple Solution
After the installation process, the configuration menu will display on the menu bar in your Dynamics instance. Select the Configurations option under the Nintex eSign Configurations section and create a new configuration.

Fill up the given fields on the Nintex eSign configuration:
-
Name: Provide any name that will best describe your configuration setting.
-
Fixed User Context: This is an optional field that is used to assign all Nintex eSign operations to a specific user. If you do not set this, extra configuration may be necessary if you create an application user for calling the Dynamics 365 eSign web hook.
-
Account Context ID: Enter your Nintex eSignaccount Context Identifier (found in eSign account settings).
-
Site URL: Enter the Nintex eSign site URL. This is the base URL for the eSign site you will be using. (found in eSign account settings).
-
Authorization URL: By default all authorization URL is https://account.assuresign.net/
-
API Username: Enter the API username for this configuration. To create an API Username reference here.
-
API Key: Provide the API key that was generated during the time of creating the API user. Create API user here
After filling in all the required fields, click save.
Next test the connection between Dynamics CRM and Nintex eSign by selecting the Test Connection button in the menu bar.
A successful connection message will display once the configuration is set up correctly.