Part 7: Package and Deploy
To move K2 applications between environments, the recommended method is to use the Package and Deployment tool. This tool essentially bundles all of the K2 artifacts into one package, allowing you to then deploy that package to another location. In Part 7, you will package the Sales Orders Application, then deploy it back to the same VM environment. (If you have access to a separate K2 environment, perform the tasks in Step 23 Option 2: Deploy the package to a new server as an alternative.
In this step, you will package the Sales Orders Application and save the package to your desktop.
Step 22 Tasks
- Launch the K2 Package and Deployment tool, then create a new package. (Start > All Programs > K2 blackpearl > K2 Package and Deployment)
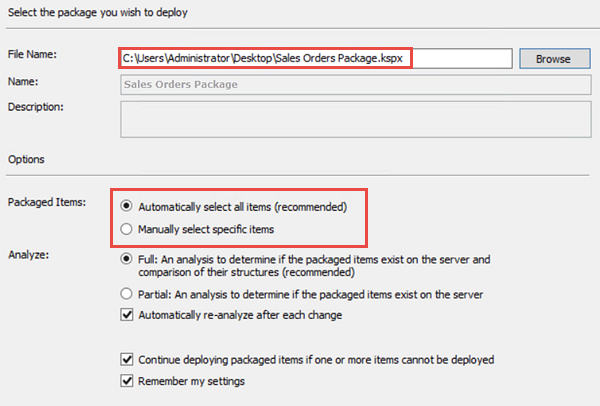
- Name the new package
Sales Orders Package
making sure you automatically include dependent items. Save the package to your desktop. (Depending on your K2 version, the option to automatically include dependent items may appear on the next screen.) - Add the Sales Orders Application artifacts:
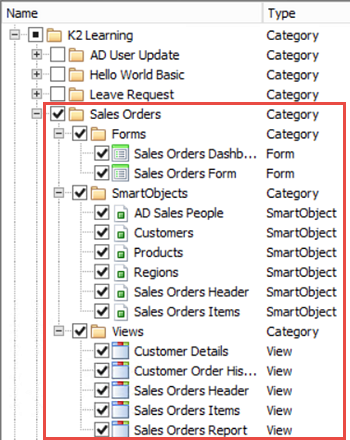
- Select the Forms, SmartObjects and Views categories from the K2 Learning > Sales Orders category. (Expand each category and confirm that all of the items for each category are selected as well.)
- Select the Sales Orders Process (the workflow) found under the Additional Items node.
- Confirm the Sales Orders Service Instance found under the Additional Items > Service Instances node is selected.
- Confirm the Active Directory Service2 Service Instance found under the Additional Items > Services Instances node is selected.
Finish the packaging process.
- Launch the K2 Package and Deployment tool. (Start > All Programs > K2 blackpearl > K2 Package and Deployment)
- In the upper right side of your screen, in the Actions pane, click Create New Package.
- The Create Package screen launches. For the Package Name, enter
Sales Orders Package
then for location, use the Browse... option and select Desktop. Click OK. (If you are building this application in your own environment, the user name shown in the image (Denallix Administrator) will not be the same as your screen.) - Confirm the option to Automatically include dependent items is CHECKED. (Depending on your version of K2, the Automatically include dependent items checkbox may or may not be displayed on this screen.) Click Next when ready.
- On the Add items to the package screen, click Add Item. Navigate to the K2 Learning > Sales Orders category. Expand all the Forms, SmartObjects and Views categories so that you can see all of the artifacts listed under each category. CHECK the box next to the Sales Orders category. (This should automatically select all of the individual items as well. If it does not, go back and check any items that need to be included.) (Do not click OK just yet.)
- Scroll down until you reach the Additional Items (Uncategorized) node. Locate and CHECK the box for the Sales Orders\Sales Orders Process (workflow).
- Expand the Service Instances node (also under the Additional Items node). Locate and confirm that the Active Directory Service2 Service Instance is CHECKED, as well as the Sales Orders Service Instance. If they are not selected, CHECK both of them now. (Depending on your version of K2, the Automatically include dependent items checkbox may or may not be displayed at the bottom of this screen.)
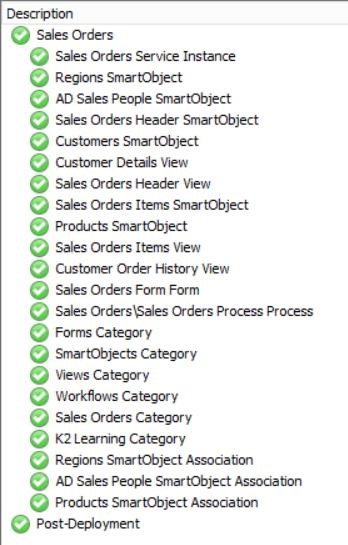
- The next step is for K2 to compile and compress all of the K2 artifacts that we've selected. You are likely to see an spinning icon that indicates K2 is processing the package. When the icon stops spinning, you will see all of the artifacts we've selected for your package (plus a few others that K2 automatically added). Click Finish to complete the process.
- Exit the Package and Deployment tool. Confirm that your Sales Orders Package zip file is saved to your desktop.


Because you built your workflow using K2 Studio, it is not included in the K2 Designer Categories, so you need to include it.

Recall in Part 1: Data, you created a SmartObject (AD Sales People) based off of the Active Directory Service2 Service Instance. Then, you created a new Service Instance of the SQL Server Service Instance, from which you created your Customers, Products and Regions SmartObjects. You need to include these Service Instances so that your SmartObject connections will deploy with the correct connection strings (brokers). When you have all of the artifacts selected, click OK.


STEP 22 REVIEW
In this step, you packaged the K2 artifacts necessary to deploy your Sales Orders Application to another location. The Package and Deployment wizard allows us to conveniently select the components you need for your package. In addition to selecting the K2 Designer artifacts, (the items found under the forms, SmartObjects and Views categories) you also selected the Sales Orders Process (which is the workflow you built using K2 Studio) and the two Service Instances (Active Directory Service2 and Sales Orders (SQL Server)) that are required for your custom SmartObject connections.
In the next step, you will deploy your package.
In this step, you will deploy the Sales Orders Package back to the current environment you are working in. Deploying a solution adds the solution artifacts (Forms, Data, Workflow and underlying configurations, etc.) so that they are published and ready for use in the target environment.
If you want to deploy the package to an environment other than the one that it was created in, follow the steps in Step 23 Option 2: Deploy the package to a different environment instead.
Step 23 Option 1 Tasks
- Open the Sales Orders Package using the K2 Package and Deployment tool.
- Change the Views Actions so that a New Version of the View is created.
- Finish the deployment.
- Double-click the Sales Orders Package zip file located on your desktop. The K2 Package and Deployment tool will launch with the Select Package screen open.
- For your tutorial, let's assume you want to replace the existing views with the views contained in this package. To do this, right-click each of the views and select 'Create New Version of View'. Click Next after you have changed the Action for each of the views.
- You will see a deployment process screen. Wait until the process has completed. If all of the status indicators are green, you have successfully deployed the Sales Orders Package! Click Finish. Exit the Package and Deployment screens.
Change the option for the Packaged Items from 'Manually select specific items' to 'Automatically select all items'. Leave the remaining default settings as they are and click Next.


K2 will now analyze the package.
When the analysis has completed, notice how K2 has identified the objects as already existing in the target environment. This is because you are deploying the package back to the same server. By default, K2 will use the existing objects where applicable.


STEP 23 OPTION 1 REVIEW
In this Step, you deployed the Sales Orders Package back to the same server. Because you deployed to the same environment, K2 did not create any new artifacts, but instead created new versions of artifacts where you selected to do so. In the real world, you would probably not deploy packages back to the same environment. But if you don't have separate environments to work with, this provides a nice opportunity to use the Package and Deployment tool.
This concludes the Sales Orders SmartForms tutorial!
In Step 23 Option 2, you will deploy the Sales Orders Package to a new server and configure the password for the Sales Orders Service Instance as part of the deployment configuration.
If you want to deploy the package to the same environment that it was created in, follow the steps in Step 23 Option 1: Deploy the package to the same environment instead
Step 23 Option 2 Tasks
- Open the Sales Orders Package using the Package and Deployment tool.
- Configure the Sales Orders Service Instance Password as
K2LearningPass
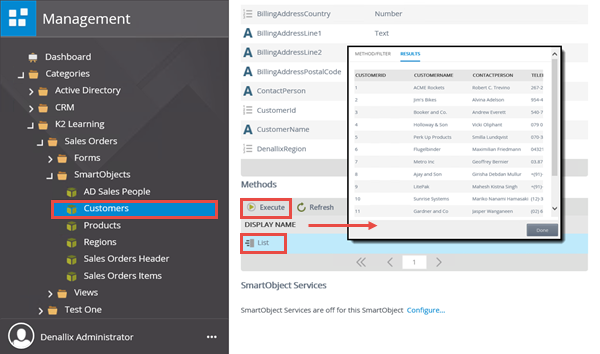
then complete the package deployment. - Test the SmartObject by executing the Customers SmartObject. You will find teh Customers SmartObject in the K2 Management site Categories > K2 Learning > Sales Orders > SmartObjects. (Double-click the Customers SmartObject, then use the Execute button found in the Methods section in the central pane.)


- Launch the K2 Package and Deployment tool. (Start > All Programs > K2 blackpearl > K2 Package and Deployment)
- Select Deploy Package found in the Actions page in upper right side of your screen. Browse to and select the Sales Orders Package solution that you saved to your desktop.

- Confirm that the option to Automatically select all items is selected for the Packaged Items value. Click Next when ready.
- When the analysis has completed, scroll down and find the Additional Items category. Locate, then right-click, the Sales Orders Service Instance and select Configure. (You will know the analysis has completed when the Next button becomes active.)
- Notice there is a detail for the UserName and Password. The Password value is blank. Double-click the Password line to open the Edit Value screen. Enter
K2LearningPass
as the password value. Click OK. - Click OK and then Next to continue with the deployment process. You will see a deployment process screen. Wait until the process has completed and if all of the status indicators are green, select Finish. Exit the Package and Deployment tool. (The deployment process may take a few minutes depending on your environment.)
- Open the K2 Management site if it is not already open
(Start > All Programs > K2 blackpearl > K2 Management) - Expand the Integration node, then click on Service Instances. Locate the Sales Orders service instance in the central pane. (You may need to navigate to the second page if you have a large number of service instances.) Click to highlight the Sales Orders service instance, then click the Refresh Service Instance button in the toolbar.
- Still in the K2 Management site, expand the Categories node, then navigate to the Sales Orders SmartObjects located in K2 Learning > Sales Orders > SmartObjects. Double-click the Customers SmartObject.
- The Customers SmartObject details will be displayed in the central pane. Scroll down until you see the Methods section. Click to highlight the List method, then click the Execute button. The method filter screen will open. You don't need to filter the results, so click the Execute button once again. You should see results returned, indicating your connection string is configured properly.

K2 will now analyze the package.
Recall once again the Sales Orders Service Instance that you created in Part 1: Data. This Service Instance provides a connection to an external SQL Database (for your Customers, Products and Regions SmartObjects). Recall during the configuration of this Service Instance, you provided a user name and password that was required to connect to this external data source. In the next step, you are going to edit the Sales Orders Service Instance (before you deploy the package) and add the password. This will eliminate errors later on, where K2 searches for, but cannot find, the user credentials for this Service Instance.


In this next step, you will refresh the Service Instance. Because you made a change to the connection string for the K2Learning database (you added the password), you need to refresh the Service Instance for the SmartObject that was created based on that connection. You will return to the K2 Management site for this step.

Now, you should test the SmartObject to confirm that the service instance was created successfully. To test your SmartObject, you will execute it from the K2 Management site.

Once you confirm the connection is working, you are ready to use your deployed solution!
STEP 23 OPTION 2 REVIEW
In the step, you deployed the Sales Orders Package to a separate environment from which is was created. Because not all credentials are passed through using the Package and Deployment tool, you took a few extra steps to configure the password manually before deploying the package. Had you not made this configuration, you would likely receive errors upon launching any of the K2 artifacts that need to communicate with this particular SmartObject (Forms, Views, etc.) You can also use the SmartObject Service Tester to re-run the setup wizard and makes these changes as well. However, by setting the password in the deployment tool, a nice, clean installation is conducted for your package.
This concludes the Sales Orders SmartForms tutorial!