Part 1: Data
Part 1 of this tutorial will extend your knowledge of K2 SmartObjects and how you can define SmartObjects that interact with other systems. SmartObjects are essentially a "middle layer" or "connector" that allows consumers of data (such as forms and workflows) to interact with providers of data (such as SQL databases, Active Directory or SharePoint, among others).
In this part, you will extend the Leave Request SmartObject by adding a field to store approver comments. You will also create a new SmartObject (along with the underlying configuration) to connect to a SQL database. The results returned will be a list of leave types that will automatically populate the Leave Type drop-down list.
This step will demonstrate how you can add additional properties to existing SmartBox SmartObjects. You will add the Approver Comments property to the Leave Request SmartObject. (Later on, you will add this field to the Leave Request item view).
Step 1 Tasks
- In K2 Designer, edit the Leave Request SmartObject and add a Memo type property called
Approver Comments
- Launch K2 Designer (Start Button > All Programs > K2 blackpearl > K2 smartforms > K2 Designer).
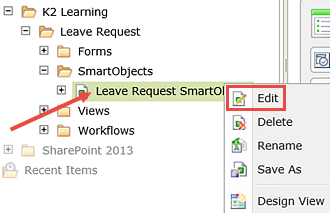
- Expand the All Items > K2 Learning > Leave Request > SmartObjects categories. Right-click the Leave Request SmartObject and select Edit.
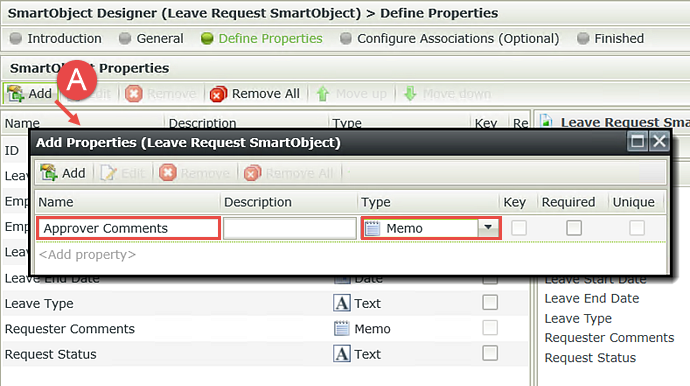
- On the SmartObject Properties screen, click Add. (A below) For the Name, enter
Approver Comments
then select the Memo option from the data Type drop-down. Click OK, then click Finish to save the SmartObject edit.
STEP 1 REVIEW
In this step, you added a new property to the Leave Request SmartBox SmartObject to hold the approver's comments. Adding a new property to a SmartBox is reflected as soon as you finish the designer, meaning the new property is ready for use in the Leave Request item view that is based off of the SmartBox SmartObject.
In Step 2, you will create a connection called a "service instance" to an external SQL database, then generate a SmartObject for a specific table in that database (leave types). The data from the leave types table will be used to automatically populate the Leave Type drop-down list in the Leave Request item view.
Step 2 Tasks
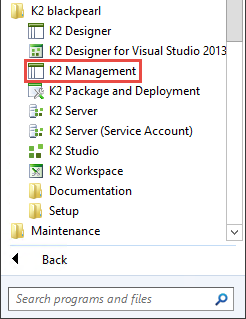
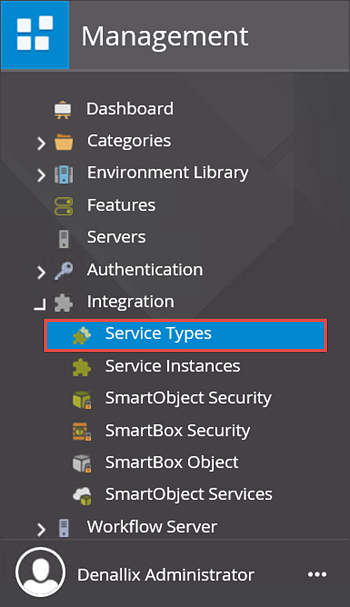
- Launch the K2 Management site. (Start > All Programs > K2 blackpearl > K2 Management)
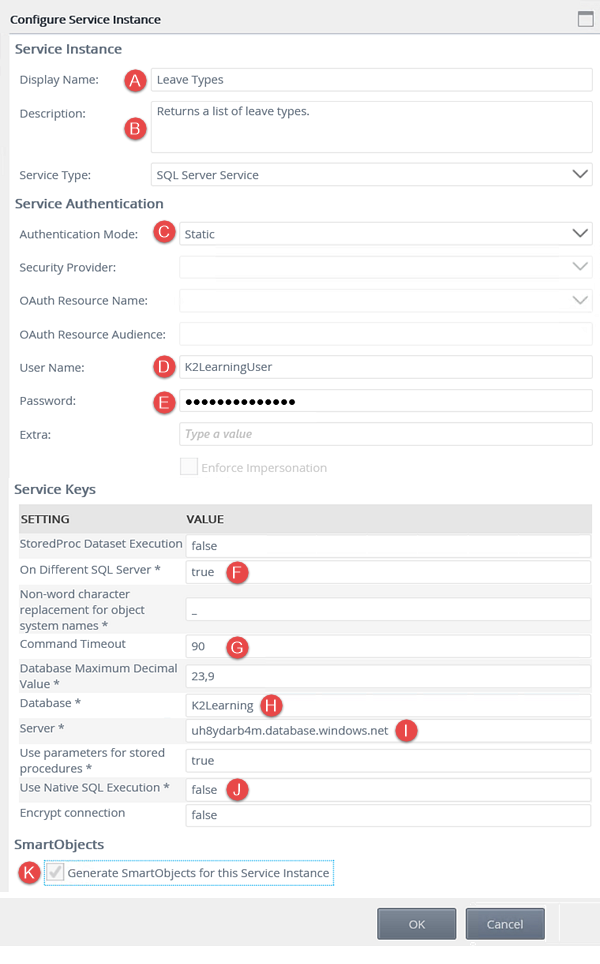
- Add a new service instance of the SQL Server Service Type using the table below as a guide for the necessary properties. If a property is not shown in the table below, then assume the default value.
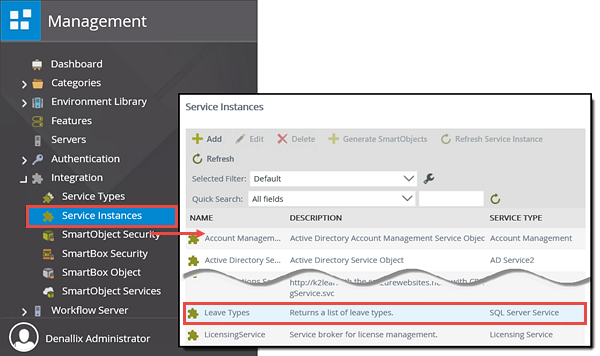
- Confirm the new Leave Types service instance is displayed in the Service Instances pane.
| Field Name | Setting | |
|---|---|---|
| A | Display Name | Leave Types |
| B | Description | Returns a list of leave types. |
| Service Type | SQL Server Service (default) | |
| C | Authentication Mode | Static |
| D | User Name |
K2LearningUser
|
| E | Password | K2LearningPass |
| F | On Different SQL Server | true |
| G | Command Timeout | 90 |
| H | Database | K2Learning
|
| I | Server | uh8ydarb4m.database.windows.net |
| J | Use Native SQL Execution | false |
| K | Generate SmartObjects for this Service Instance | CHECKED |
- Launch the K2 Management site. (Start > All Programs > K2 blackpearl > K2 Management)
- Expand the Integration category, then click Service Types.
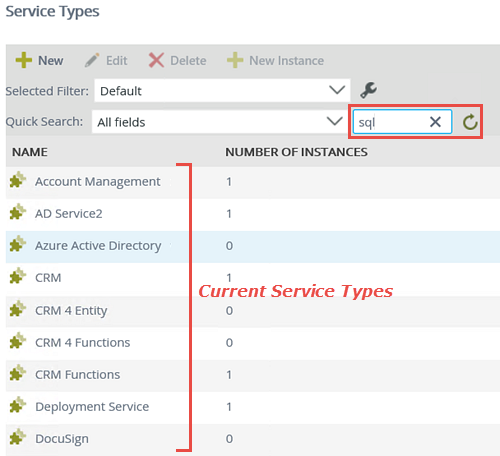
- The available service types are displayed in the central Service Types pane. You will be adding a service instance of the SQL Server Service Type for this step. To help you locate the correct service type, enter
sql
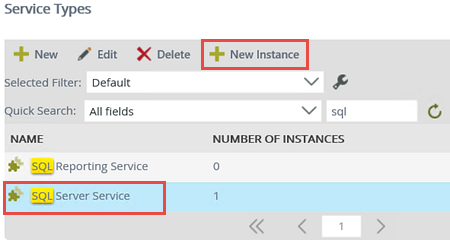
into the search text box, then click the green refresh icon. - At least two service types for SQL are returned: SQL Reporting Service and SQL Server Service. (There may be additional service types depending on your environment.) Click to highlight SQL Server Service, then click the New Instance button.
- Use the table below as a guide for configuring the service instance. For additional reference, see the image below the table. Click OK after you have set the fields.
- You should see a confirmation dialog box. Click OK to close the dialog box.
- Still in the Integration node, click Service Instances. Scroll down and locate the Leave Types service instance. Notice the name, description and service type correspond to your configuration settings.
| Field Name | Setting | |
|---|---|---|
| A | Display Name | Leave Types |
| B | Description | Returns a list of leave types. |
| Service Type | SQL Server Service (default) | |
| C | Authentication Mode | Static |
| D | User Name |
K2LearningUser
|
| E | Password | K2LearningPass |
| F | On Different SQL Server | true |
| G | Command Timeout | 90 |
| H | Database | K2Learning
|
| I | Server | uh8ydarb4m.database.windows.net |
| J | Use Native SQL Execution | false |
| K | Generate SmartObjects for this Service Instance | CHECKED |

Take a moment to locate the new service instance you just created using the following steps.
STEP 2 REVIEW
In Step 2 you created a new service instance based on the SQL Server Service Type. The new service instance contains connection settings that are specific to an external SQL database. As part of the configuration, you selected the option for K2 to automatically generate SmartObjects for the data objects that were discovered. In the next step, you will test the SmartObject, then rename it and move it to the appropriate Leave Request category.
Before you use the new SmartObject in your item view, you will test it to confirm the connection configuration. Then, just to keep your environment organized, you will rename the SmartObject and move it to the Leave Request > SmartObjects category that was created in the basic tutorial.
Step 3 Tasks
- Expand the Categories node, then the SQL Server Service node. Locate the [HumanResources].[LeaveType] table under the Leave Types Service Instance, then execute the List method. Confirm results are returned with two properties shown: LeaveTypeid and LeaveTypeDescription.
- Click the Design link to edit the SmartObject. Rename the SmartObject to
Leave Types
then move the Leave Types SmartObject to the K2 Learning > Leave Request > SmartObjects category.
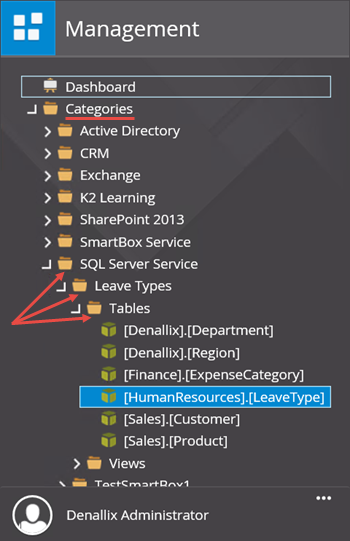
- Expand the Categories node, then expand the SQL Server Service node. Notice the Leave Types SmartObject. Expand Leave Types, then Tables. There are six tables discovered with this SmartObject.
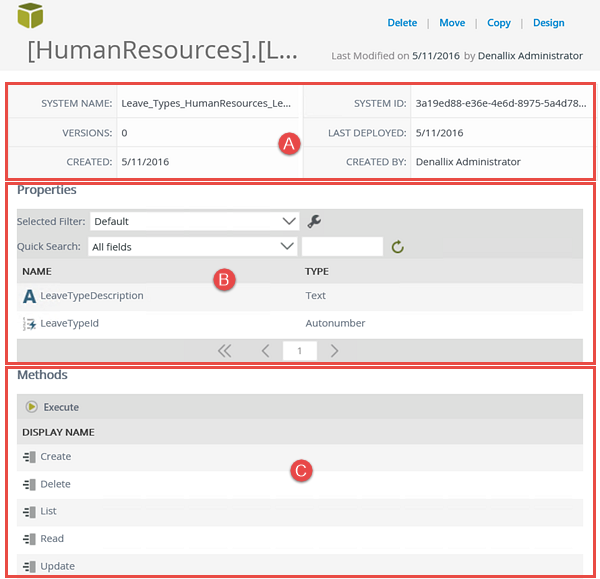
- Double-dlick the [HumanResources].[LeaveType] table to expose the properties and methods in the central pane. Take a minute to review the following sections:
- A: Displays the system details such as the system name, date created and created by values.
- B: Displays the properties: LeaveTypeDescription and LeaveTypeid (think spreadsheet column titles).
- C: Displays the methods for this table. You will use the List method to return a list of leave types for the Leave Type drop-down list on the item view.
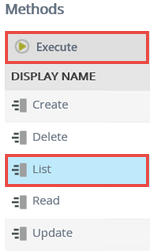
- In the Methods pane, click to highlight the List method, then click Execute.
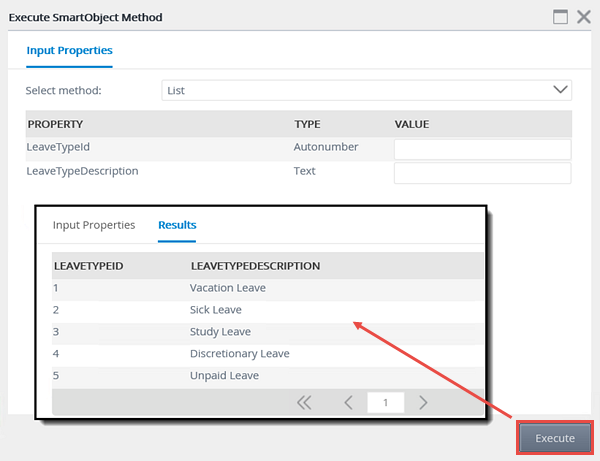
- There are no input properties for this test, so click Execute. The Results pane will appear with the values from the [HumanResources].[LeaveType] table. This confirms the external SQL database connection is correct. Exit the Execute SmartObject Method screen.
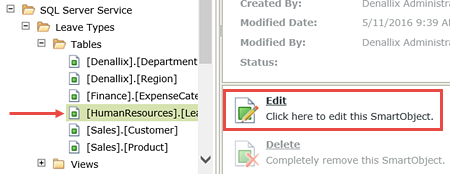
- Click to highlight the [HumanResources].[LeaveType] table to expose its properties (if they are not already). Click the Design link in the upper right corner of the screen.
- You will be redirected to the K2 Designer. (The K2 Designer will open in a new tab on your browser.) Confirm the [HumanResources].[LeaveType] table is highlighted, then click Edit.
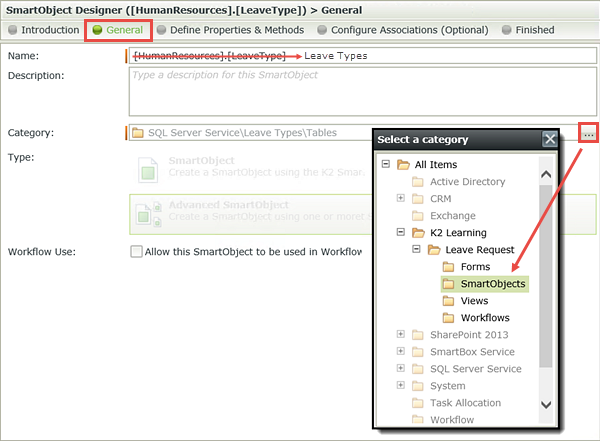
- Switch to the General settings screen. Change the Name of the SmartObject to
Leave Types
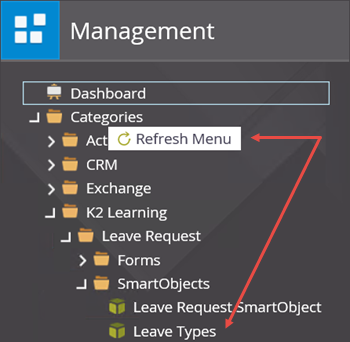
then change the Category to the K2 Learning/Leave Request/SmartObjects category. (Your category names may be different if you chose different names in the basic tutorial.) There are no other edits to this screen, so click Finish to republish the SmartObject. - Switch back to the Management site tab in your browser. Right-click the Categories name and select Refresh Menu. Expand the K2 Learning > Leave Request > SmartObjects categories and confirm the Leave Types SmartObject is shown. Notice too, that the Leave Request SmartObject also appears in Management site menu. This is the SmartBox that you created in the basic tutorial.

Next, you will test the SmartObject connection by executing the List method.
The last step in this series is to rename, then move the new SmartObject to the Leave Request category that you created using K2 Designer in the basic tutorial. This will keep all of your K2 artifacts organized and easy to locate as you move through the next steps.

STEP 3 REVIEW
In this step you confirmed the service instance configuration is working correctly by executing the SmartObject list method. The results returned are the values that are found in the external database (leave type) table. The leave type values will be used to automate the Leave Type drop-down list on the item view. You concluded this step by renaming the SmartObject to a more friendly name, then moving the SmartObject to the appropriate category.
This concludes the data changes you will make for this new version of the Leave Request application. In Part 2: Forms, you will edit the item view and add the two new data sources just created: Approver Comments and Leave Types.