Leave Request Approval (V1 or "Basic" version)
This tutorial explains how to build a simple Leave Request Approval application, using K2 Designer to build an application with Data (SmartObjects), Forms (SmartForms) and Workflow elements. The tutorial is intended for users new to K2, or with little K2 experience.
This tutorial can be completed in any environment that has K2 version 4.6.9 or later installed. K2-delivered training events normally include access to a Virtual Server environment provided by K2 which you will use for the exercises. The screenshots and users used in the tutorial reflect this K2-provided virtual environment. You can, however, complete this tutorial in any other environment as long as the necessary K2 components are installed and operational. You must also have the necessary rights and permissions to create the K2 artifacts in the target environment.
Some tutorials require that you have internet access to be able to connect to an external SQL database used for retrieving data. Those tutorials contain expanded information on internet connection requirements.
Leave Request Approval Application Overview
K2 applications consist of four main components: Data, Forms, Workflows and Reports. This tutorial is intended to give you an entry-level understanding of the Data, Forms and Workflow components and how these work together to build a K2 application. For this particular application, we will use a SmartBox-based SmartObject as the Data component, a K2 smartforms-based Form as the Form component and a simple, single-approval workflow. All the components in this application will be designed using K2's browser-based K2 Designer tool.
Understanding the Main Components of K2
The following is an overview of each component and how they integrate with each other to form a complete K2 Application.
Data represents information that could reside in a variety of sources including SharePoint lists, Active Directory, SQL Server, CRM, SAP and other systems. K2 interacts with these data sources primarily through a technology called SmartObjects. SmartObjects are the connections made to the data sources and the data source properties and methods that are returned through those connections.
Forms represent the User Interfaces that people use to capture and view information and potentially start a workflow or complete tasks during a workflow. For this Application, we will use a technology called SmartForms, which allow you to easily create User Interfaces incorporating SmartObjects, Controls, Rules and Workflow integration. (With K2, you can also use other Forms technologies such as web-based forms and InfoPath, among others. You are not limited to only SmartForms.)
Workflows provide the mechanism for moving data along in a logical sequence of events and tasks.
Reports are automatically available and generally use K2 Workspace as the Report and Administer tool for K2 Applications. You can also create dashboard-style Reports using reporting controls found in K2 Designer. (This application will not feature any custom reporting components.)
Designing K2 Applications
Before starting to build an application, it is important to perform some preliminary design to decide exactly what we need our application to accomplish. If your application has a workflow component, a good place to start is to create a flowchart to determine what tasks need to take place and who (or what) will be performing them. Following that, design the Forms (User Interfaces) to determine what data is needed for the users to complete their work. Finally, design the Data elements for the application based on what you discovered during the Workflow and Forms design stages.
Leave Request Workflow
The key to a successful workflow is to completely understand the steps of the process. What are the steps necessary to accomplish our workflow goal? Who (or what) will be performing these steps and what happens during the step?
A very good approach for this is to map the workflow as a flowchart on paper or using any number of software tools. The flowchart below was created with Visio, but you can use any method, even paper and pencil. What is important is to determine the steps in the workflow, how those steps are connected and what happens during those steps.
Below is an example of a workflow design for the basic version of the Leave Request Approval application. This flowchart represents a swim-lane format, where we have separated the User Tasks and System Tasks into separate lanes.
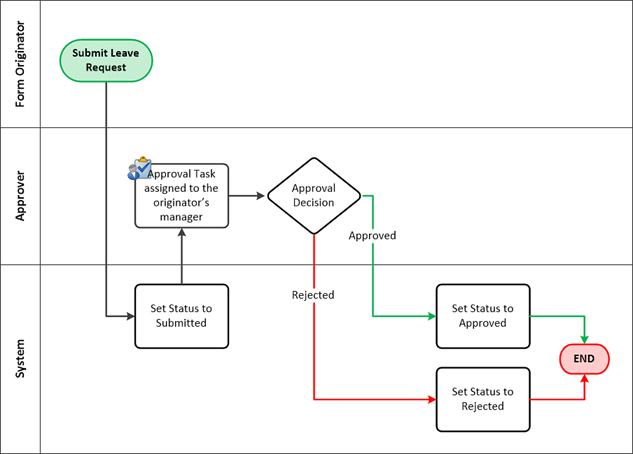
There are two swim-lanes for User Tasks. The first is the Form Originator, or the person submitting the form for the first time. The second swim-lane represents the Approver lane, in our case this will be the form originator's manager. The third lane represents System Tasks, or tasks that K2 will manage behind-the-scenes.
Notice that along the way, the workflow may move from one lane to another lane. K2 seamlessly interacts with both human and system components.
K2 Workflow concepts: Process, Workflow, Steps and Events
When working with K2 workflows, a basic understanding of some terms and definitions will be valuable. A Process or Workflow is a container for all of the steps that make up a workflow. These Steps contain Events that define the actual work to be performed, which in turn might be performed by the K2 Server (System steps) or a human (Client steps).
The diagram below shows the eventual implementation of the workflow design, along with the specific K2 terms highlighted. 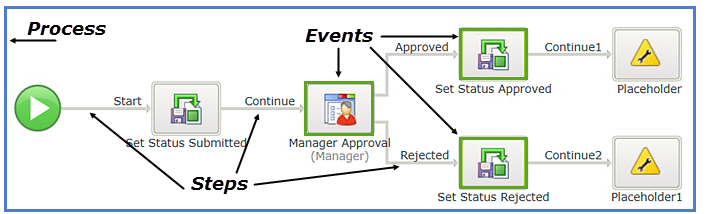
Leave Request Forms
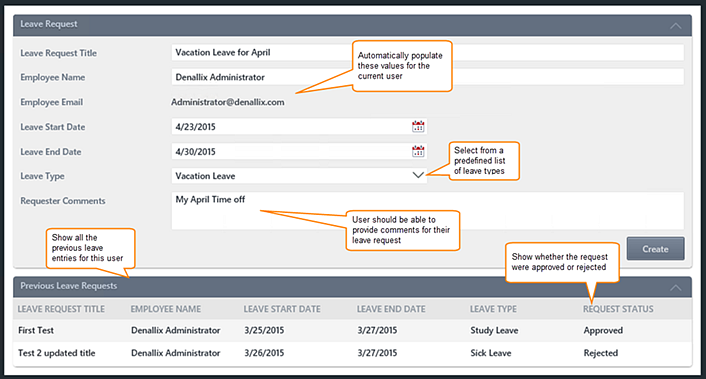
Once you have the workflow design, the next step is to design the Forms ("user interfaces") that will be used in each step where users will interact with the workflow. In this application, there are two user steps: the first is when the workflow is Started, the second is when the manager needs to approve the leave request.
As with designing the workflow, you can use any tool you like to design the Forms, even pen and paper. The most important part is to determine what values/fields should show on the Form to allow users to complete their tasks, and whether there are any particular validation (e.g. what fields may be required) and behavioral (e.g. what happens when the user clicks a button) requirements. The image below is a sample of what a screen design might look like.
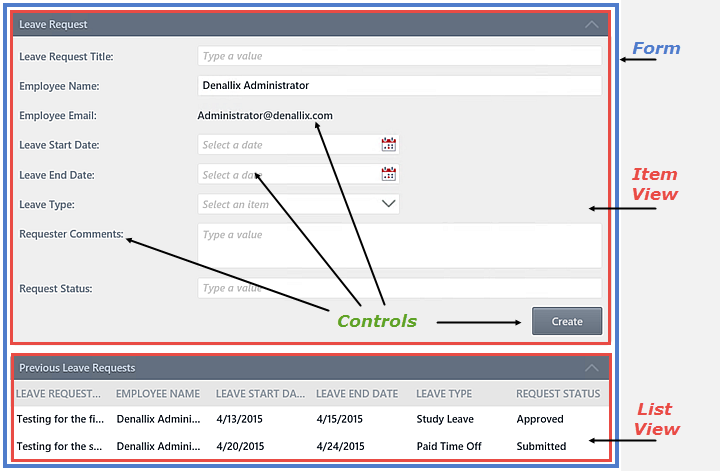
SmartForms Concepts: Forms, Views, Controls, Rules and States
For this simple application we will use two K2 smartforms. SmartForms are browser-based forms, allowing the user to access and submit the form without any additional client-side software installed on their computer. You don't HAVE to use SmartForms for K2 applications: you are free to use a number of different technologies. SmartForms however, provide easy and seamless integration between Data, Forms and Workflows and are the recommended approach for building applications quickly. To better understand how SmartForms are used, it is important to understand a few basic concepts.
Forms
A form is the main container for all of the form related elements. Typically, a form will contain one or more views and controls. Forms can also have rules applied to them. A form is the "web page" that is exposed to users.
Views
Views are parts of a form broken down into logical sections. There are two types of views: Item Views and List Views. Item Views contain the content from one record. List Views contain the content from multiple records, often displayed as rows of data.
Controls
Controls are all of the bits and pieces that make up views and forms. They include form fields, labels, (submit) buttons, images, etc.
Rules
Rules contain Events, Conditions and Actions. An event is when something occurs (such as a button clicked). A condition checks to see if some criteria has been met (such as required form fields) and an action says do something if the event and conditions are met (such as start the workflow). Rules provide dynamic functionality to your form.
States
A State is just a value that determines how the Form should behave. For example, a Form may have a Read-Only state where rules will disable the Form for any input. Or it may have a "Workflow Task" state which indicates that the Form is being used to complete a workflow task and therefore needs some workflow integration actions.
The image below explains some of these SmartForms concepts in terms of the Leave Request form:
Leave Request Data
Once we have our Workflow and Forms laid out and know what data we need to collect, we can plan our data sources. Some questions to answer during this design stage are whether there is an existing system that can store the data, or whether we need to create a new data store. Are there form fields that can be populated from data sources already in existence, for example drop-down lists or search boxes? In this particular application we will assume there is no existing data source that can store Leave Request details, so we will be creating our own data storage area from scratch. To keep things simple, we will leverage K2's built-in storage area called "SmartBox" so that we do not have to create the underlying database ourselves.
When designing the Data sources, try to identify the logical "objects" in the application, and then define the properties for these objects. In this sample application there is only one logical "object", the Leave Request itself. We used a table like this to describe the properties of this Leave Request object:
Leave Request Data Design
| Name | Data Type | Notes |
|---|---|---|
| Leave Request Title | Text | Allows the user to enter a unique title for their leave request |
| Employee Name | Text | The name of the employee who submitted the leave request |
| Employee Email | Text | The email of the employee who submitted the leave request |
| Leave Start Date | Date | The date on which the leave is due to start |
| Leave End Date | Date | The date on which the leave is due to end |
| Leave Type | Text | The type of leave. To keep the data clean, we want users to select from a predefined list of leave types. |
| Requester Comments | Long Text | Allow the requester to add comments about their leave request |
| Request Status | Text | The workflow will update the status of the leave request as the request progresses (e.g. Submitted-Approved-Rejected) |
Building the application
Now that you have designs for each of the elements of the application, you can start building them. In most cases, building the application goes in the reverse order from designing it: start with the Data elements, then do the Forms elements and finally the Workflow elements.
When you are ready to start building the Leave Request Approval application, continue on to the Building the Leave Request Application (V1 or "Basic" Version) section.