Part 1: Data
This exercise will introduce you to K2 SmartObjects and how you can define SmartObjects that interact with other systems such as Active Directory. Remember that SmartObjects are essentially a middle layer that allows consumers of data (such as forms and workflows) to interact with providers of data (such as SQL Databases, Active Directory or SharePoint, among others).
In Step 1 of this part, you will create the categories (think folders) used to store the elements of your application, and in Step 2, you will create an advanced SmartObject using K2 Designer.
In this part, you will learn:
- Using the category system
- How to create an advanced-mode SmartObject that connects to Active Directory
The first step in your application is to create the categories that will house your forms, views, SmartObjects and workflows. You can think of categories as folders. While it is not necessary to group elements into folders like you do here, it does help to keep the similar elements together, especially for larger applications that may contain several SmartObjects, views, forms and workflows.
User Name: Denallix\Administrator
Password: K2pass!
Step 1 Tasks
- Launch K2 Designer. If you did not complete the Hello World (Basic) application, create a new category under All Items called
K2 Learning
(Skip to Step 2 if the K2 Learning category exists.) - Create a new category under K2 Learning called
AD User Update
then create four additional categories under AD User Update and name them
Forms
SmartObjects
Views
Workflows
- Launch K2 Designer (Start > All Programs > K2 blackpearl > K2 Designer).
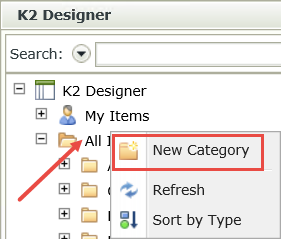
(If you do not see K2 Designer in your start menu, contact your K2 administrator to obtain the designer URL.) - If the K2 Learning category does not already exist, create a new category under All Items for all of your projects. Right-click All Items and select New Category. Name the new category
K2 Learning - Create a new category under K2 Learning and name it
AD User Update - Create four new categories under AD User Update and name them
Forms
SmartObjects
Views
Workflows - Your category folders should look like the image below when you are done. (If you did not complete the Hello World (Basic) application, you will not have the Hello World category. It is not needed for this lab.)
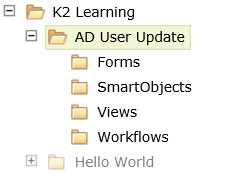
In this step, you will create an Advanced SmartObject and connect it to Active Directory. You will add two Active Directory methods to your SmartObject. The first method (GetUsers) will return a list of all Active Directory accounts. The second method (GetUserDetails) will return the account details for one Active Directory account that you select from the list.
Step 2 Tasks
- Create a new SmartObject based off the Active Directory Service2 ServiceObject. Name it
AD User - Add a GetUsers method to the AD User SmartObject and name it
AD GetUser - On the Default ServiceObject method bindings screen, Create All the Input and Return properties.
- Add a second method, GetUserDetails and name it
AD GetUser Detail - Auto-map the Default ServiceObject method binding.
- Assign the UserName Input property to the Name SmartObject property to associate the SmartObject property with the Active Directory property.
- Finish the SmartObject designer to publish the SmartObject

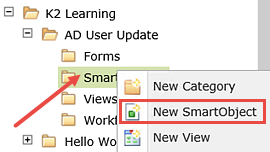
- In K2 Designer, right-click the SmartObjects category and select New SmartObject.
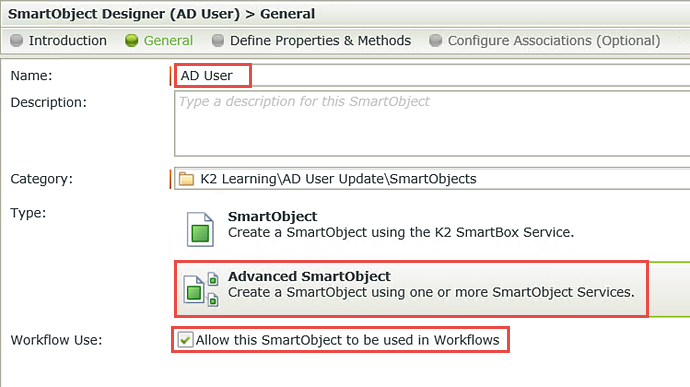
- On the SmartObjects home screen, click Next. On the General screen, Name the SmartObject
AD User
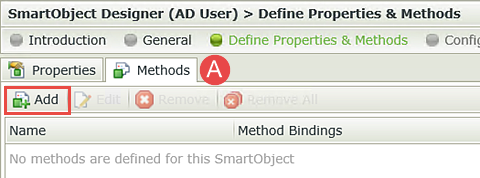
then select the Advanced SmartObject option for the Type and CHECK the box to Allow this SmartObject to be used in Workflows. Click Next to continue. - On the Define Properties & Methods screen, click the Methods tab then click Add.
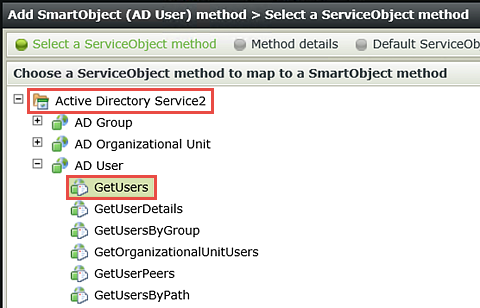
- On the Select a ServiceObject method screen, expand the Active Directory Service2 node, then the AD User service instance, then select the GetUsers method. Click Next.
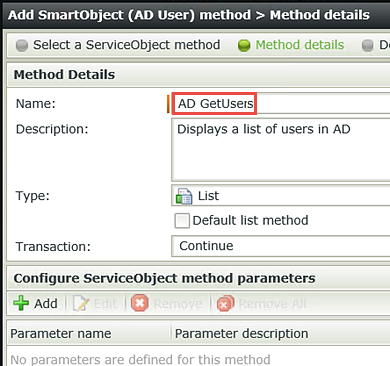
- On the Methods details screen, Name the method
AD GetUsers
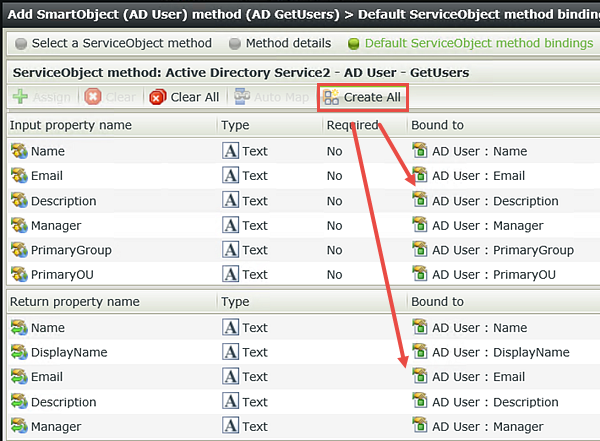
Notice that the default Type for this method is List. This method will list the accounts in Active Directory. There are no parameters to configure, so click Next. - On the Default ServiceObject method bindings screen, click Create All. K2 will automatically create the Input and Return Properties. Click Next to continue.
- There are no ServiceObject method bindings changes, so click Next, then Finish. Your screen should look like the image below.
- With the Methods tab still selected, click Add. Expand the Active Directory Service2 node, then the AD User Service Instance until you can select GetUserDetails. Click Next to continue.
- On the Methods details screen, Name the new method
AD GetUser Detail
There are no changes to the method parameter settings, so click Next. - On the Default ServiceObject method bindings screen, click Auto Map.
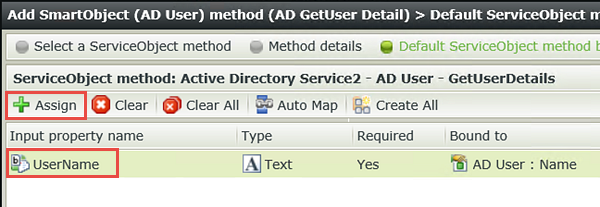
- Highlight the Input property name UserName and click Assign. Select Name from the SmartObject property drop-down list and click OK. Click Next, then Finish.
- Now you need to publish the new SmartObject to the K2 environment. Click the Finish button to complete the SmartObject designer, which will publish the SmartObject to the K2 environment.
The first method you are going to define (connect to) will be the GetUsers method, which will output all of the Active Directory accounts to a List View that you will create in a later step.

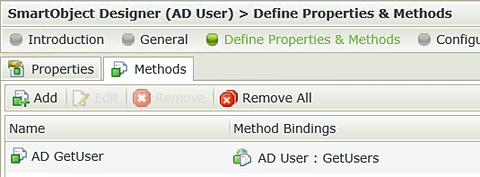
The second method you are going to define will be the GetUserDetails method, which will output the details for a single Active Directory account. You will use this method in a later step for viewing the details and updating the Active Directory account.
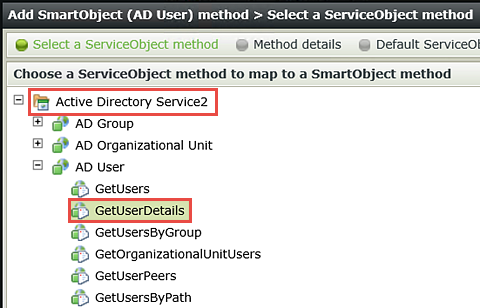
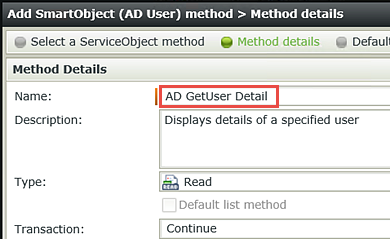
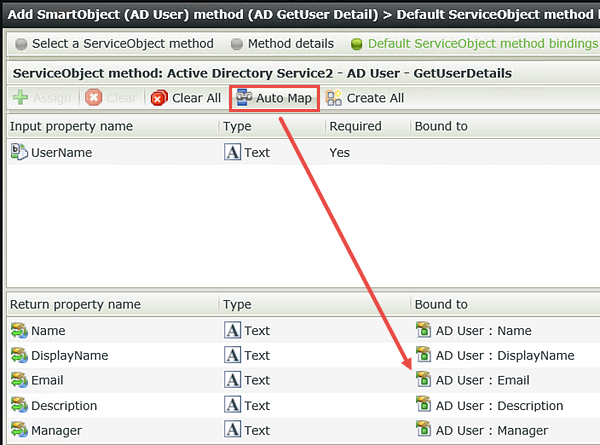
After an account in the list has been clicked, you need some way to match that account (from the list view) with its details from Active Directory. You will do this by associating the UserName property (from Active Directory) with the Name property (from the AD User SmartObject). When an account is clicked, K2 will take the Name value and match it with an Active Directory UserName value and return the details for that account.
Your SmartObject Designer screen should now look like the image below.

STEP 2 REVIEW
In Step 2, you created the AD User SmartObject containing two methods: AD GetUser (retrieves a list of users) and AD GetUser Detail (retrieves details for a specific user). While creating this SmartObject, you took advantage of the service instances that K2 provides as standard for the Active Directory service type.
This concludes the data component of your Active Directory User Update application.