K2 Cloud for SharePoint: Expense Claim Application Design
As you have learned in other tutorials, it is important to lay out your application design before you begin building. Start with the workflow component. The workflow helps you identify the tasks needed to complete the workflow goal. After you have identified the workflow tasks, think about the forms you need and the users that use the forms. Do you need to edit content on a form? Is the form better-suited as a read-only interface? What data sources do you need to both retrieve data and store data? Finally, do you need reports? What kind of reports do you need and what format is best for displaying reporting content?
Workflow
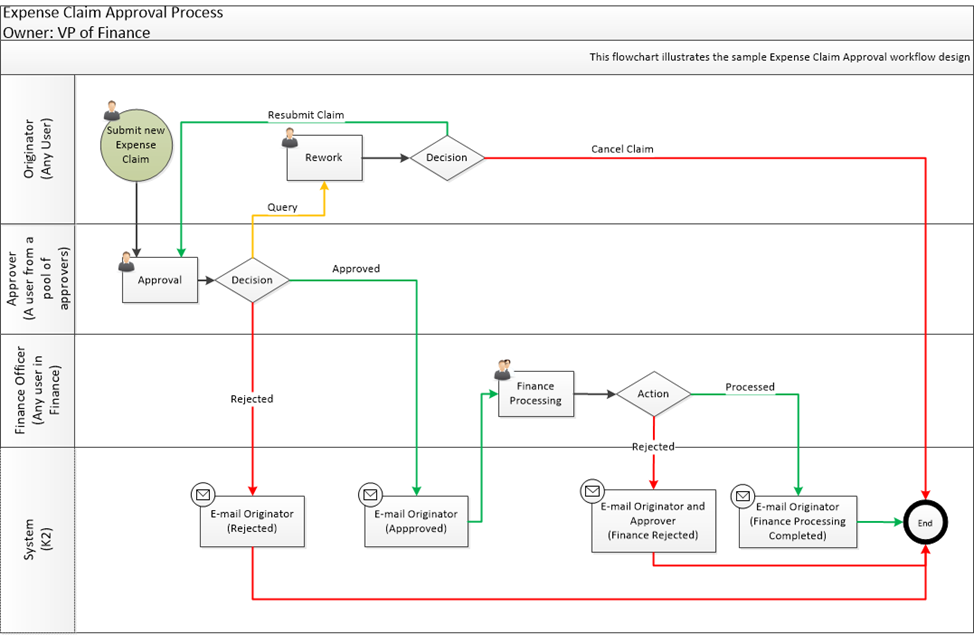
An effective method for laying out the workflow is to create it in a flowchart format. The image below displays the Expense Claim Workflow as a swim-lane flowchart. Notice the four lanes. Each lane represents the user or system responsible for the task.
The Expense Claim Workflow consists of the following steps:
- Any user in the organization can submit a new expense claim for approval and processing. The form originator selects the expense claim approver from a limited pool of users.
- The expense claim approver reviews the claim, then decides whether approve, reject, or query the claim. If the approver approves the claim, the workflow moves to the finance processing user task. If the approver rejects the claim, the originator receives a notice and the workflow ends. If the approver queries the claim, the workflow routes the claim back to the originator for rework.
- If the originator receives a claim for rework, they can either modify and resubmit the claim or cancel the claim. This query-resubmit loop can repeat itself as many times as necessary until the approver or originator chooses another action (such as approved, rejected, or canceled).
- If the approver approves the claim, the workflow continues to the finance processing step. The recipients for this step are a group of users defined in SharePoint. The finance processing group can process the claim or they can reject the claim.
- Throughout the workflow, K2 updates the status of the claim so that you know where your claim is in the process. K2 also sends email notifications when the claim is either approved, rejected, or processed.
Expense Claim Workflow Design
Forms
This application uses SmartForms for the user interfaces. SmartForms allow greater control over the form layout, behavior, and workflow integration. You generate new, edit, and display forms from the Expense Claim list in SharePoint. You also build forms from scratch in K2 Designer. SmartForms allow communication with external data sources, which is not easily configured with standard SharePoint forms.
The Expense Claim application has four forms for the user tasks. Like designing the workflow, sketching the form layout allows you to add notes and adjustments based on the intended use and behavior. You can determine the fields that are necessary and the fields that are not necessary. You can also get a start on the data requirements for the fields. Which fields retrieve content from a data source when the form loads? When the originator submits the form, what data source stores the field values?
New Expense Claim Form
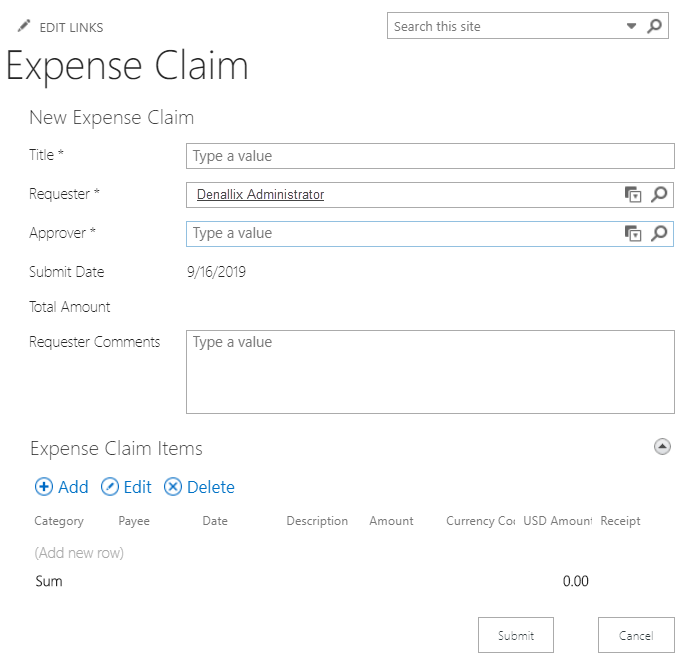
The New Expense Claim form captures and submits a new expense claim for approval. The image below displays the basic layout and behavior of this form.
This form is a classic header/details (or parent/child) form. The Expense Claim list in SharePoint stores the header content as one record. This content includes the name, email, department, etc. for the claimant. This is the parent record.
Notice then, at the bottom of the form, is a section where you list the individual expense claim items. This section is the details or child section. The SmartBox SmartObject stores this content as many records, one record per row. So, the header section is the parent record and the line items section are the child records. They are bound together by a common property, in this case, an ID.
Looking closer at the line item section, notice that you can attach receipts or invoices to the claim. This section also supports multiple currencies and calculates the USD amount for an expense item.
You allow users to submit claims on behalf of other users (perhaps a manager's assistant). They can select the approver from a SharePoint group of pre-defined users.
New Expense Claim Form
Approve Expense Claim Form
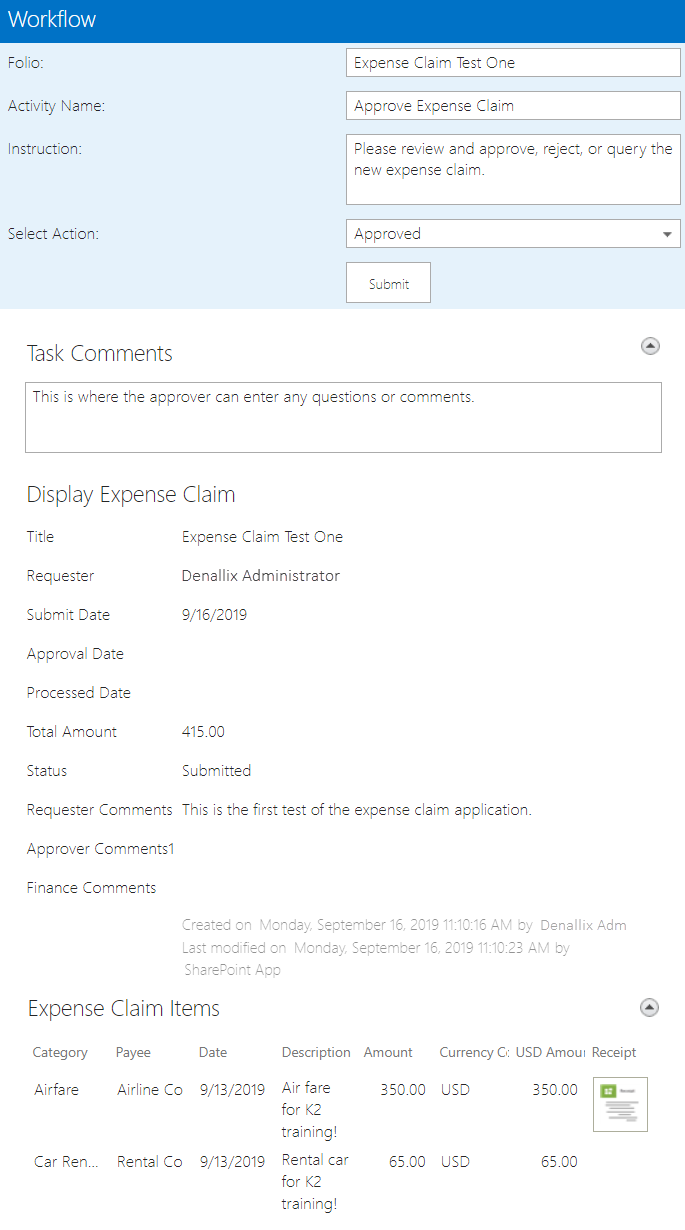
The approver also uses a SmartForm to review the claim and decide how they want to handle the claim. They can approve, reject, or query the claim. Querying a claim sends it back to the originator for rework. While the approver cannot make changes to the originator's submittal, they can open receipts to view them and enter comments or questions on a task comments view.
The form used for the Approve Expense Claim task
Finance Processing Form
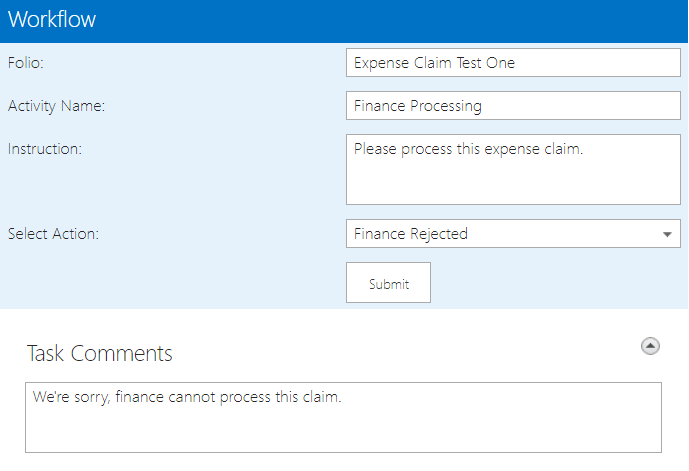
The finance team uses a SmartForm as well to review and process the claim.
Because the finance processing form and the approve expense claim form are so similar, you use the same SmartForm for both user tasks. You use rules to adjust the behavior of the form, depending the user task. The finance processing team can process or reject the claim.
The form used for the Finance Processing task
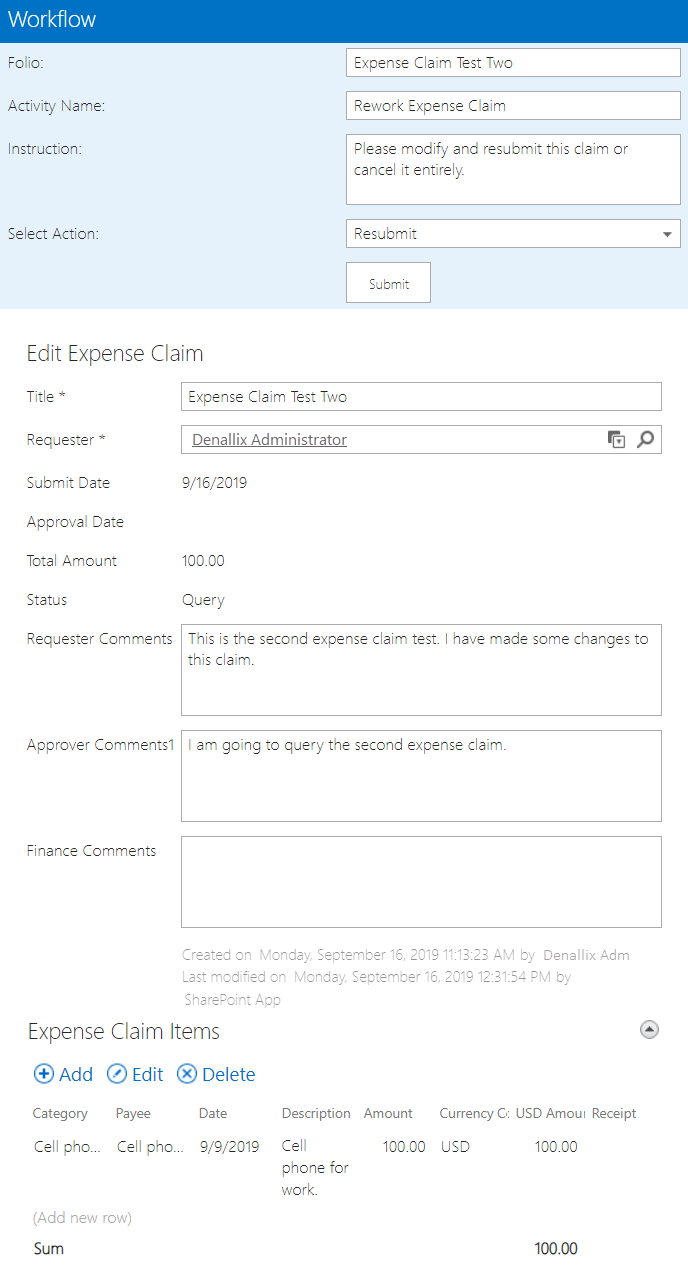
Rework Form
The originator also uses a SmartForm to rework the task if the approver queries the claim. The rework form displays the approver's comments, along with the original request content. The originator can make any changes needed, including adding, editing, or deleting line items. The originator can resubmit the claim or cancel the claim completely.
The form used for the Rework task
Data
The data component is core to this application. You combine data from several systems into one application. The image below shows the business objects that make up the SmartObjects. Notice that each object has a different data source with lines representing the relationships between the objects.
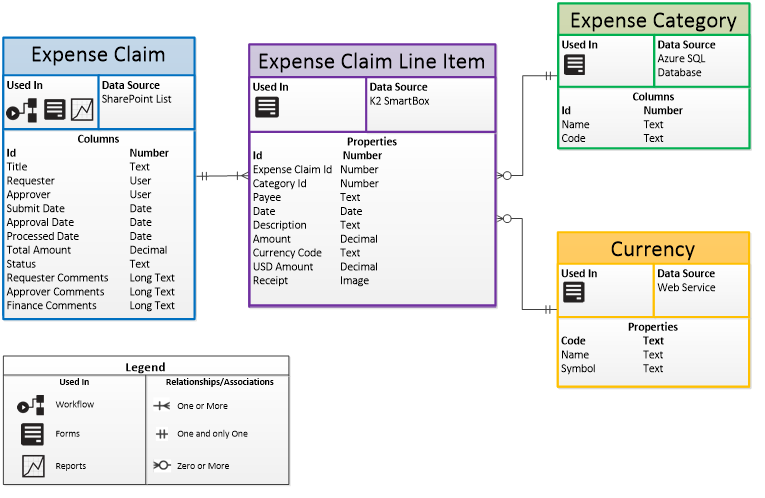
- Expense Claim: the Expense Claim list in SharePoint stores the header, or parent record for each expense claim submitted. The ID of the record is then saved back to the workflow and inserted into the child records. In this way, the parent record is linked to each of its child records.
- Expense Claim Line Item: the Expense Claim Line Item SmartBox SmartObject stores the line items, or child records. SmartBox is K2-provided storage on the SQL server that houses K2. When you create a SmartBox SmartObject, K2 creates a table in the K2 database on your behalf. K2 loops through each line item row on the form and creates a child record for each row.
- Expense Category: you use an Azure SQL database for the expense claim categories. When the form loads, K2 retrieves the categories and loads them into the category control. Categories include items such as Travel Expenses, Office Equipment, and Meals. Once again, this database is for tutorial purposes only. You should not use this content for production purposes.
- Currency: You use a sample web service to look up currency rates and calculate USD values. You can enter line items using several different country codes. You configure a rule that converts all the values to USD. This web service is for tutorial purposes only. You should not use this content for production purposes.
If you are unable to connect to the provided SQL Azure database, you will need to open up the appropriate firewall rules or ports, or alternatively install the database on a local SQL environment using the provided SQL scripts located at http://help.k2.com/files/8553. Contact your SQL database administrator for help, if necessary.
The web service used by this application also runs on Azure. This web service should be accessible through port 80 and unless your organization has strict firewall policies in place, it should be available for use anywhere. If you need to host the web service internally, you can download the source code for the web service from the following location: http://help.k2.com/files/8554.
Contact a member of your application development team for help establishing connections, if necessary.
Reports
K2 offers standard reports that are always available for K2 applications. In this tutorial, you create a new dashboard-style report, using reporting controls found in K2 Designer. With these reports, you can tell at-a-glance the current state of expense claims. The dashboard displays the number of expense claims submitted and the average duration of a claim process. You include two lists: one for expense claims waiting for approval and one for expense claims waiting for finance processing.
Reports and dashboards can be much more complicated than the sample in this tutorial. The goal is to help you learn the basic principles of using business data along with workflow data to create rich graphical representations of application activity.
Two expense claim reporting lists used in this application

SharePoint Artifacts
- Expense Claim: You create a single SharePoint list to store the header, or parent records.
- Expense Claim Approvers: You add a new SharePoint group and add users that approve the expense claim. You select the approver for your claim from this list. Approvers are employees that have the authority to approve claims.
- Expense Claim Processing: You add a new SharePoint group and add users that process the claim. This group of users are typically finance members or payroll members.