24. Edit the Edit Expense Claim Form
Now that you have deployed your final workflow version, you return to editing rules. In this step, you add actions that update the records with any changes made by the originator during the rework task. You also create new details records the originator adds and delete any details records the originator removes.
Update existing header record
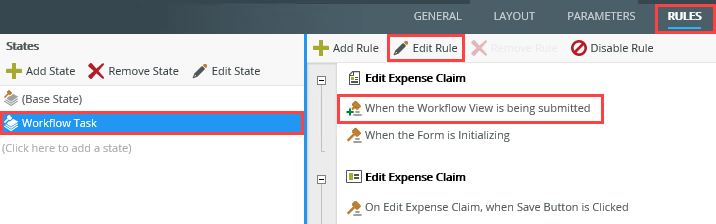
- Edit the Edit Expense Claim form. Edit the When the Workflow View is being submitted rule for the Workflow Task state.
- Check out, then edit the Edit Expense Claim form.
- Click the RULES tab. Edit the When the Workflow View is being submitted rule for the Workflow Task state.
- Add an action to Execute a View method and configure the action to call the Update List Item method of the Edit Expense Claim view. You are updating the existing header record with any changes to the header view the originator made.
- Add an action to Execute a View method and configure the action to call the Update List Item method of the Edit Expense Claim view. Click (configure). You are updating the header record in your SharePoint list.
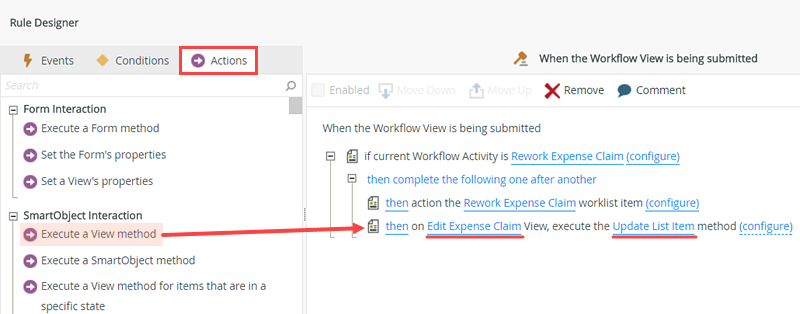
- Add an action to Execute a View method and configure the action to call the Update List Item method of the Edit Expense Claim view. Click (configure). You are updating the header record in your SharePoint list.
- Input Mappings: Map the Edit Expense Claim form > Parameters > ID to the ID input property. Here, you are mapping the ID of the current record (Parameters > ID) as the ID for the record to update.
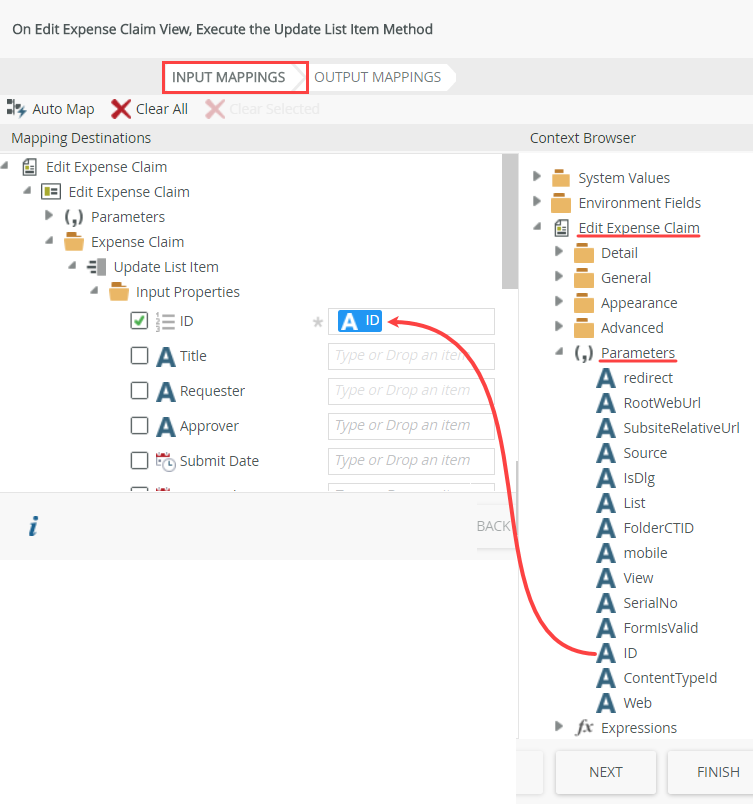
- First, you need to tell K2 which record to update. You are mapping the ID of the "current" expense claim record as the record to update. This is the record K2 associates with the workflow instance.
On the Input Mappings screen, expand the Edit Expense Claim form > Parameters node in the Context Browser, then drag the ID parameter into the ID input property.
- First, you need to tell K2 which record to update. You are mapping the ID of the "current" expense claim record as the record to update. This is the record K2 associates with the workflow instance.
- Map the following controls (from the Edit Expense Claim view) to the input properties: Title Text Box, Requester Text Box, Approver Text Box, Requester Comments Text Area, and Total Amount Data Label. Here, you are mapping the form fields to their respective SmartObject properties.
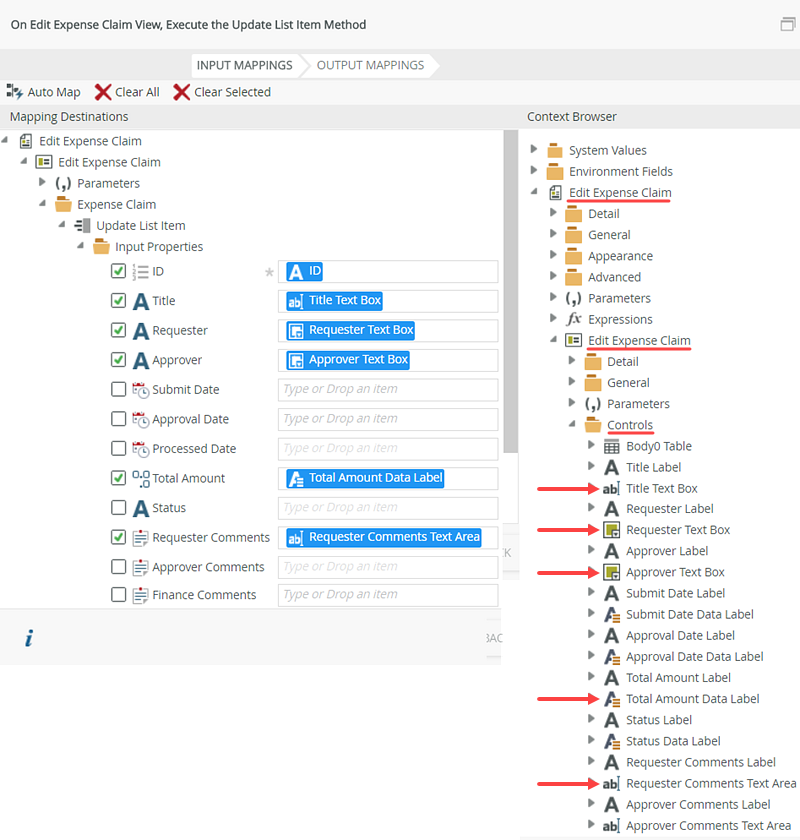
- Next, map form fields from the header view to the Expense Claim SmartObject.
Expand the Edit Expense Claim form > Edit Expense Claim view > Controls node, then drag the following controls into their respective input properties: Title Text Box, Requester Text Box, Approver Text Box, Request Comments Text Area, and Total Amount Data Label. You only need to update the values that the originator can change, so you won't map all properties. - Click FINISH to complete the mappings setup. You don’t need to save the returned ID from the header like you did for the New Expense Claim form because the child records are already mapped to their parent record ID. Next, you add the actions for the Expense Claim Items view. These are the actions for adding, updating, or deleting list items (the child records).
- Next, map form fields from the header view to the Expense Claim SmartObject.
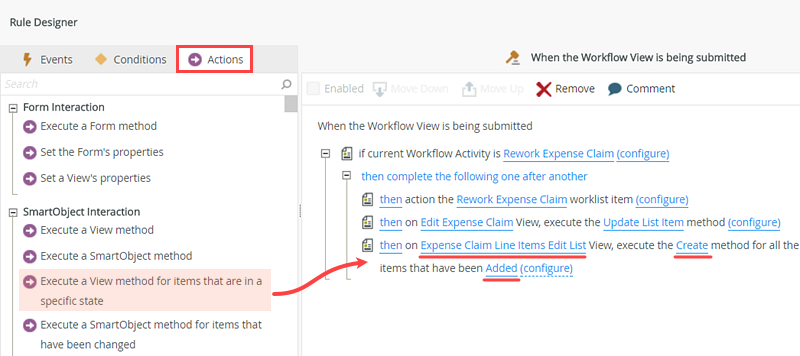
- Execute a View method for items that are in a specific state. Use the Create method of the Expense Claim Line Items Edit List view for all the items that have been Added.
- Add an action to Execute a View method for items that are in a specific state. Configure the action to execute the Create method of the Expense Claim Line Items Edit List view for all the items that have been Added. Click (configure). Here, you are creating a new child record in the SmartObject for each new item the originator adds.
- Add an action to Execute a View method for items that are in a specific state. Configure the action to execute the Create method of the Expense Claim Line Items Edit List view for all the items that have been Added. Click (configure). Here, you are creating a new child record in the SmartObject for each new item the originator adds.
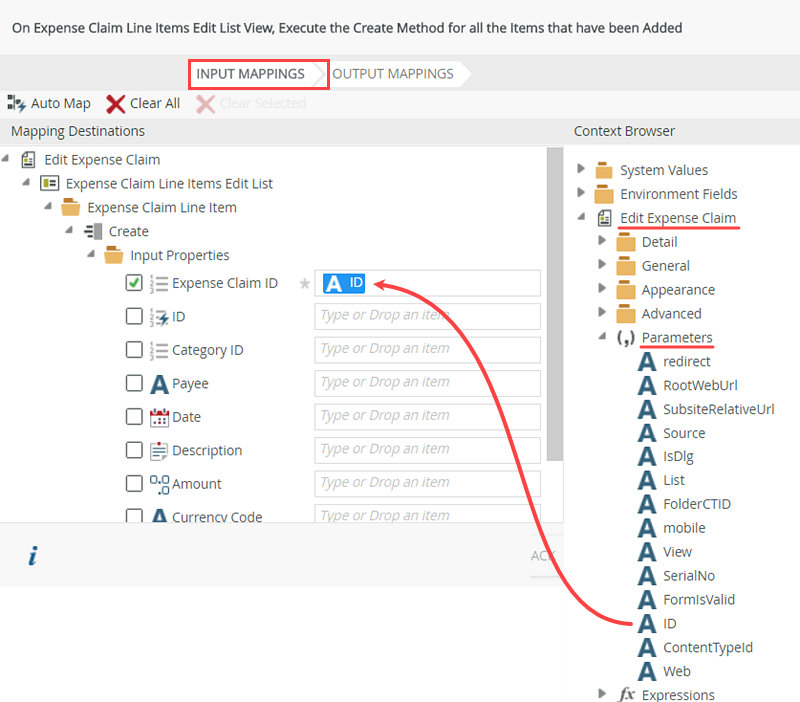
- Map the Edit Expense Claim (form) > Parameters > ID to the Expense Claim ID input property.
- On the Input Mappings screen, expand the Edit Expense Claim node in the Context Browser, then expand the Parameters node. Map the Parameters > ID to the Expense Claim ID input property. Once again, you are linking the new child record(s) with the parent record via the ID.
- On the Input Mappings screen, expand the Edit Expense Claim node in the Context Browser, then expand the Parameters node. Map the Parameters > ID to the Expense Claim ID input property. Once again, you are linking the new child record(s) with the parent record via the ID.
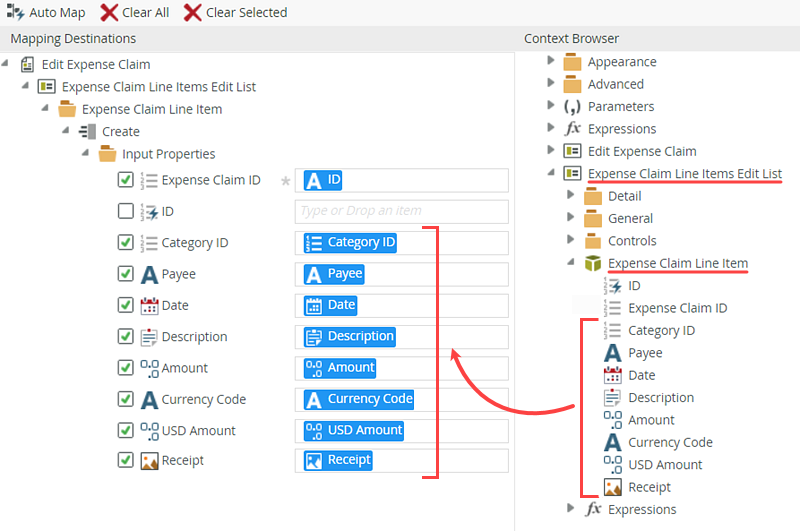
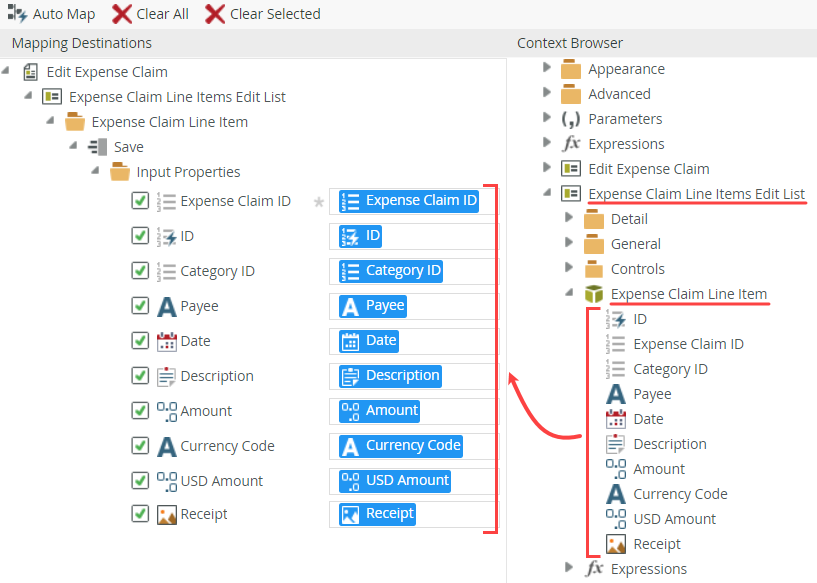
- Map the Expense Claim Line Items Edit List > Expense Claim Line Item SmartObject properties to the input mappings.
- Now expand the Expense Claim Line Items Edit List > Expense Claim Line Item SmartObject and map the properties for the SmartObject to the input properties. When you are mapping properties for an editable list (that loops through each row/record), you must use the properties from the associated SmartObject and not the controls.
- Click NEXT then FINISH to complete the action configuration.
- Now expand the Expense Claim Line Items Edit List > Expense Claim Line Item SmartObject and map the properties for the SmartObject to the input properties. When you are mapping properties for an editable list (that loops through each row/record), you must use the properties from the associated SmartObject and not the controls.
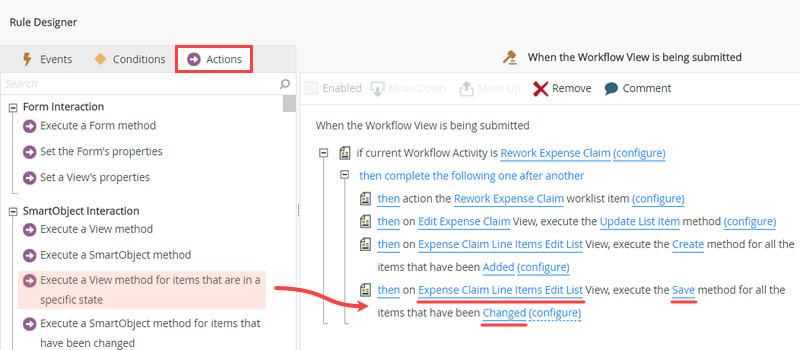
- Execute a View method for items that are in a specific state. Use the Save method of the Expense Claim Line Items Edit List view for all the items that have been Changed.
- Add an action to Execute a View method for items that are in a specific state. Configure the action to execute the Save method of the Expense Claim Line Items Edit List view for all the items that have been Changed. (In K2, save is the equivalent of update.) Here, you are updating existing child records with any changes made by the originator. Click (configure).
- Add an action to Execute a View method for items that are in a specific state. Configure the action to execute the Save method of the Expense Claim Line Items Edit List view for all the items that have been Changed. (In K2, save is the equivalent of update.) Here, you are updating existing child records with any changes made by the originator. Click (configure).
- Map the properties from the Expense Claim Line Item SmartObject to the Input Properties.
- For the Input Mappings, map the properties from the Expense Claim Line Item SmartObject to the Input Properties. You do not use the ID form parameter for the Expense Claim ID because the Expense Claim header ID already exists for changed items.
- Click FINISH to complete the mapping configuration.
- For the Input Mappings, map the properties from the Expense Claim Line Item SmartObject to the Input Properties. You do not use the ID form parameter for the Expense Claim ID because the Expense Claim header ID already exists for changed items.
- Execute a view method for items that are in a specific state. Use the Delete method of the Expense Claim Line Items Edit List view for all the items that have been Removed.
- Add an action to Execute a view method for items that are in a specific state. Configure the action to execute the Delete method of the Expense Claim Line Items Edit List view for all the items that have been Removed. Click (configure).
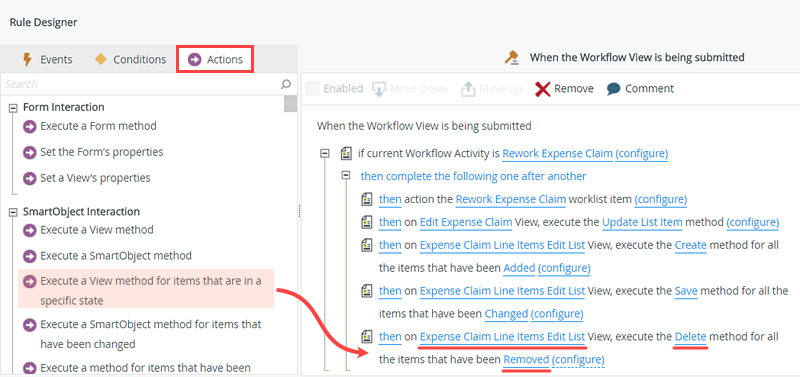
- Add an action to Execute a view method for items that are in a specific state. Configure the action to execute the Delete method of the Expense Claim Line Items Edit List view for all the items that have been Removed. Click (configure).
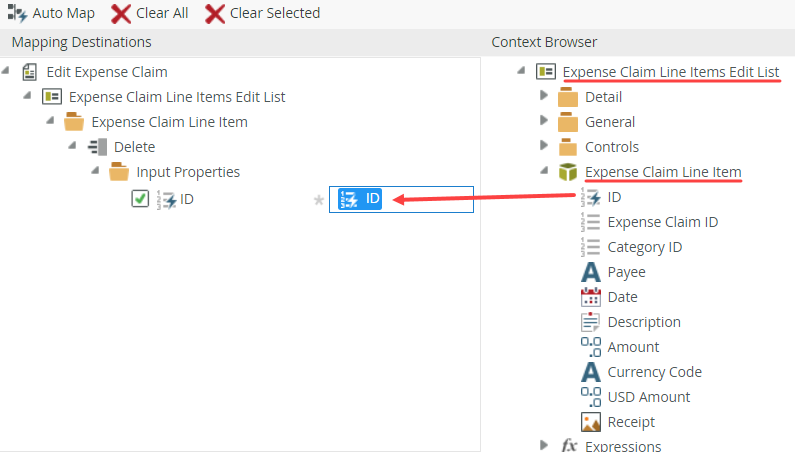
- Map the Expense Claim Line Item > ID to the input properties.
- The only input mapping needed is the ID of the Expense Claim Line Item SmartObject. Here, you are removing any child records the originator deletes from the form.
- Click FINISH to complete the input mappings configuration.
- The only input mapping needed is the ID of the Expense Claim Line Item SmartObject. Here, you are removing any child records the originator deletes from the form.
- Add an action to show a message after the claim is resubmitted using content of your choice.
- Add an action to show a message indicating the claim has been resubmitted. Use the images below as a guide, if necessary. Click OK to continue.
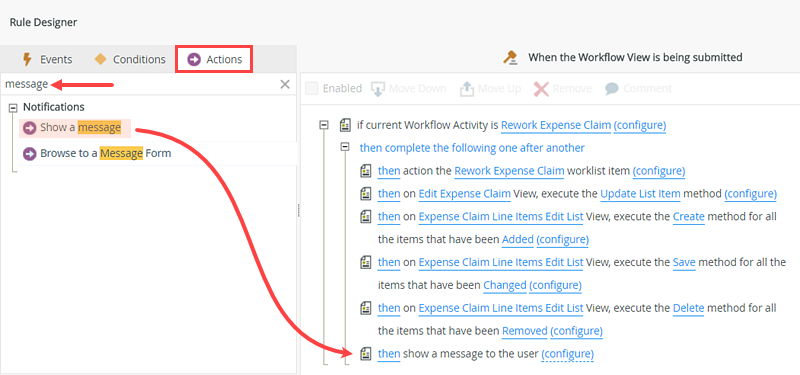

- Add an action to show a message indicating the claim has been resubmitted. Use the images below as a guide, if necessary. Click OK to continue.
- Add an action to Close the browser window.
- Add an action to close the browser window. Your actions should look like the image below.
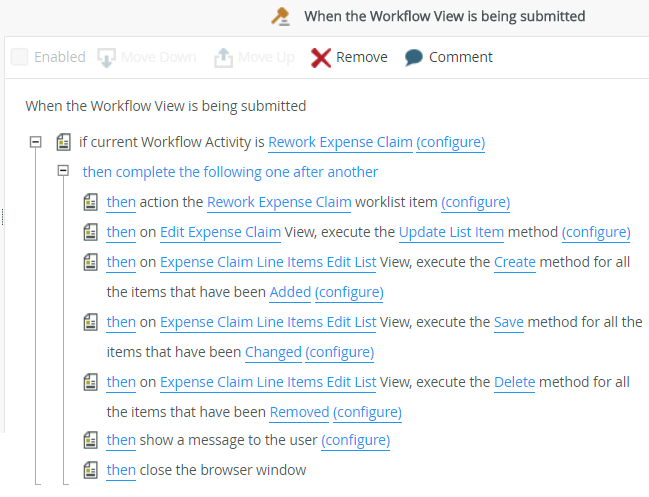
- Add an action to close the browser window. Your actions should look like the image below.
- Change the methods (create, save, delete) to run as a batch. Finish the form, then check in any views and forms still checked out.
- Change the execution block to run as a batch. This is so the add, edit, and update actions run as a block before K2 moves on to the next rule.
In the rule definition pane, find the then on Edit Expense Claim view, execute the Update List Item method action. Click then and change it to also.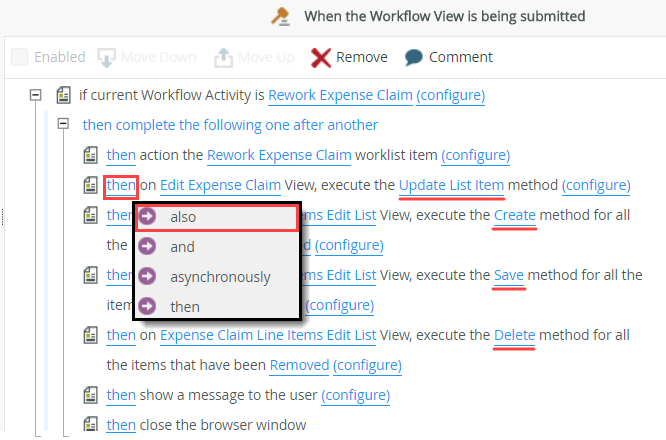
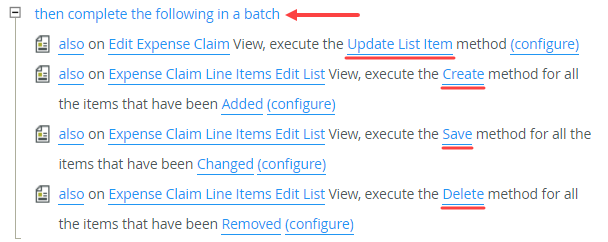
- Repeat the step above for the Create, Save and Delete actions, so that they run in a batch. The four actions now run in a single batch action.
- Click OK to complete the rule designer, then click FINISH to complete the form designer and return to the K2 Application elements page.
- Check in any views or forms that you have checked out. You have completed the required changes for the Edit Expense Claim form. If time permits you can test the Edit Expense Claim form as described below, otherwise continue on to the next step.
- Change the execution block to run as a batch. This is so the add, edit, and update actions run as a block before K2 moves on to the next rule.
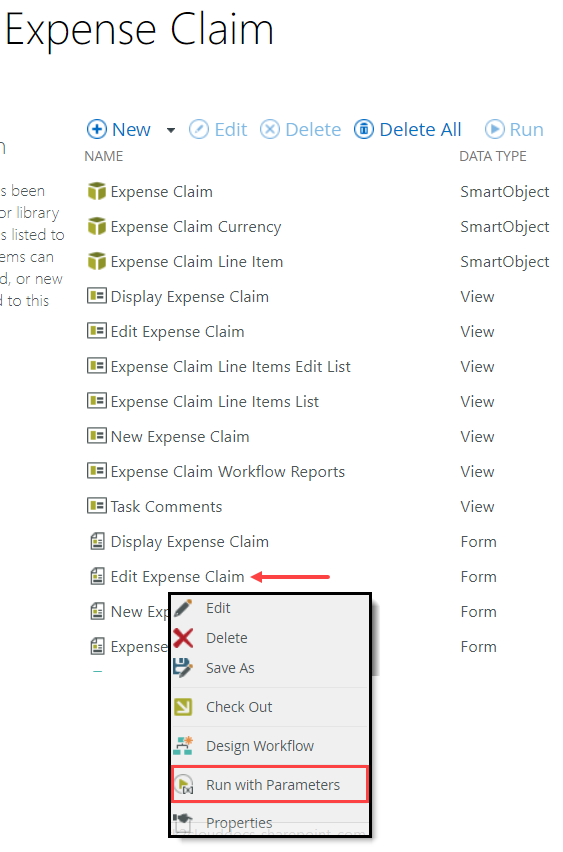
- From the K2 Application elements page, run the Edit Expense Claim form with a parameter. Enter 1 for the ID. Confirm you have both parent and child records returned.
- On the K2 Application elements page, right-click the Edit Expense Claim form and select Run with Parameters. You add the Expense Claim list item ID for an item added earlier. Because you are not opening the parent form first, K2 doesn't know which parent or child records to retrieve so you must provide the parent ID for testing.
- On the parameters screen, provide a value for the ID parameter, then click Run. The ID value "1" is most likely the first test item added to the Expense Claim list, but you can try sequential numbers if the edit form does not show any data.
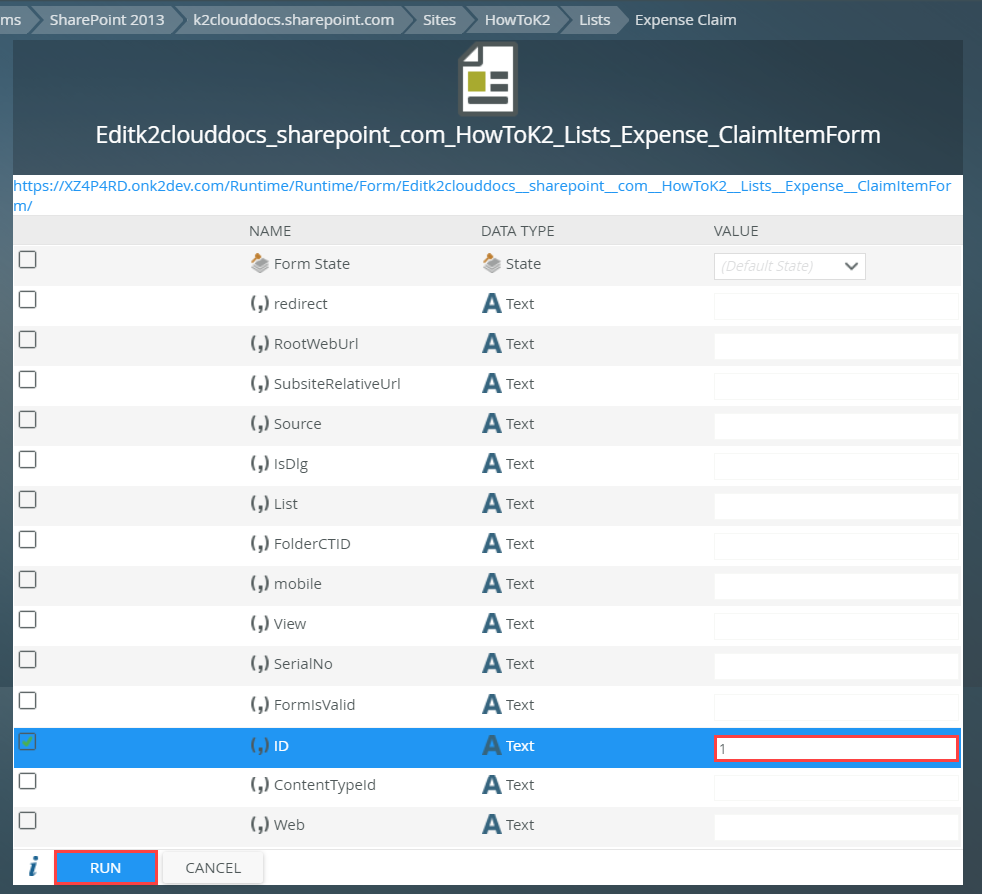
The form should populate with the parent record and correct child records. There is not a submit button, so you cannot change the records at this point. Close the Edit Expense Claim browser window.
Troubleshooting
If things did not work as expected, the most likely cause is that you did not use the parameter ID in the rule actions. Review the steps for mapping the Expense Claim ID.
- On the K2 Application elements page, right-click the Edit Expense Claim form and select Run with Parameters. You add the Expense Claim list item ID for an item added earlier. Because you are not opening the parent form first, K2 doesn't know which parent or child records to retrieve so you must provide the parent ID for testing.
Add new expense claim items
Update existing expense claim items
Delete expense claim items
Add confirmation message when expense claim is resubmitted.
Close the browser window after the resubmit.
Test the rule change
Review
In this step, you worked with rules to add, update, or delete any changes the originator made during the rework task. You learned how to work with parent records and child records. First, you updated the parent record, then you configured actions to either add, update, or delete child records. You configured the actions to run as a batch, which simply means K2 completes the processing of this batch group before it moves on to the next rule, condition, or action. Next, you edit the display form and configure rules to add any comments the approver or finance processor entered.