2. Create the Supporting Libraries in SharePoint
In this step, you create two document libraries in SharePoint: Documents to Review and Approve and Approved Documents. The Documents to Review and Approve library is your primary data source for this application. This library is the working area for new documents that need reviewing, then approval. You upload documents to this library, then when you are ready to submit the document for review, you manually start the Document Review Workflow. When you are ready to submit the document for approval (regardless of whether there was a review workflow or not), you manually submit the document to the Document Approval Workflow. This workflow moves the submitted documents to the second document library (Approved Documents) if all approvers approve the document.
-
In your SharePoint site, create a new document library called Documents to Review and Approve then add the following columns:If you are working in a shared environment where there are multiple builds of the same application, consider adding your initials to the application name so that you can easier determine which projects are yours. For example, Documents to Review and Approve YourInitials.
Column Name Type Notes Title Single line of text This is the title of the document. This column is already in your library by default. Reviewers Person or Group - Allow multiple selections
- Require that this column contains information
This is a collection of users who review the document. The requester adds names to this list and when the workflow starts, the users review the submitted document.
You allow the requester to enter more than one name in this list so that they can have multiple people review their document. This column is required so that you can route the review task to the users entered.Review Status Single line of text The workflow updates this column as it progresses. Approvers Person or Group - Allow multiple selections
- Require that this column contains information
This is a collection of users who approve the document. The requester adds names to this list, then when the workflow starts, the approvers approve the submitted document.
You allow the requester to enter more than one name in this list so that they can have multiple users approve their document. This column is required so that you can route the approval task to the users entered.Approve Status Single line of text The workflow updates this column as it progresses. 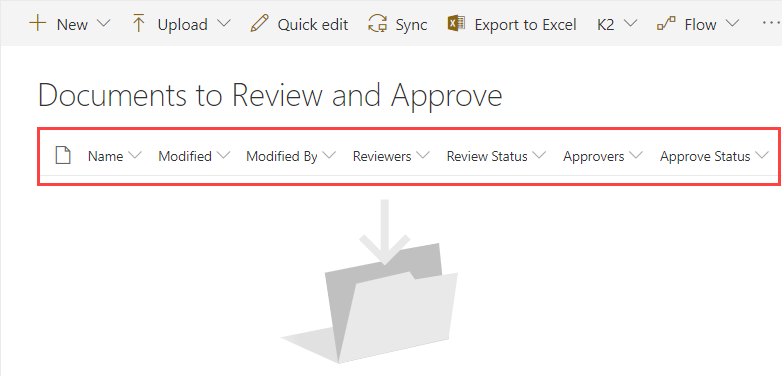
- In this step, you add the first of two document libraries in SharePoint. The first library, Documents to Review and Approve, acts as your primary data source for this application. From your SharePoint site, click New > Document Library. Name the library
Documents to Review and Approve
then click Create.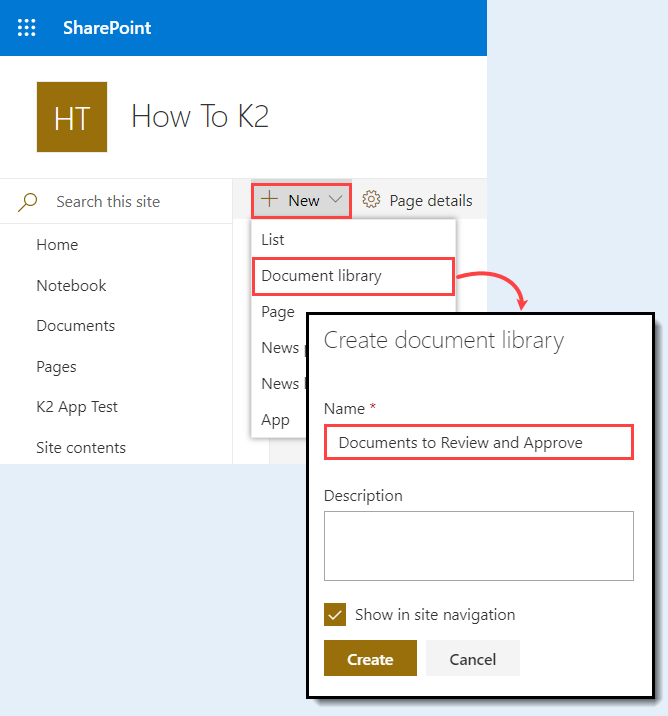
- If you are working in a shared environment where there are multiple builds of the same application, consider adding your initials to the application name so that you can easier determine which projects are yours. For example, Documents to Review and Approve YourInitials.
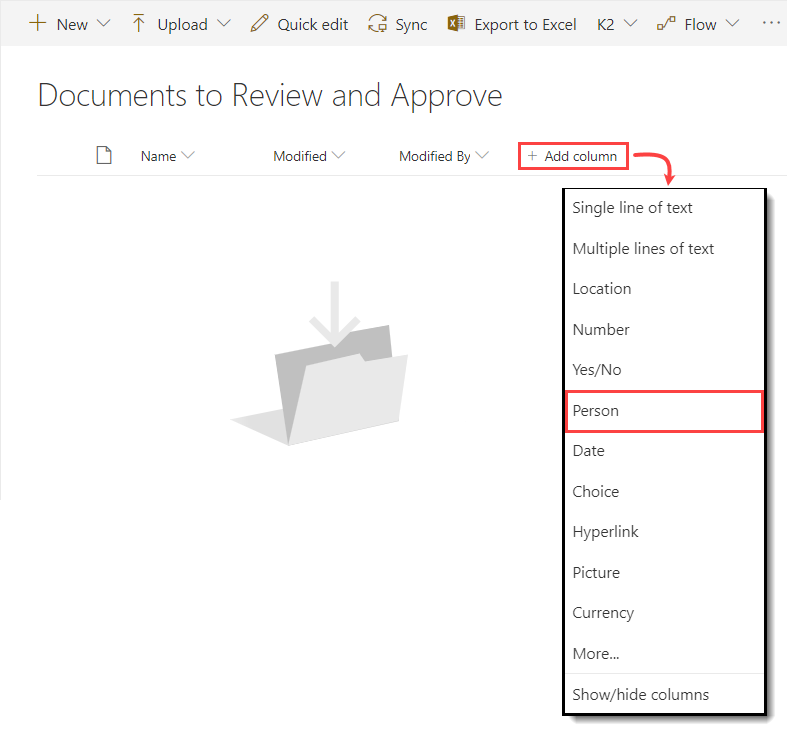
- You are now on the Documents to Review and Approve landing page. You add new columns for reviewer and approver names, along with current status. Begin with reviewers. Click Add column, then select Person.
- Name the column
Reviewers
then click More options. Select Yes for both Allow multiple selections and Require that this column contains information. Click Save. This is a group of users who review the document. You add names to this group and when the workflow starts, the users should review the submitted document. You allow the review requester to enter more than one name in this group so that they can have multiple people review their document. This column is required so that you can route the review task to the users entered.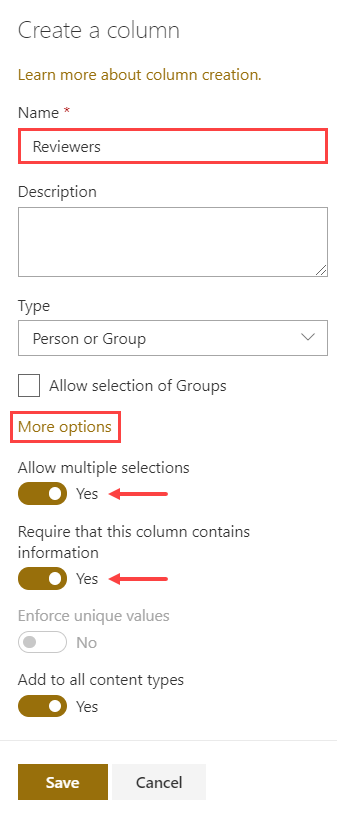
- Use the table below to add three more columns.
Column Name Type Notes Review Status Single line of text The workflow updates this column as it progresses. Approvers Person or Group - Allow multiple selections
- Require that this column contains information
This is a group of users who approve the document. You will add names to this list and when the workflow is started, the users should approve the submitted document.
You will allow the user to enter more than one name in this list so that they can have multiple people approve their document. This column is required so that you can route the approval task to the users entered.Approve Status Single line of text The workflow updates this column as it progresses.
Your library’s Columns should look like the image below.

-
Create the second document library and name it Approved Documents . If you are working in a shared environment, consider adding your initials to library name to make it unique.
-
Next, you add the Approved Documents library. Return to your SharePoint site home page and click New > Document Library. Name the library
Approved Documents
and click Create. There are no adjustements for this library.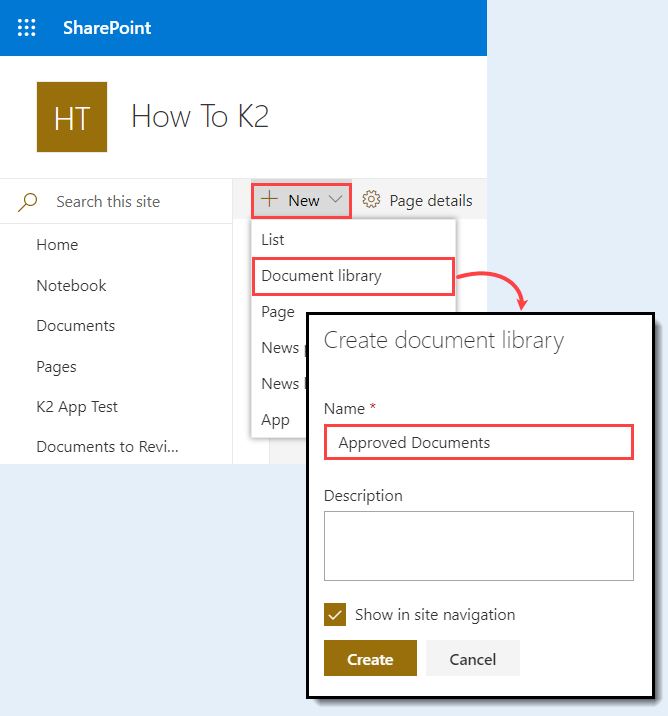
-
Next, you add the Approved Documents library. Return to your SharePoint site home page and click New > Document Library. Name the library
Review
In this step, you created two SharePoint document libraries: Documents to Review and Approve and Approved Documents. The first library acts as the primary data source for this application. In the next step, you will generate the application elements, or artifacts, for the Documents to Review and Approve library.