Rename fields (x-ntx-summary)
|
|
In this example, you will add the summary Specification Extension A Nintex-specific OpenAPI Specification key that allows special functionality within Nintex Xtensions. to rename the action A task that can be performed or triggered within a workflow, such as moving a file, sending an email, or using third-party API functionality. and configuration fields of the Airport-Data Xtension. |
Nintex Workflow uses the definitions in the OpenAPI Specification A standard, language-agnostic description of RESTful APIs that can be read by both humans and machines. Formerly known as Swagger. to control the names that appear on custom actions and their configuration fields.
These fields and action names are not always helpful when designing workflows. You can use the x-ntx-summary Specification Extension to rename them to something more useful, or even provide short instructions.
The complete OpenAPI Specification and icon for this example are available here.
Tip: Want the short version? Check out our OpenAPI Specification quick reference for quick definitions of parameter types, authentication, file handling and Specification Extensions.
The following examples also use x-ntx-summary:
- Extract data with a regex.
- Create drop-downs (x-ntx-dynamic-values).
- Hide operations (x-ntx-visibility).
- Create dynamic fields (x-ntx-dynamic-schema).
- Accept an XML response
- Upload files by streaming
- Upload files by URL.
- Download files by URL.
- Download base64 files.
- Upload base64 files.
- Create a suggestion box.
- Add subscribers to Mailchimp.
Also see the how-to on x-ntx-summary.
Summary
The x-ntx-summary Specification Extension is a simply key-value pair, where the key is always x-ntx-summary, and the value is the name you want to use. It can be added to:
- The info object, to define the name used for the action group. Note that this name can be overridden when the Xtension A set of workflow actions defined for a specific third-party API such as Salesforce, Box, or another service provider. Nintex Workflow provides many connectors out of the box, and you can create your own custom connectors using the Nintex Xtensions framework. is imported.
- The HTTP method object, to define the name of the custom action.
- The parameter A piece of information passed to a third-party API during a request.object, to define the label used on the configuration field.
- The response The return from a third-party API after a request has been made by the client.object, to define the label used on the configuration field.
Nintex Xtensions also supports the Microsoft Flow format of this Specification Extension: x-ms-summary.
Rename custom actions
Step 1: Create the basic OpenAPI Specification
Use the Airport-Data OpenAPI Specification you created earlier as a starting point, or download the completed Airport-Data API example here.
{
    "swagger": "2.0",
    "info": {
        "version": "1.0.0",
        "title": "Airport Data"
    },
    "host": "www.airport-data.com",
    "basePath": "/api",
    "schemes": [ "https" ],
    "produces": [ "application/json" ],
    "paths": {
        "/ap_info.json": {
            "get": {
                "summary": "Get airport info",
                "description": "Get airport info",
                "operationId": "getAirportInfo",
                "produces": [ "application/json" ],
                "parameters": [
                    {
                        "name": "iata",
                        "in": "query",
                        "type": "string",
                        "description": "Airport code"
                    }
                ],
                "responses": {
                    "200": {
                        "description": "OK",
                        "schema": {
                            "$ref": "#/definitions/airportInfo"
                        }
                    }
                }
            }
        }
    },
    "definitions": {
        "airportInfo": {
            "type": "object",
            "properties": {
                "name": {
                    "type": "string"
                },
                "location": {
                    "type": "string"
                },
                "country": {
                    "type": "string"
                }
            }
        }
    }
}
Step 2: Add summary to the HTTP method object
Inside the HTTP method object, add the x-ntx-summary key, with the value of a new name for the custom action. You can add the x-ntx-summary field anywhere within the HTTP method object.
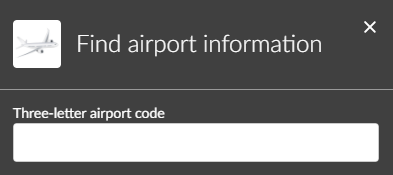
In the Workflow designer, the custom action displays the new name:

"paths": {
    "/ap_info.json": {
        "get": {
            "summary": "Get airport info",
            "description": "Get airport info",
            "operationId": "getAirportInfo",
            "produces": [ "application/json" ],
            "x-ntx-summary": "Find airport information"
        }
    }
}
Rename parameter configuration fields
Inside the parameter object, add the x-ntx-summary key, with the value of a new name for the parameter configuration field. Note that the x-ntx-summary field must be inside the individual parameter object, not in the parameters array.
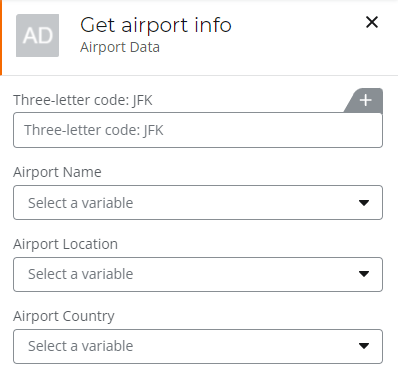
In the Workflow designer, the custom action displays the new configuration field name:
"parameters": [
    {
        "name": "iata",
        "in": "query",
        "type": "string",
        "description": "Airport code",
        "x-ntx-summary": "Three-letter airport code"
    }
]
Rename result configuration fields
Inside the property objects of the response The return from a third-party API after a request has been made by the client. definition or response schema object, add the x-ntx-summary key, with the value of a new name for the response configuration field. Note that the x-ntx-summary field must be inside the individual object for each property, not in the properties object or schema object.
In the Workflow designer, the custom action displays the new configuration field names:
"definitions": {
    "airportInfo": {
        "type": "object",
        "properties": {
            "name": {
                "type": "string",
                "x-ntx-summary": "Airport name"
            },
            "location": {
                "type": "string",
                "x-ntx-summary": "Airport location"
            },
            "country": {
                "type": "string",
                "x-ntx-summary": "Airport country"
            }
        }
    }
}
The OpenAPI Specification
This is the complete OpenAPI Specification which renames the custom action and configuration field names. You can import this Xtension and use it in your workflows. See Import the OpenAPI Specification.
{
    "swagger": "2.0",
    "info": {
        "version": "1.0.0",
        "title": "Airport Data"
    },
    "host": "www.airport-data.com",
    "basePath": "/api",
    "schemes": [ "https" ],
    "produces": [ "application/json" ],
    "paths": {
        "/ap_info.json": {
            "get": {
                "summary": "Get airport info",
                "description": "Get airport info",
                "operationId": "getAirportInfo",
                "produces": [ "application/json" ],
                "x-ntx-summary": "Find airport information",
                "parameters": [
                    {
                        "name": "iata",
                        "in": "query",
                        "type": "string",
                        "description": "Airport code",
                        "x-ntx-summary": "Three-letter airport code"
                    }
                ],
                "responses": {
                    "200": {
                        "description": "OK",
                        "schema": {
                            "$ref": "#/definitions/airportInfo"
                        }
                    }
                }
            }
        }
    },
    "definitions": {
        "airportInfo": {
            "type": "object",
            "properties": {
                "name": {
                    "type": "string",
                    "x-ntx-summary": "Airport name"
                },
                "location": {
                    "type": "string",
                    "x-ntx-summary": "Airport location"
                },
                "country": {
                    "type": "string",
                    "x-ntx-summary": "Airport country"
                }
            }
        }
    }
}
Test the result
Step 1: Add your Xtension
Import the OpenAPI Specification you created into Nintex Workflow:
- Open your Nintex Workflow tenancy.
- Go to Workflows > Xtensions.
- Click
 in the Custom connector list.
 - Click OpenAPI Specification via file upload or URL.
- Click Choose a file. Navigate to the OpenAPI Specification on your computer.
- Wait for Nintex Workflow to validate the file.
- Click Next.
- The Xtension does not use authorization, so click Next.
- Edit the Name of the Xtension, which becomes the name of the action group in the Workflow designer.
- Edit the Description of the Xtension. This appears in the Private connector list in the Xtensions page.
- Select or upload an icon for the Xtension. This is displayed for each action or event in the Workflow designer.
- Click Publish.
Step 2: View the custom action
- In the Nintex Workflow tenancy, go to Workflows > All workflows.
- Click Create workflow.
- Scroll down the action toolbox to the Airport Data action group.
- Drag the Find airport information action to the canvas and open the configuration.
- The fields are renamed.