Build Pane
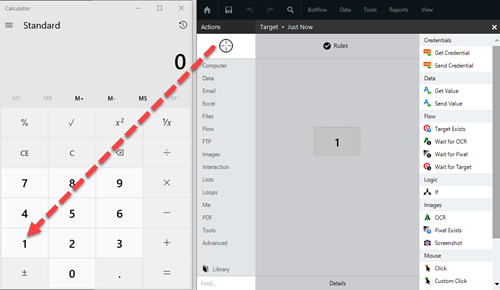
The Build Pane displays after you select a targeted element in a Windows application. In the Build Pane, you can:
- Preview an acquired target element from a Windows application.
- Define how selected target elements are used in actions.
- Manage the rules Required to locate a target and vary based on the targeted application. used to locate the target element.
Selected target elements display in the Build Pane with a list of actions supported by the targeted item. The Build Pane also displays how long the item has been targeted.

| Field or button | Description |
|---|---|
| Target Selector | Use the Target Selector to build actions in the Build Pane. |
| Actions | The list of actions supported by the targeted item. |
| Preview | A preview of the target displays. |
| Rules | Manage the rules used to locate the target. |
| Recent Target |
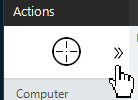
Click the Recent Target button to the right of the Target Selector to access the most recent target. This tool is useful when you are creating Excel, emulator, and web table targets because it allows you to create new actions with existing targets.
|
Some actions have rules required to locate a target and vary based on the targeted application. Rules of a targeted application element are configured and saved with the action. The rules are then used to locate the proper targeted element, such as a Microsoft Excel workbook. Other notes about rules:
- Some targets provide no rules.
- Most targets provide at least the text of the target, such as 'Log in' for a log-in screen action.
- Some targets provide a name to identify the target (a unique developer-defined control name).
- Some targets provide an ID (a unique identifier that locates an item based on how it appears in the target).
- Some rules include parents to aid in finding the targets.
- All targets use the following rules:
- Ignore: Ignores the value of the selected rule.
- Exact Match: Uses an exact match when considering the value of the rule.
- Best Match: Uses a best match when considering the value of the rule and uses a variety of information to locate the target.
- Left Match: Uses leading characters when considering the value of the rule based on a specified number of leading characters.
- Right Match: Uses trailing characters when considering the value of the rule based on a specified number of trailing characters.
To set up the most common rules:
- Click Rules on the Build Pane Area to add new actions and edit existing actions. The Build Pane displays after you select a targeted element in a Windows application. The center of the Build Pane is referred to as the Task Editor Pane. or Action Builder Provides access to the tools needed to add and modify actions or instructions within a botflow. Located on the left side of the Nintex Bot window. .
- Select Use Smart Targeting to enable smart targeting with up to six rules. With this feature, you can:
Select to Ignore or find an Exact Match for rules.
Click the arrows next to the rules to change the order and priority in which the rules are followed. After the target has been found, the rest of the rules are ignored.
Manually edit rules. This is an advanced feature should only be used if you know how Google Chrome queries work.
If tables can be bridged, select Yes or No next to Table Bridge to turn on or off this feature. Bridging web table searches allows you to search, move highlight, get list, and complete other actions across multiple tables on a web page that have the same number of columns. It also improves targeting on web pages and apps (for example, in Salesforce and Navigator).
If you want to enable legacy smart targeting rules, select Apply Fallback Legacy Targeting. This option allows you to enable old targeting rules when the Nintex Bot Target Selector fail to find the target. Nintex Bot will fail the action instead of using the Best Match rule. The default is deselected.
- Adjust the available rules, as required.
- Select Ignore Invisible Elements to turn on a legacy targeting rule that ensures that Nintex Bot only considers visible elements (elements that can be seen) and disregards all invisible elements (elements that have "visible:hidden" and/or "display:none" style properties) during action execution. When selected, this setting disregards all cached/invisible elements in the dom as these elements can be the original target (the target element used to create the action). Selecting this setting can improve reliability during the action execution when interacting with elements that look identical but are actually overlaid. Note that this feature is only available for targeting using Google Chrome technology (Google Chrome and Microsoft Edge).
- Click OK to save the rules.
The Rules window displays the rules available for the selected targeted application.
Rules used when targeting tables in a web environment may interact with dynamic collections of data within the web tables. Actions for web tables often require adjustments to the rules to properly locate the target.
To adjust web table rules:
- Click Rules.
-
Adjust the web table rules, as required:
- Show Less/Show All: Toggles the table display.
- Bridge: This option is available if tables can be bridged. The default is No. Selecting Yes bridges web table searches and allows you to search, move highlight, get list, and complete other actions across multiple tables on a web page that have the same number of columns. Bridging web table searches improves targeting on web pages and apps (for example, in Salesforce and Navigator).
- Ignore Position (default): The default setting is set to ignore the position of dynamic positoned web tables. Click the drop-down to select Exact Position if the target web table position is static, which could increase the action speed. Click the X to close the drop-down and save the setting.
- <number> Columns: The number of columns the targeted web table displays by default. Click the drop-down to change from Exact Count to Ignore Count if the number of web table columns could change.
- Left Match (default): Click the drop-down to Ignore (if table headers contain dynamic information) or Ignore (column). Otherwise, use Left Match to define the column header length.
- Length: Type the required column header length or use the up and down arrows to adjust the value.
- Click OK to save the settings.
The Rules window displays with additional table rules.
Rules used when targeting Microsoft Excel control the connection letter to an Excel workbook.
To change the connection letter:
- Click Rules.
- Type the Connection Letter.
- Click OK to save the rule with the connection letter.
The Excel-specific Rules Window displays.
Rules used when targeting a terminal emulator control the connection letter to the targeted emulator.
To change the connection letter:
- Click Rules.
- Type the Connection Letter.
- Click OK to save the rule with the connection letter.
The Emulator-specific Rules Window displays.
Rules used when targeting an FTP action control the connection letter to the targeted FTP action.
To change the connection letter:
- Click Rules.
- Type the Connection Letter.
- Click OK to save the rule with the connection letter.
The FTP-specific Rules Window displays.
Rules used when targeting an Adobe form control the connection letter to the targeted Adobe form.
To change the connection letter:
- Click Rules.
- Type the Connection Letter.
- Click OK to save the rule with the connection letter.
The Adobe-specific Rules Window displays.
Rules used with UIA targets may interact with dynamic collections of data within tables. Actions for tables often require adjustments to the rules to properly locate the target.
To adjust rules with UIA targets:
- Click Rules.
-
Adjust the table rules, as required:
- Row #: Select Auto to use the text values in the columns of each row to determine which row should be targeted. The text of the row must match the rules in the Column Text. Select Exact to specify a specific row number that will always be targeted in the table.
- Match: Type a number to tell the algorithm when to stop looking for matching rows. For example, type 1 to find the first matching row or 2 to find the second matching row.
- Show Less/Show All: Toggles the table display.
- Click OK to save the settings.
The Rules window displays with additional table rules.
