Mouse Sequence
The Record Mouse tool creates a Mouse Sequence that records your mouse activity as actions An instruction within a botflow. and then adds the Mouse Sequence to a botflow Automated steps that you can design for each bot that will run..
Using the Record Mouse tool to create a Mouse Sequence, you can record the following mouse actions:
- Click on a target.
- Right Click for a sub-menu.
- Hover Mouse to expand a menu.
Some examples of using the Mouse Sequence action are:
- Automate multiple mouse clicks to perform a task, such as the clicks needed to select the content in a spreadsheet.
- Expand a web page menu to select the required menu option.
-
Retrieve data from a system needed to interact with the botflow that retrieved the data from that system.
-
Add click actions to botflows using interactions such as If clauses.
For best results when using the Mouse Recorder to add a Mouse Sequence action to a botflow, be sure to set your browser and system settings as follows:
- Browser zoom to 100%.
- Microsoft Windows Display Scale and layout to 100% (Settings >System >Display).
- Microsoft Windows Display Make text bigger to 100% (Settings > Ease of Access > Display).
Jump to:
Add a Mouse Sequence action to a botflow
- Click Tools in the Menu Bar Provides a variety of menus allowing you to use the commands in Nintex RPA LE. and select Record Mouse.
- Use your mouse to perform mouse actions:
- Click: Adds a Click action to the Mouse Sequence action.
- Right-click: Add as Right Click action to the Mouse Sequence action.
- Hover: Adds a Hover Mouse action to the Mouse Sequence action.
- Perform the following actions, as needed:
Click Stop on the Recorder window to complete the recording when all required mouse actions have been recorded.
-
Click Pause to temporarily pause the recording and click Resume to continue with the recording.
-
Click Cancel to cancel the recording.
Note: The Stop Mouse to record hover message applies to the Hover mouse action.
The Mouse Sequence is added to the botflow and can be further adjusted.
Adjust a Mouse Sequence action in a botflow
- Navigate to the Mouse Sequence on the Build Pane.
- Click the Mouse Sequence edit (pencil) icon.
- Select the required recorded mouse action:
- If needed, adjust the Rule settings to modify how Nintex Bot finds the application target.
- If needed, adjust the Run Error Task settings and Timing settings to fine tune how the action runs.
- View the action Details settings.
- (Optional) Add an action note.
- Click OK to save the Click, Right Click, or Hover Mouse action changes to the Mouse Sequence.
- Click Return to Task when all adjustments are complete to return to the botflow.
Tip: Click Test to test the recorded Mouse Sequence.
| Field or button | Description |
|---|---|
| Mouse Sequence options/settings | Click
The Bypass the mouse for a faster click option increases the speed of your botflow, if supported by the target application. Nintex RPA LE uses your mouse to click a target. Enabling the Bypass the mouse for a faster click option clicks the target without using the mouse. Applications responding to changes submitted by an actual mouse click will not support the Bypass the mouse for a faster click option. Perform the Click action in the botflow to confirm the expected actions are made by the Click action. Clicks resulting in a pop-up window are not supported. If the selected target is a check box, you will have the option of choosing how the check box is displayed.
|
| Rules |
Some actions have rules required to locate a target and vary based on the targeted application. Rules of a targeted application element are configured and saved with the action. The rules are then used to locate the proper targeted element, such as a Microsoft Excel workbook. Other notes about rules:
To set up the most common rules:
The Rules window displays the rules available for the selected targeted application. |
| Preview | All actions created using the Target Selector include a preview of the targeted element. |
| Details |
When directed by Nintex Support, click Details from the Preview Panel of the Action Builder. If needed, Nintex Support will supply additional information. |
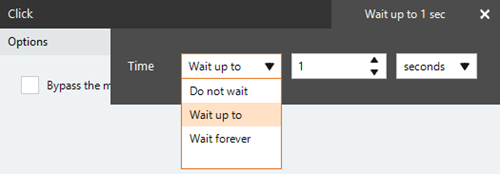
| Timing Settings |
Some actions have timing settings and vary based on the targeted application. The timing settings of a targeted application element are configured and saved with the action. The timing settings are then used to control when the action starts.
|
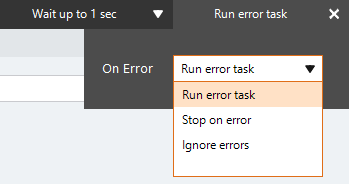
| Run error task |
|
| Note |
(Optional) Type a Note to document any special instructions or functionality.
|
| OK/Cancel | Click OK to save the action or click Cancel to discard the action or any changes. |