Third-Party Configurations
Before installing Process Discovery, there are some key steps to take. These include setting up databases (MariaDB and MongoDB) and configuring Seq (Structured Event Query Language).
While the System Manager supports an all-in-one installation, you will still need to separately install MongoDB and MariaDB. You have the option to install them on the same server or a remote server. However, it is recommended to install them on a remote server for optimal performance.
This list will walk you through the process, to ensure a successful Process Discovery installation.
Seq
-
Download Seq.
-
Locate and open the downloaded MSI installer file to start the installation process.
-
Follow the installation on-screen prompts and instructions.
Leave the installation configurations at their default settings unless you have specific requirements. -
Proceed with the installation and wait for the process to complete.
-
Start the Seq service.
If this is your first time installing Seq, selecting to start the Seq service will open the Seq Service Administration dialog for initial configuration. -
Provide a location to store Seq's data files and a URL to host the user interface and HTTP API. If you are unsure, it is recommended to choose the default options.
-
Deselect the option Create a limited user account for the Seq Windows Service.

-
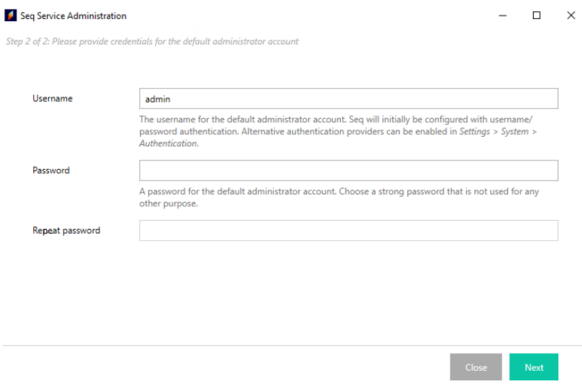
Complete the Password fields with a strong and unique password that is not used for any other accounts.
-
Click Next.
-
Open the Seq admin panel in your web browser.
-
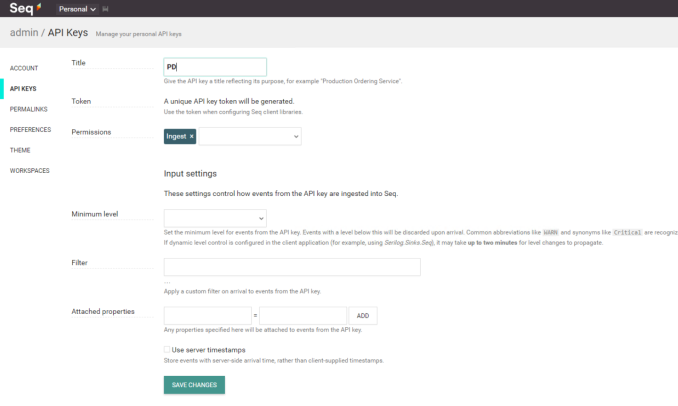
Navigate to the API Keys section in the admin panel menu.
-
Complete any required fields or provide necessary information for the API key, such as a name or description.
-
Choose the desired permissions or access levels for the API key. This may include options such as read-only access or full administrative privileges.
-
Click SAVE CHANGES to generate the API key.
-
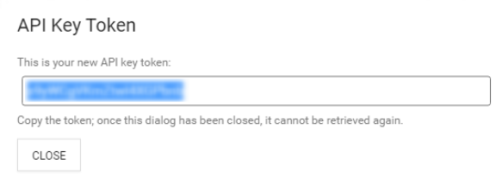
Make a note of the API key token for future reference and use. It is important to store the API key token securely as it will be needed for authentication and accessing the Seq API in the future.
MariaDB
-
Download the MariaDB Server installation package from the official website using the pre-signed URL provided: MariaDB Server Download.
-
Open the downloaded MSI installer.
-
Click Next.
-
Select the I accept the terms in the License Agreement checkbox.
-
Click Next until the installation wizard reaches the Default instance properties dialog.
-
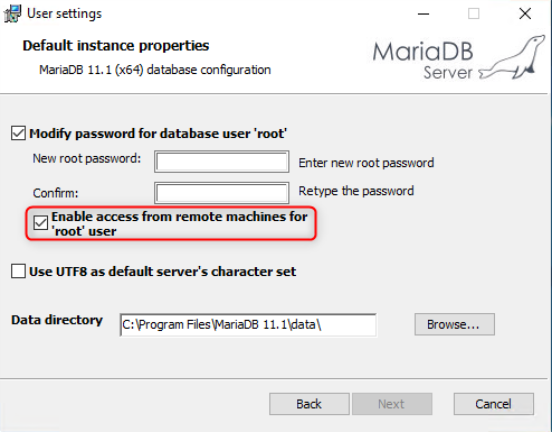
Set the password for the root user.
This password is important for administrative tasks, so choose a strong and secure password, and keep it accessible. -
Select the Enable access from remote machines for 'root' user checkbox. This will allow you to connect to the database from external tools.
-
Click Next until the installation wizard reaches completion.
-
Click Install to finalize the installation.
If you have upgradable instances of MariaDB/MySQL already running as services, an additional dialog will appear with a Do you want to upgrade existing instances checkbox. If selected, this checkbox will launch the Upgrade Wizard post-installation. For instances where you have installed a database instance as a service, the service will already be running.
-
Run the HeidiSQL Setup application (
HeidiSQL_12.4.0.6659_Setup) from the Process Discovery bundle zip file (C:\Downloads\nintex-pd-23.8.0-full\installer-assets). -
Follow the installation on-screen prompts and instructions.
Leave the installation configurations at their default settings unless you have specific requirements. -
Click Finish to complete the installation.
-
Launch HeidiSQL from the Start menu or by double-clicking the desktop shortcut.
-
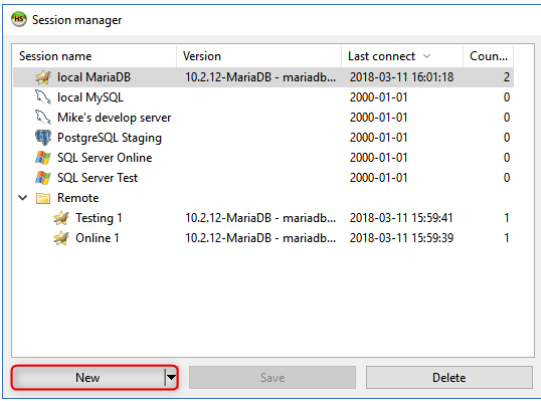
Click New in the Session manager.
-
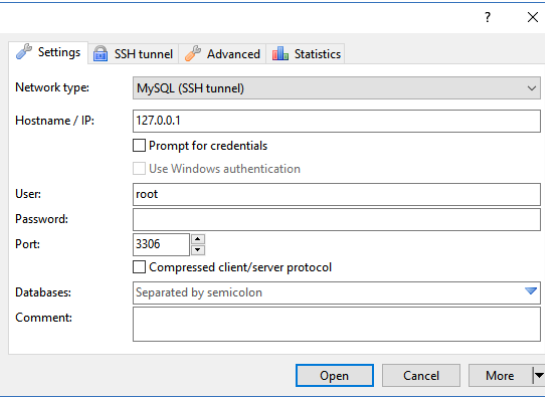
In the Settings tab, configure the connection details:
-
Network type: MariaDB or MySQL (whichever is applicable)
-
Hostname/IP: Enter the hostname or IP address of the server where MariaDB is installed.
-
User: Enter the username (typically 'root') for the MariaDB server.
-
Password: Enter the password associated with the username.
-
Port: Default is usually 3306 for MariaDB.
-
-
Click Open to establish the connection to the MariaDB server.
MongoDB
-
Download the MongoDB Community Server.
-
Run the installer package and follow the on-screen instructions to begin the installation process, using the default options.
-
Once the installation is finished, configure MongoDB by modifying the configuration file
C:\Program Files\MongoDB\Server\6.0\bin\mongod.cfgin a text editor like Notepad++ or a similar program:This is the default installation path, which may vary depending on your MongoDB version and whether you chose a different installation folder during installation.-
Remove the
bindIpfield in thenetsection. -
Add a new field called
bindIpAllin thenetsection with the value set to true. -
Add a new field called
ipv6in thenetsection with the value set to true.
-
-
Restart the MongoDB service.
-
Launch MongoDB Compass.
-
Click Connect to establish the connection to the local server.

-
Click on the + (Add) icon next to Databases on the left side menu.

-
Enter
kryon-dbin the Database Name and Collection Name fields.The collection name is required for the database setup but can be removed after the database is created since it's not needed for normal operations.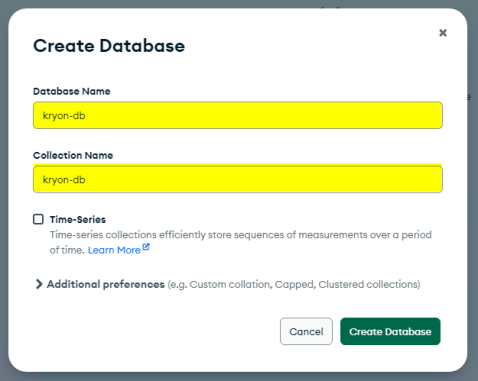
-
Choose additional options such as the Time-Series and Additional preferences if necessary.
-
Click Create Database.
MongoDB creates the database, and it appears in the list under the Databases section.
-
Launch MongoDB Compass.
-
Click on
>_MONGOSH, which is typically located near the bottom left of the application interface.
-
Enter the following command and press Enter. The confirmation should display
switched to db admin.Copyuse admin -
Enter the following command and press Enter to create a new user. The confirmation should display
{ ok: 1 }.The default password can be changed later if needed
Copydb.createUser(
{
user: "nintex",
pwd: "Nintex123!",
roles: [ { role : "readWrite", db: "kryon-db"}]
}
) -
Enter the following command and press Enter to create a new admin user. The confirmation should display
{ ok: 1 }.Copydb.createUser(
{
user: "admin",
pwd: "Nintex123!",
roles: [ "root" ]
}
) -
Minimize the MongoDB shell.
In the MongoDB shell window, in the top right corner of the shell interface, click the downward-pointing arrow to collapse or minimize the window.
-
Run the Robo 3T application (
mongodb-client-robo3t-1.4.1-windowns-x86_64-122dbd9) from the Process Discovery bundle zip file (C:\Downloads\nintex-pd-23.8.0-full\installer-assets). -
Click on Connect or go to File > Connect from the menu.
-
Click Create button to create a new connection.

-
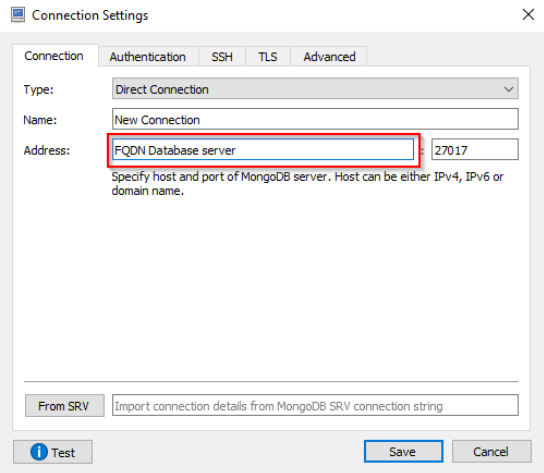
In the Connection tab, configure the connection details:
-
Type: Direct Connection
-
Name: A name to identify this connection.
-
Address: FQDN Database server
-
Port: 27017
-
-
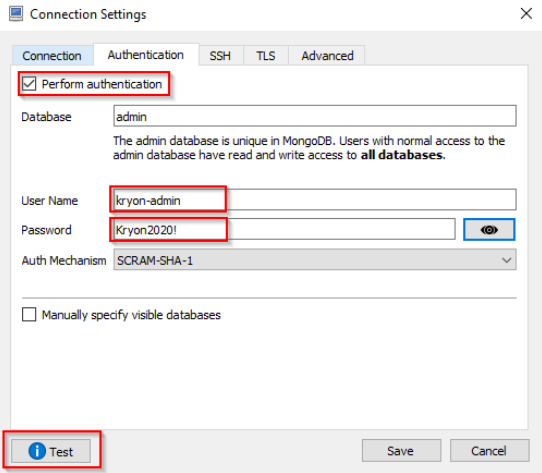
In the Authentication tab, configure the connection details:
-
Perform authentication: Check this box.
-
Database: admin
-
Username: Database username
-
Password: Database password
-
Auth Mechanism: SCREAM-SHA-1
-
-
Click Test to check the success of the connection.
Next step:
After completing these configurations, continue with the Process Discovery installation using either the GUI installer or the Silent installation.