MongoDB Manual Configuration

Manually install MongoDB 4.4.3 (or higher) by following these steps:
-
Download MongoDB from here.
-
Create the
Nintex-dbdatabase. -
Create the Process Discovery Administrator and default users following one of the options below:
Option 1: Create users through running designated commands
Option 2: Install and configure Robo 3T to create database users
Create the Nintex-db database
-
Create a new cluster of MongoDB with engine Version 4.0.0 and only one instance within the database subnet.
-
Connect to MongoDB.
-
Create the database
Nintex-db. -
Execute the following query on the MongoDB to create the users (or use Robo 3T to create users) :
```json
use admin
db.createUser(
{
user: "Nintex-admin",
pwd: "<<new-password-for-mongodb>>",
roles: [ "root" ]
}
)
db.createUser(
{
user: "Nintex-rw",
pwd: "<<new-password-for-mongodb>>",
roles: [ { role : "readWrite", db: "Nintex-db"}]
}
)
You can use Robo 3T ({InstallFolder}\Nintex\SupportTools\mongodb-client-robo3t-1.4.1-windows-x86_64-122dbd9\robo3t-1.4.1-windows-x86_64-122dbd9\robo3t.exe to connect to MongoDB.
Create users through running designated command
Run the following commands to create users:
-
To create a Process Discovery Administrator user run:
-
To create a Process Discovery default user run:
cd C:\Nintex\MongoDB\Server\4.4\bin
mongo
use admin
createUser({user: 'Nintex-rw', pwd: 'Kryon123!', roles: [ { role : 'readWrite', db: 'Nintex-db'}]})
cd C:\Nintex\MongoDB\Server\4.4\bin
mongo
use admin
db.createUser( { user: "Nintex-admin", pwd: "Kryon2020!", roles: [ 'root'] } )
Add TLS configuration for MongoDB (optional)
-
Copy the file
rds-combined-ca-bundle.pemtoC:\Nintex\config\prod\general\ssl\rds-combined-ca-bundle.pem(you might need to create the folder first). -
Replace the content of the file
C:\Nintex\config\prod\general\mongodb-connector-Nintex-db-r.jsonwith the following and insert the domain: -
Replace the content of the file C:\Nintex\config\prod\general\mongodb-connector-Nintex-db.json with the following and insert the password and the domain:
-
Replace the content of the file
C:\Nintex\config\prod\general\mongodb-connector-Nintex-db-admin.jsonwith the following and insert the password and the domain: -
Open CMD and run:
```json
{
"name" : "mongodb-connector-Nintex-db-r",
"value" : {
"dbName" : "Nintex-db",
"url" : "mongodb://<<domain-of-cluster>>:27017/Kryon-db?authSource=admin&tls=true&tlsCAFile=rds-combined-ca-bundle.pem&replicaSet=rs0&readPreference=secondaryPreferred&retryWrites=false",
"debug" : true,
"options": {
"poolSize": 10,
"tls": true,
"tlsInsecure": false,
"tlsCAFile": "rds-combined-ca-bundle.pem",
"useNewUrlParser": true,
"sslValidate": true
}
}
}
```
```json
{
"name": "mongodb-connector-Nintex",
"value": {
"description": "",
"dbName" : "Nintex-db",
"url": "mongodb://Kryon-rw:<<password>>@<<domain-of-cluster>>:27017/Kryon-db?authSource=admin&tls=true&tlsCAFile=rds-combined-ca-bundle.pem&replicaSet=rs0&readPreference=secondaryPreferred&retryWrites=false",
"debug": true,
"options": {
"poolSize": 10,
"tls": true,
"tlsInsecure": false,
"tlsCAFile": "rds-combined-ca-bundle.pem",
"useNewUrlParser": true,
"sslValidate": true
}
}
}
```
```json
{
"name": "mongodb-connector-Nintex",
"value": {
"description": "",
"dbName" : "admin",
"url": "mongodb://Kryon-admin:<<password>>@<<domain-of-cluster>>:27017/admin?authSource=admin&tls=true&tlsCAFile=rds-combined-ca-bundle.pem&replicaSet=rs0&readPreference=secondaryPreferred&retryWrites=false",
"debug": true,
"options": {
"poolSize": 10,
"tls": true,
"tlsInsecure": false,
"tlsCAFile": "rds-combined-ca-bundle.pem",
"useNewUrlParser": true,
"sslValidate": true
}
}
}
```
```bat
cd C:\Nintex\PDServer\Support\Nintex-admin-cli
set CONFIG_DIR=C:\Nintex\config
set NODE_ENV=prod
set Nintex_ENC_CFG=C:\Nintex\config\prod\general\Nintex-decrypt.json
set NODE_PATH=C:\Nintex\PDServer\MicroServices\node_modules
node bin\cli.js --provider=mongodb --command=uploadCodex --collectionName=masking-codex --fileName=C:\Nintex\PDServer\MicroServices\AlgoNextGen\masking-private-codex.csv --tenantName=default
```
Install and configure Robo 3T to create database users
Robo 3T (Robomongo) is the free, lightweight, open-source MongoDB GUI with an embedded mongo shell.
-
Downland and install Robo 3T: Floating Content Panels.
-
Robo 3T is included in Process Discovery installation under
${InstallationFolder}\Nintex\SupportTools. -
You can download Robo 3T also from here.
-
-
Open Robo 3T > Click on File > Click on Connect.
-
Click Create to create a new connection.
-
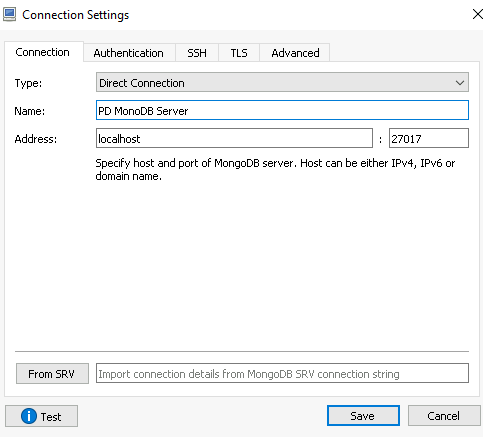
In the Connection tab, specify the MongoDB server FQDN and port.
-
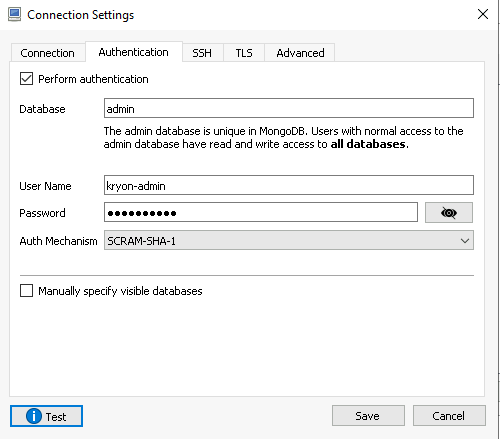
In the Authentication tab, Check the “Perform authentication” checkbox and specify the username and password.
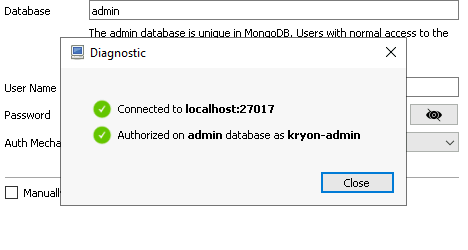
- Make sure the details are accurate by clicking on Test.
-
Click Save.
-
Select the newly created connection and click Connect.
EXAMPLE:

EXAMPLE:

