Configuring LDAP with SSL (LDAPS)
Lightweight Directory Access Protocol (LDAP) is a lightweight, open-source application protocol that is used to access, authenticate, and manage directory services over TCP and IP protocols.
LDAPS is an upgraded LDAP that is more secure by allowing for the encryption of the LDAP data while it is being exchanged with the LDAP server. This helps prevent theft of user credentials, securing the connection between client and server, and makes LDAPS the accepted standard directory protocol in place of LDAP.
Prerequisites
-
LDAPS certificate: This can be downloaded from your LDAP provider management tool.
-
The certificate must be valid for Server Authentication. This means that it must also contain the Server Authentication object identifier (OID): 1.3.6.1.5.5.7.3.1
-
The subject name, or the first name in the Subject Alternative Name (SAN), must match the Fully Qualified Domain Name (FQDN) of the host machine, such as Subject: CN=Nintexldaps
-
The host machine account must have access to the private key
-
-
User credentials for Nintex Aerobase/ Keycloak Authentication platform.
Configuring LDAP with SSL
If you are using LDAP integration, and you need to move to LDAPS, you need to secure LDAP over SSL.
To configure LDAP over SSL:
-
Open the LDAP Management tool.
-
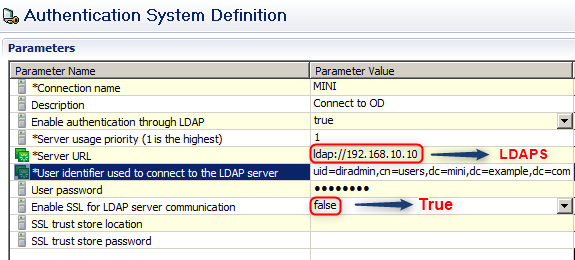
Make sure the server URL begins with LDAPS and set the Use SSL to
True. -
Login to the Aerobase console or Keycloak Admin.
-
Go to Identity Provider (under Configure on the left pane).
-
To configure the LDAPS provider, you have these options:
-
Import the LDAPS provider metadata via URL.
-
Import LDAPS provider metadata via an XML file.
-
Modify the current LDAP configuration to use LDAPS.
-
-
For more details, see Adding another LDAP user federation and Kerberos
-
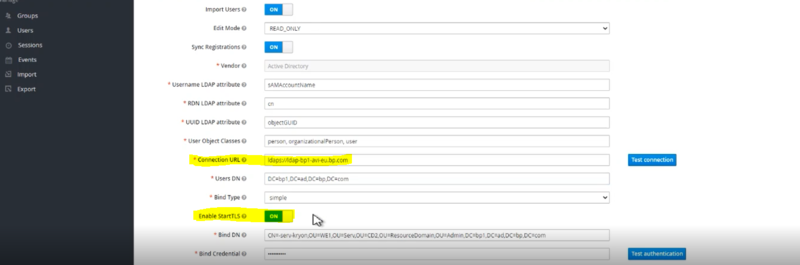
Change the Connection URL to your SSL URL.
-
Set Enable StartTLS to ON
-
Import the LDAP Certificate to the JRE KeyStore.
If tested, the connection with LDAPS should now be successful.
Import the LDAP Certificate
To ensure a successful authentication, you need to import the LDAP certificate to the JRE KeyStore using the Keytool command.
To import the LDAP certificate:
-
Find the location of the Java Home path by searching for %Java_Home%.
-
Copy and rename the default KeyStore cacerts file as jssecacerts.
-
Open CMD as an administrator.
-
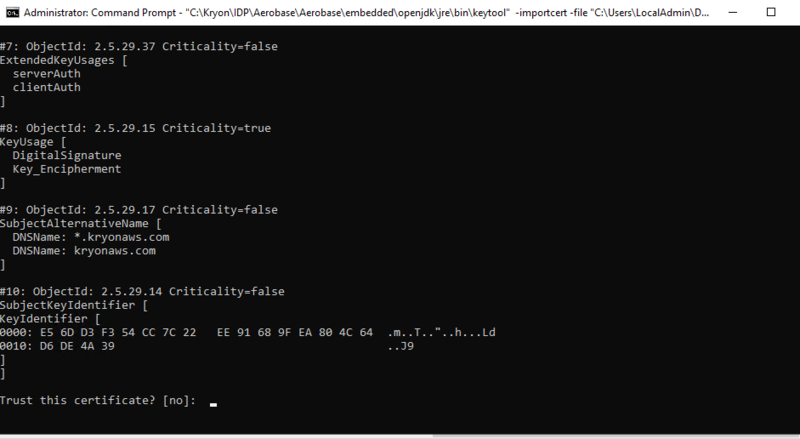
Import the certificate to the jssecacerts KeyStore using the following command:
"C:\Nintex\IDP\Aerobase\Aerobase\embedded\openjdk\jre\bin\keytool" -importcert -file "C:\Users\LocalAdmin\Desktop\NintexCert.cer" -alias Nintex14-126.Nintexaws.com -keystore "C:\Nintex\IDP\Aerobase\Aerobase\embedded\openjdk\jre\lib\security\jssecacerts" -storepass changeit
-
Replace $JDK_HOME with your actual JDK home path.
-
Replace $CERT with the path to your certificate that you previously installed in the system.
-
Replace $ALIAS with the preferred alias to be used in the KeyStore.
-
The command output should match this:
-
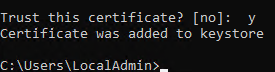
Trust this certificatemessage appears, type y and press Enter. -
The certificate is imported:
-
Restart all of the Aerobase services and complete the LDAPS Configuration.
<Java_Home>/lib/security/cacerts to <Java_Home>/lib/security/jssecacerts

Always place the command in a notepad, as it needs to be run on a single line.
The default syntax is:
$JDK_HOME/bin/keytool -importcert -file $CERT -alias $ALIAS -keystore
$JDK_HOME/lib/security/jssecacerts -storepass changeit
The LDAPS connection can now be authenticated successfully.