Sort and filter table data
Use sorting and filtering to organize and find specific data in a table. You can sort table data by one or more columns and apply filters to display only rows that match specific criteria.
Jump to:
Sort table data
You can sort table data by a single column or by multiple columns.
Sort multiple columns
You can now sort table data by multiple columns simultaneously. Select up to three columns to define the sort order. For example, you can sort form submissions by Status, then Due date, then by Name.
-
Only columns that support sorting are available for selection when sorting. Some column types, such as People (multiple), Relationship, Text-Long, and Multi-select, don't support sorting.
-
Applying multi-column sorting replaces any existing sorting applied to individual columns.
-
You can sort by up to 3 columns at a time.
-
Go to Tables.
-
Open the table you want.
-
On the top right, click Sort.
-
In the Sort by field, select the column you want to sort by.
-
Select the arrow next to the column to set the sort direction as Ascending or Descending.
-
Click Add to add another column to the sorting order, and repeat the previous steps.
-
Click Apply.
Sort by one column
By default, the data in a table is sorted based on the date it was created. You can sort the data in the table by a column. You can sort by the Created date and Modified date columns, or a column that supports sorting.
To sort the table by a column
-
Go to Tables.
-
Open the table you want.
-
Hover over the column header of the column you want to sort.
-
Click
 .
.
Note: Only one column can be used for sorting at a time.
You can filter table data to display only the rows that match specific criteria. Filters can be applied to individual columns or you can create filter groups to group filters together for more complex queries.
-
Filtering by columns: Users can apply filters to individual columns to display rows that match specific criteria. For example, filtering the Status column to display only Active entries, or the Amount column to show values greater than 5,000. These filters can be applied one at a time or together for more refined results.
-
Filter groups: A filter group is a collection of filters, grouped together to apply more advanced logic. How you group filters affects the order and logic of how they are applied.
Note: You can nest a filter group inside another filter group. Each filter group can have a maximum of two more filter groups inside it.
-
And/Or operators: Use the And and Or operators to control how filters are combined. The And operator requires all filters to be true for a record to match. The Or operator requires at least one condition to be true for a record to match.
Jump to:
Filter table data
You can filter table data to display only rows that match specific criteria. You can apply filters to individual columns or create filter groups for more complex queries.
-
Go to Tables.
The Tables page is displayed and lists all the existing tables created in the tenant.
-
Open the table you want to filter.
-
On the top right of the table, click Filter.
-
Add filters or create filter groups:
-
Click Add filter to:
-
Choose a column
-
Set a condition (equals, greater than, contains)
-
Enter a value.
-
You can use multiple filters and use the And/Or drop-down to control how filters are evaluated.
-
-
Click Add filter group to:
-
Group multiple filters together.
-
Use the And/Or drop-down to control how filters within the group are evaluated.
-
Tip: When you add another filter or filter group, the And/Or operator defaults to And to connect the filters. You can change this to Or depending on the required logic.
-
-
After you set the filters, click Apply to view the filtered data.
Clear or delete filters
You can delete one filter or clear all to remove all filters and return to the unfiltered table data view:
-
Go to Tables.
The Tables page is displayed and lists all the existing tables created in the tenant.
-
Open the table.
-
On the top right of the table, click Filter.
-
To delete filters:
-
Click Clear All to remove all filers and return to the unfiltered table data view.
-
Click
 next to a filter to remove one filter.
 -
Click Delete Group to delete an entire filter group.
-
-
Click Apply.
Example: Filter sales employees based on performance, region, or travel frequency
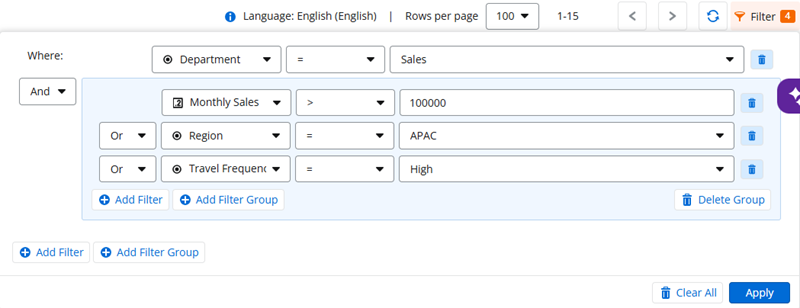
You can use filters and filter groups to filter table data to show only Sales department employees who meet specific criteria, such as high monthly sales, being in a particular region, or travel frequency.
Filter criteria:
Show all employees in the Sales department, with the following criteria:
-
Have monthly sales greater than 100,000
-
OR are located in the APAC region
-
OR have a travel frequency of High
You can set the following filter and filter group:
-
Click Add filter and add the following filter criteria:
-
Column: Department
-
Operator: =
-
Value: Sales
-
-
Click Add filter group and add the following filters:
-
Monthly Sales > 100000
-
Region = APAC
-
Travel Frequency = High
-
-
Use And between the Department filter and the filter group.
-
Use OR between filters within the filter group.
-
Click Apply.
The filter query used for this criteria is: department+eq+%27Sales%27+and+%28monthlySales+gt+100000+or+region+eq+%27APAC%27+or+travelFrequency+eq+%27High%27%29
Tip: When the filter is applied, the URL of the workflow will reflect the query from filter onwards. For example, for this filter query the URL is: https://NWtenant.com/dashboard/tables/1419920679825842176?filter=department+eq+%27Sales%27+and+%28monthlySales+gt+100000+or+region+eq+%27APAC%27+or+travelFrequency+eq+%27High%27%29
The breakdown of the filter:
filter = department eq 'Sales'
and
(
monthlySales gt 100000
or region eq 'APAC'
or travelFrequency eq 'High'
)
The filter is executed in the following order:
-
Parentheses: Expressions inside parentheses are evaluated first.
-
Logical AND (and): Evaluated before OR.
-
Logical OR (or): Evaluated after AND.
-
Comparison operators (eq, ge, le, etc.): Evaluated within each logical group.