Use the Tagger to add field tags to your document package
Once a document template has been created or before you upload it, you can add field tags to the document package. Tags are placeholders for data that is related to the page the document is being generated from. Once created, tags can be copied and pasted into your document using the Tagger.
For example, let's say you want to generate a document that contains the following information:
-
Client name
-
Client address
-
Company name
-
Case ID number
In order to generate a document with the above data you need to add those fields to the document using tags created in the Tagger. Once the document is generated that data is filled in automatically, without the need to manually enter data each time you generate the document.
You can use the Tagger from your document package designer to add and manage tags in two ways:
-
Within the online editor when editing your Microsoft Word document (Recommended)
-
Tag documents outside the designer
The tagger is the same for both these methods. You can define tags for the document package using either of these methods.
Add tags to a document within the document package designer
When you edit a document created or uploaded to the document package designer, you can add tags to your documents within the editor, without having to switch tabs between the editor and the designer.
Nintex Documents add-in
The Tagger in the online editor uses the Nintex Documents add-in, which requires authorization the first time you use it. Click Allow and Continue.
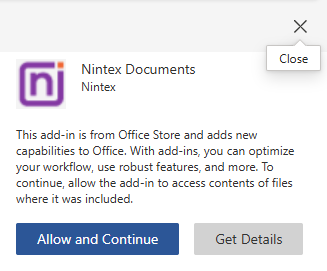
Note: This add-in is used only for tagging documents when using the editor in the Document Package designer. It does not allow tagging of documents in Microsoft Word (Desktop) and Microsoft Word Online.
To add tags to a document in the online editor:
-
In the document package designer, click Edit on a document.
The document opens on a separate tab.
In the editor, on the formatting ribbon, click Nintex Tagger.

The Tagger pane is displayed.
-
Create tags:
-
Click in the Tags field, and type in the name of the tag. For example, using the information above you would type in "Client Name".
-
Click Add. Once you add the tag it appears in the Tags section, along with the ability to copy the tag.
-
Create more tags as required.
-
Once all of the tags have been added, click Save.
-
-
Add tags to your document:
-
Click + next to a tag you want to copy. You can copy only one tag at a time.
-
Paste each tag into a required location in your document. For example, the client name and address might go into the top-left hand corner of the document.
-
Create tags for a document you want to upload to a document package
You can add and edit tags before you upload a document to your document package.
The Tagger pane is displayed when you open the document package designer.
Create tags:
-
Click in the Tags field, and type in the name of the tag. For example, using the information above you would type in "Client Name".
-
Click Add. Once you add the tag it appears in the Tags section, along with the ability to copy the tag.
-
Create more tags as required.
-
Once all of the tags have been added, click Save.
Add tags to your document:
-
Within the Tagger pane, click the copy button next to a tag you want to add to the document. Only one tag can be copied at a time.
-
Open the document you are going to be uploaded to the document package.
Tip: If you have a screen large enough you can use the Windows functionality to display the Tagger on one side of the screen and have the document open on the other side of the screen. That way you can easily copy each tag and add it into your document.
-
Paste each tag into a required location in your document. For example, the clients name and address might go into the top-left hand corner of the document.
-
After adding in all the required tags, save the document. You will then need to upload this document to the document package.
Add a tag to your document package settings
To add a field tag to the Output filename field in your document package settings:
-
Create the tag in the Tagger and copy the tag following the steps above.
-
In Settings, paste the tag into the Output filename field. For example, add the tag <<custom_document_name>> to the field.