File viewer
Use the File viewer form control to allows users to preview files directly in forms. This makes it possible to view uploaded content in your form.
Supported file types
-
PDF
-
EXCEL
-
IMAGE
-
TXT
-
DOCX
-
RTF
-
PPTX
Supported file extensions
-
.pdf
-
.png
-
.jpg
-
.jpeg
-
.gif
-
.webp
-
.svg
-
.docx
-
.pptx
-
.xlsx
-
.csv
-
.txt
-
.rtf
Where the file viewer form control can be used:
-
Start form: Provides a preview of files uploaded on a start form.
-
Table form: Provides a preview of files uploaded on a table form.
-
Task form: Provides a preview of files uploaded on the start form using reference table data variables for File type table columns. To use this:
-
Enable the file uploaded on the start form to be saved to a table using an existing workflow action.
-
Use a table variable referencing the File type column to display the file in the task form.
-
-
Start or task form using URL: The designer can pass a publicly available URL of a file to the File Viewer control.
-
Files from other URLs might not display due to CORS restrictions. For best results, upload the file to a table and use table variables to reference it.
-
File previews are not supported in the File viewer on anonymous forms when the file is referenced through a table variable. To preview files, the form must be an authenticated form.
Preview a file uploaded in the same form
You can configure the File viewer control to display a file that a user uploads in the same form.
For example, a user uploads a receipt using a File Upload control, and you immediately display a preview of that receipt in the File Viewer.
-
Add a File upload control to your form (e.g. Receipt Attachment).
-
Add a File viewer control.
-
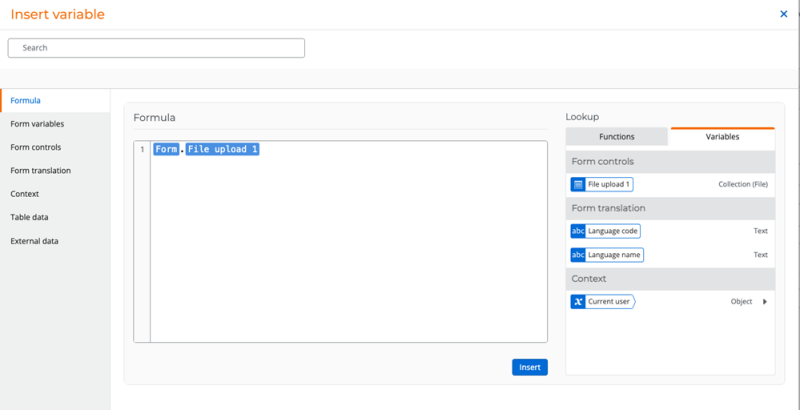
In the File viewer control File viewer input field, set the file source using a formula:
-
Click Insert. The Insert variable dialog that includes the Formula builder is displayed.
-
Open the Variables tab.
-
Under form controls, select the File upload control you added in the 1st step.
-
Set the file source using a formula.
-
Form.File Upload
-
-
Save the form.
Once a file is uploaded, it will automatically appear in the File viewer control.
Add a File viewer to a task form
A common scenario is showing a file uploaded earlier in the workflow so reviewers can open it in a task form.
This example demonstrates a common approval scenario where a file is uploaded on a start form, saved to a table, and then displayed in a task form for review.
-
Configure the start form.
-
Add a File upload form control to the start form.
Form user uploads a file when submitting the form.
-
-
Save the file to a Nintex Data table using a workflow action.
-
In the workflow use a Tables - Create a row action to create and save the submitted form data including the file to a table.
-
Map the File upload control in the form to a File type column in the table.
-
-
Add a Assign a task to multiple users to the workflow.
-
Add a File viewer control to the task form.
-
Connect the File viewer to the uploaded file in the table using a table data variable:
-
Insert > Table data > [Select table data variable] > Rows > File-type column
-
-
Publish and run the workflow.
The file will now appear in the task form for users to preview.
| Section | Setting | Description |
|---|---|---|
| (unlabeled) | Title |
Field name displayed on the published form. |
| File viewer input |
Enter one or more URLs or variables, each on a new line. These will be used to load files in the viewer. To display a file from a Nintex data table in the File viewer control:
|
|
|
Name |
(This field becomes configurable only when you switch the Customize toggle to Yes.) Customizes the name of the variable A placeholder that stores changes each time the workflow runs, such as the information entered in a form, or the name of a file. You can also create variables to store information you use in a workflow, such as an email address. for the field. If the name is not customized, the Title will be used as the variable name. |
|
| Connected to |
This field is only available when configuring the form control for Table forms. Connects the form control to a column in the table. When a column is selected, the control is connected to that table column and can store values in the column. Only compatible columns based on data type can be selected. Use the Connected to field to:
|
|
|
Visible |
Shows the field on the published form when loaded. |
|
|
Description |
Helper text displayed below the field on the published form. |
|
| Styling | CSS class |
Add a CSS class to apply a style to this form control. You can create the CSS class in the CSS code editor in form styles. Enter one class name or multiple class names separated by a space. For more information, see Add a custom CSS to individual controls. Note: The CSS Class field is available only if the Custom CSS setting is enabled in Nintex Workflow Form settings. |
| Border color |
Border color to apply to the field. To select a color, click the color box and use the color picker to specify the color you want. You can click on the color map to select the color or enter the Hex code. To revert back to the global style, click Reset to global style. |