19. (Optional) Clean up your environment by deleting the application artifacts
This optional step describes how you can clean your environment by deleting the artifacts that you created in this tutorial. For example, if you are working in a shared environment, you may want to delete your tutorial applications to keep your environment clean and tidy.
Delete application elements for the Documents to Review and Approve library.
In this step, you delete the workflows, views, forms, and SmartObject that you generated for the Documents to Review and Approve library.
- From the Documents to Review and Approve application elements page, select the Document Review Workflow and click Delete. You see a message that gives you the options to delete all versions and historical log data. Check both of these options and click Yes. Repeat this step for the Document Approval Workflow.
- Delete artifacts from the Documents to Review and Approve application elements page. To navigate to the page, open the Documents to Review and Approve library. Click the K2 menu and select Application.

- On the application elements page, you see a list of artifacts K2 generated when you created the elements. (Remember, you selected the Data, Forms, Workflow, and Reports elements, then added a second workflow.) You begin by deleting the workflows. Select the Document Review Workflow and click the Delete button.

- You see a confirmation message asking if you want to delete all versions and running instances, as well as historical log data. Check the box for each option and click Yes.

- It may take a few minutes for the product to process the command. First, the product deletes any active process instances, then it deletes all versions of the workflow. Typically, there is a new version each time you deploy the workflow, so you may have several versions to delete. When the workflow is no longer displayed, you can delete the second workflow. Select the Document Approval Workflow and click Delete.

- Check both boxes to delete all versions and running instances, along with historical data. Click Yes.

- Next, you delete forms. You should delete forms before deleting views. Select the Documents to Review and Approve Workflow Reports form and click Delete. Click Yes for the confirmation. Repeat this step and delete the remaining forms.

- Now, you can delete the views. Select the Documents to Review and Approve Workflow Reports view and click Delete. Click Yes for the confirmation. Repeat this step and delete the remaining views.

- In the steps above, you deleted artifacts individually. To complete the process however, you need to delete the SmartObject. You cannot delete the SmartObject using the Delete button. This is because of underlying associations the product created when generating the SmartObject. Instead, you will use the Delete All option. This options resolves any associations first, then deletes the SmartObject. Click Delete All. (In fact, you could just click this button in the first place if your intention is removing the entire application artifacts. We just wanted you to see how to delete individual items in the event you need to.)

- You see a confirmation message that tells you all items are removed, including categories. Click Yes.

- Delete artifacts from the Documents to Review and Approve application elements page. To navigate to the page, open the Documents to Review and Approve library. Click the K2 menu and select Application.
Finish the clean-up by deleting the SharePoint library and subsite.
In this step, complete your clean-up by deleting the SharePoint libraries and subsite.
- For a complete scrub of your environment, be sure to delete the Documents to Review and Approve and Approved Documents libraries, and finally the subsite (if you created one).
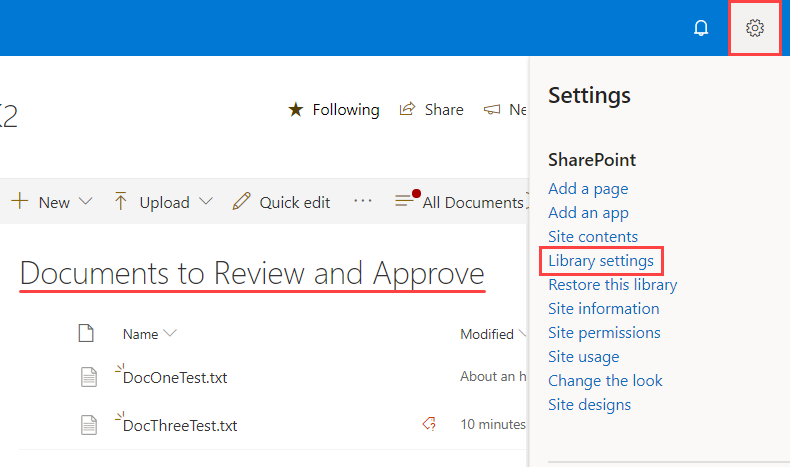
- To delete the Documents to Review and Approve library, click the Settings cog and select Library settings.

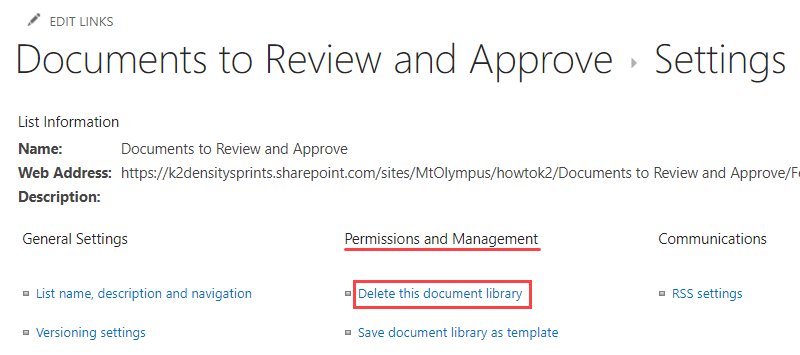
- Under Permissions and Management heading, click Delete this document library, then OK for the confirmation.

- Navigate to the Approved Documents library settings page. Under Permissions and Management, click Delete this document library, then OK for the confirmation.
- Delete the subsite (if you created one). Contact your SharePoint administrator for instructions on deleting sites in your environment.
- To delete the Documents to Review and Approve library, click the Settings cog and select Library settings.
Summary
The Document Review and Approval tutorial focused on building applications with SharePoint libraries. Now that you have completed this tutorial, you should know:
- How a SharePoint library can store data and start new workflows
- How to add user task and system task steps to the workflow design canvas
- How to build a workflow with a rework loop
- How to start workflows manually from a SharePoint library
- How to include documents as attachments to emails
- How to edit SmartForms to further customize the user experience
- How to clean your environment by deleting artifacts no longer needed