K2 Workflow Importer
Microsoft has announced that support for the Office 365 SharePoint 2013 Workflow Engine will end on April 2, 2026. To ensure continuity, Microsoft recommends migrating to a supported workflow orchestration solution. Nintex Automation K2 provides such a solution.
If you currently rely on SharePoint 2013 workflows, you must migrate your existing workflows to Nintex Automation K2 before the Microsoft deadline. From Nintex Automation K2 (5.9) onwards, you can use the K2 Workflow Importer to simplify this process. The K2 Workflow Importer enables you to package your existing Nintex for SharePoint-based workflows and import them into the product while retaining most steps, configurations, and rules.
To prevent issues when using the K2 Workflow Importer, ensure you have the latest fix pack installed. For more information, see Nintex Automation K2 5.9 Fix Packs.
Use the K2 extraction script to extract workflows from lists, libraries, site collections, and sites on the Nintex for SharePoint server. The script packages these workflows so they can be imported into Nintex Automation K2.
Before packaging your workflows, ensure the following requirements are met:
- Download the K2 extraction script to the server hosting Nintex for SharePoint.
- You must have administrative access to the server that hosts SharePoint Central Administration, where the script will be executed.
- The administrator account running the script must have SPShellAdmin privileges.
- The server must be running PowerShell version 5.0 or later.
Before running the script:
-
Review and identify which workflows you plan to import.
-
Remove any dormant or unused workflows to avoid packaging unnecessary items.
-
Ensure that at least one published workflow exists in each list or library you plan to include. Lists or libraries that contain only draft workflows will not be packaged.
Depending on how the script is executed, the following components can be packaged:
- Workflows from lists and libraries.
- Workflows from SharePoint site collections.
- Site workflows
A list or library must contain at least one published workflow. If there are only draft workflows in a list or library, no workflows will be packaged for that list or library.
The K2 extraction script packages workflows from selected lists or libraries or from an entire site collection. After downloading the script, extract it to a directory of your choice. The extracted folder contains two scripts, K2ExtractionMain and K2ExtractionStart.
- Right-click the K2ExtractionStart script and select Run with PowerShell.
- When PowerShell opens, enter P to create a package.
- Choose the extraction scope:
- If you choose L (list or library):
- The list or library must contain at least one published workflow.
- All workflows in that list or library will be packaged, including unpublished ones.
- If packaging multiple lists or libraries, each will be saved as a separate package in the destination folder.
- Provide the web-relative URL without a trailing slash (e.g., https://sharepoint.contoso.com).
- When prompted for the List Title, enter the exact name of the list or library.
- Separate packages are created for lists or libraries that contain at least one published workflow.
- Lists or libraries containing only draft workflows will not be packaged.
- Enter the SharePoint site URL without a trailing slash (e.g., https://sharepoint.contoso.com/sites/HR).
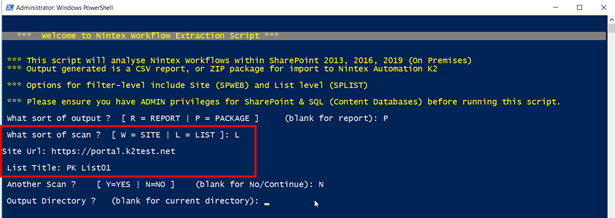
- Optional: Another Scan (Scan additional lists or libraries)
- Enter Y (Yes) to include multiple lists or libraries.
- Enter N (No), or leave the field blank, to continue to the next step.
- Output directory:
- Enter Y (Yes) to specify a custom folder where the packages will be saved.
- Enter N (No), or leave the field blank, to save the packages in the same folder as the scripts.
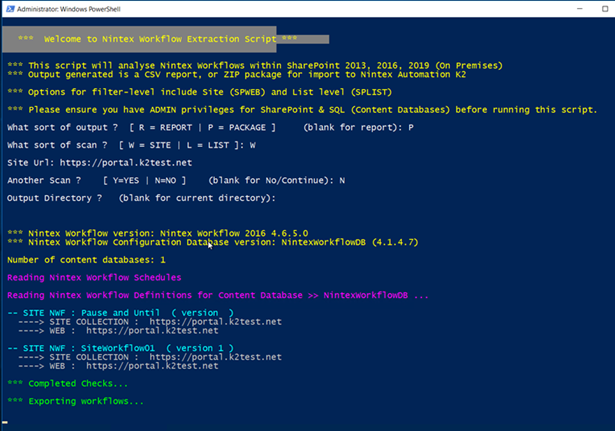
The script packages all extracted workflow files into the specified output directory.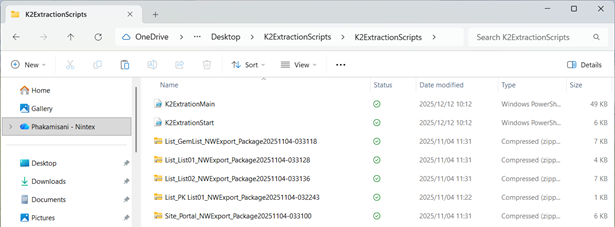
At this stage, your workflows have been packaged and are ready to be imported into Nintex Automation K2.
Before importing, ensure the following requirements are met:
- An active K2 for SharePoint application.
- A target list or library and a SharePoint application with SmartObjects. The application generates the necessary artifacts in categories that the K2 Workflow Importer uses during the import process.
- Permissions to create or deploy applications.
- Permissions to use applications.
- Site workflows cannot be imported using the K2 Workflow Importer since they are not associated with a list or library. Use Swagger UI to import site workflows. See Nintex site workflows for more information about importing these workflows into Nintex Automation K2.
Locate and run the K2 Workflow Importer in the Designer to import a packaged workflow into a SharePoint list or library.
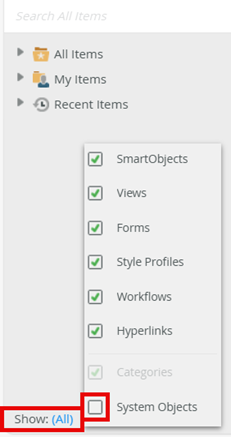
- In the Designer, enable the display of the hidden System folder in the category tree. To do this:
- Click the (All) link next to Show at the bottom.
- Select the System Objects check box.
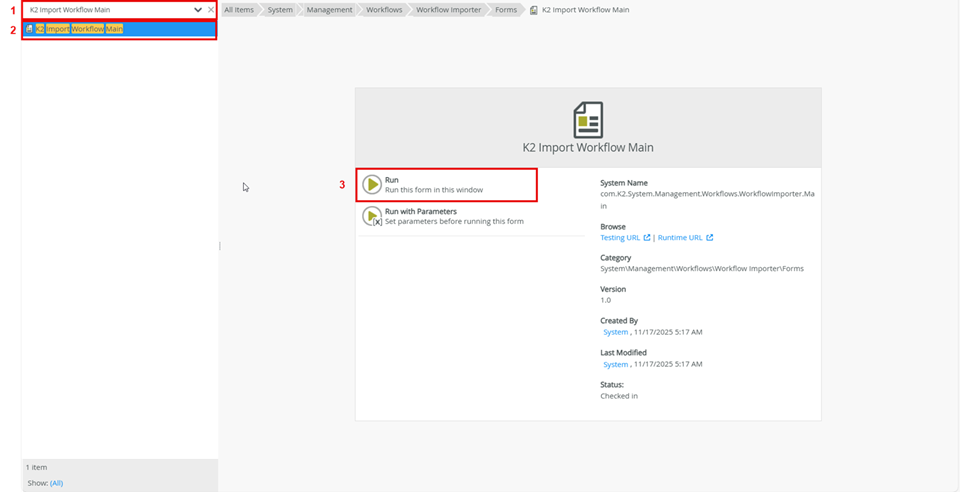
- In the category tree search bar, type K2 Import Workflow Main.
Alternatively, click the arrow next to All Items in the category tree and expand the categories in the following order:
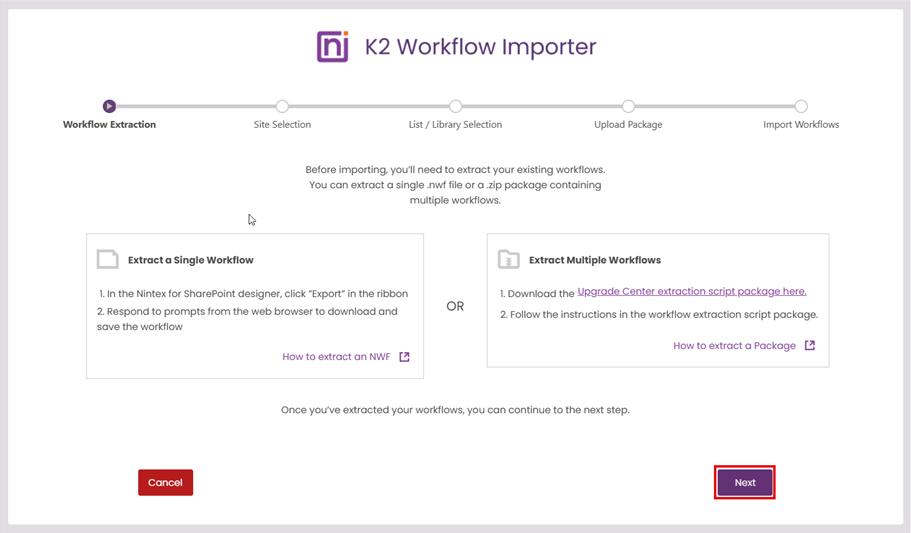
\System\Management\Workflows\Workflow Importer\Forms - Click K2 Import Workflow Main, and then click Run to open the K2 Workflow Importer.
- On the Workflow Extraction step, click Next. Note:
When using the option Extract a Single Workflow to export workflows from the Nintex for SharePoint designer, ensure you use one of the supported versions as listed below:
- Nintex for SharePoint 2013: All versions supported.
- Nintex for SharePoint 2016: Workflow product version 4.6.15.0 or earlier.
- Nintex for SharePoint 2019: Workflow product version 5.2.15.0 or earlier.
- Nintex for SharePoint Subscription Edition (SE): Workflow product version 6.0.11.0 or earlier.
For version information, see the release notes for Nintex for SharePoint 2016, Nintex for SharePoint 2019, and Nintex for SharePoint SE.
If you are using one of the versions above, you must serialize your .nwf file before it can be recognized by the K2 Workflow Importer. Download the Nintex Workflow Serializer Package (.zip) and follow the steps included in the Convert-NintexWorkflow.ps1 user guide to complete the conversion.
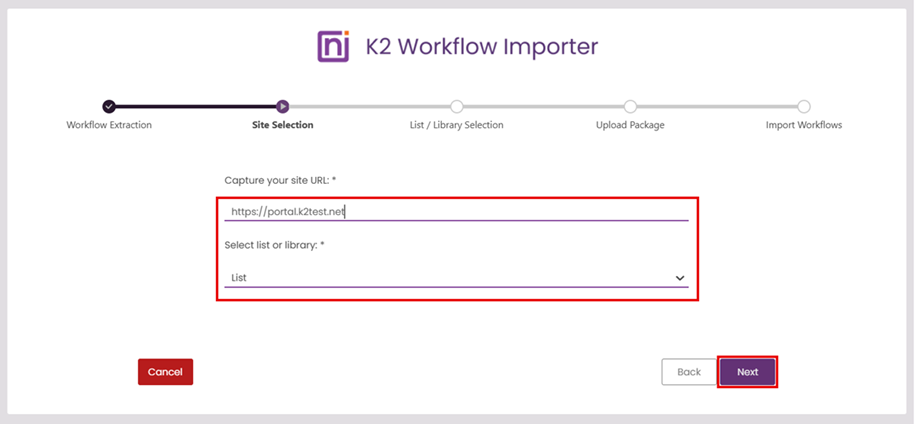
- On the Site Selection step, enter the SharePoint site URL where you want to import the workflow. Choose whether you are importing into a List or Library in the drop down list, then click Next.
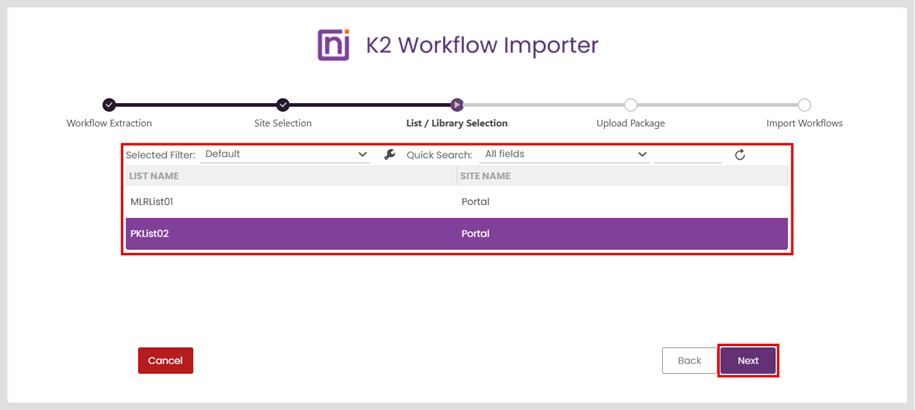
- Select the target list or library you created in SharePoint, then click Next. Your workflow will be imported into this category using the list or library name as the category name.
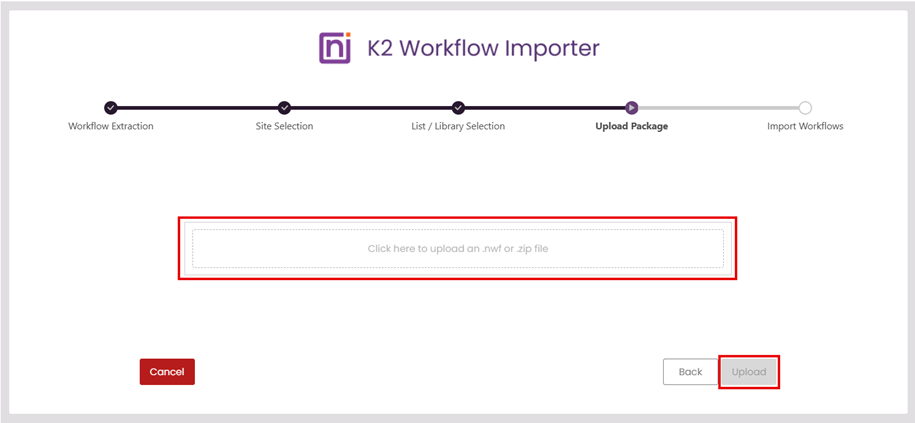
- Click the upload link, browse to your workflow package, and click Upload.
The K2 Workflow Importer supports the following file formats:
- .nwf (single workflow file)
- .zip (zipped package containing multiple workflows)
- Click Finish.
After importing the workflow, verify that all components were created successfully and mapped correctly.
To validate the import:
- Confirm that the workflow appears in the target list or library in the Designer and in SharePoint.
- Read the conversion.log file located at:
C:\Program Files\K2\ServiceBroker\Conversion\Logs
This file lists any warnings or errors that may have occurred during the import process. See Post import for steps required after importing the workflow, and Troubleshooting for tips with errors.
After the import is complete, additional configuration may be required depending on the complexity of the workflow.
To configure the imported workflow:
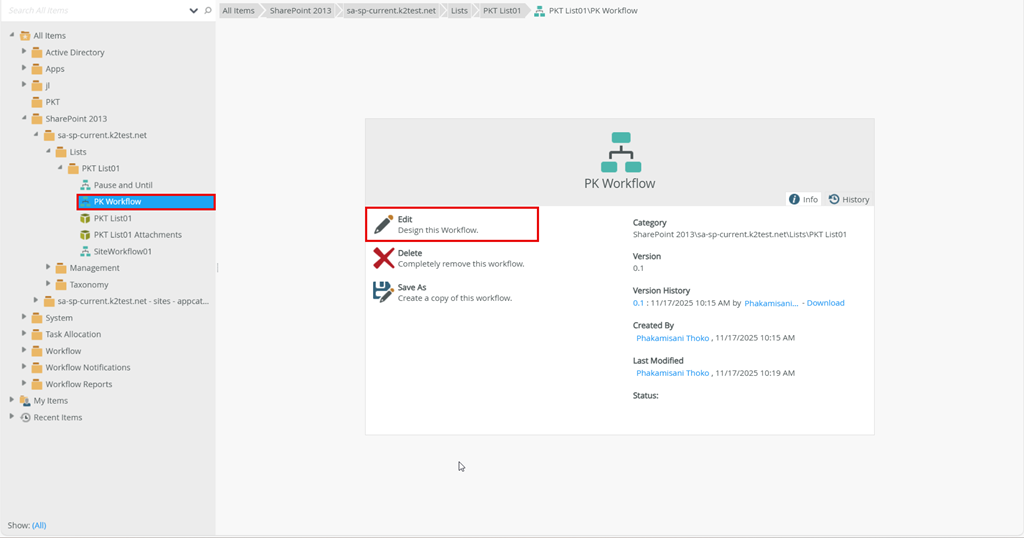
- In the Designer, locate your imported workflow in the target list, library or category.
- Select the workflow and click Edit.
- Review the error console and notification indicators.
- Resolve dependencies by double-clicking items marked with an exclamation icon, then provide any required configuration in the properties panel.
The table below shows the supported Nintex for SharePoint actions and their corresponding steps in Nintex Automation K2. You must still review and adjust each step’s configuration to ensure it meets your requirements.
Nintex for SharePoint Nintex Automation K2 Assign flexi task Task step Assign todo task Task step Build string Set Variables step End workflow End step Item Reference Create Reference step Math operation Set Variables step Pause for Timer step Pause until Timer step Query list Update List Item step Regular expression Set Variables step Request approval Task step Run if Decision step Send notification Send Email step Set variable Set Variables step Start Event Start step Switch Decision step Update item Update List Item step Parallel Split and Merge steps State Machine Decision step Change State Set a variable step Set Item Value Update List Item step Items that are not yet supported are replaced with a placeholder which includes the name of the Nintex for SharePoint action in the note of the placeholder step. You will need to configure these items using K2 workflow functionality.
- Once all errors and warnings are resolved, deploy your workflow.
Nintex site workflows are packaged using the K2 extraction script. However, site workflows cannot be imported into Nintex Automation K2 using the K2 Workflow Importer because they are not associated with a list or library.
To import site workflows, you must use Swagger UI.
To successfully import a site workflow, ensure the following requirements are met:
- Packaged site workflow file.
- Swagger UI with the conversion service.
- The category and, category name (path) or Id where the site workflow will be imported.
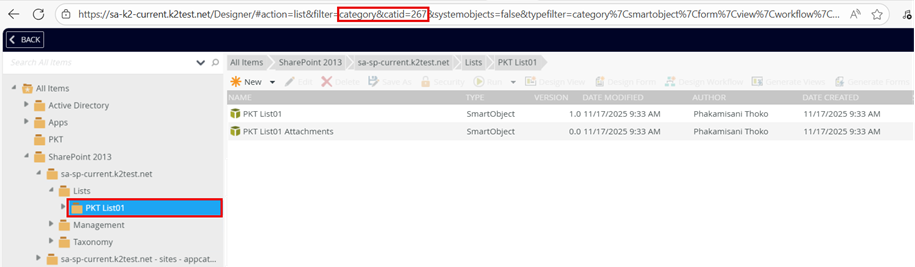
- Select the category you created from the category tree in the Designer.
- In the browser URL, locate the text "category&catid=".
- The number immediately following the = sign is the unique category ID (e.g., in "category&catid=267", the category Id is 267).
If you are using one of the supported versions listed above you must serialize your .nwf file before it can be recognized by the K2 Workflow Importer. Download the Nintex Workflow Serializer Package (.zip) and follow the steps in the included Convert-NintexWorkflow.ps1 user guide to complete the conversion.
Category: Since site workflows aren’t associated with a specific list or library, you must create a category in the Designer to import the site workflow. The category must be created in the SharePoint 2013 folder in the Designer under your SharePoint portal.
Category path: The name of the category.
Swagger UI:
Swagger UI is available at:
https://YourAppURL/designer/k2workflow/sandbox/index
Replace "YourAppURL" with your K2 site URL.
Once your site workflow has been packaged, use Swagger UI to import it into Nintex Automation K2.
- In Swagger UI, click Conversion and select /api/Conversion/UploadAndConvert.
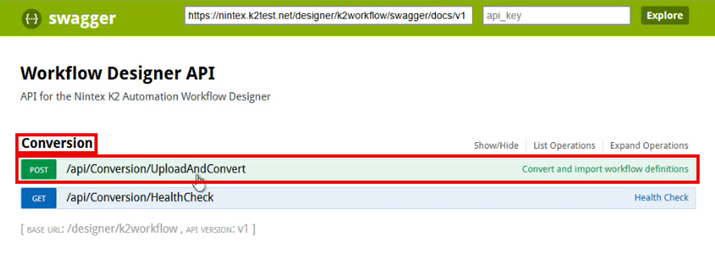
- Complete the files and catId or path parameters (the rest of the parameters are not required). Click Try it out. The site workflows are imported into the category, and a 200 success or 201 success message appears in the Swagger UI's response body to confirm a successful import.
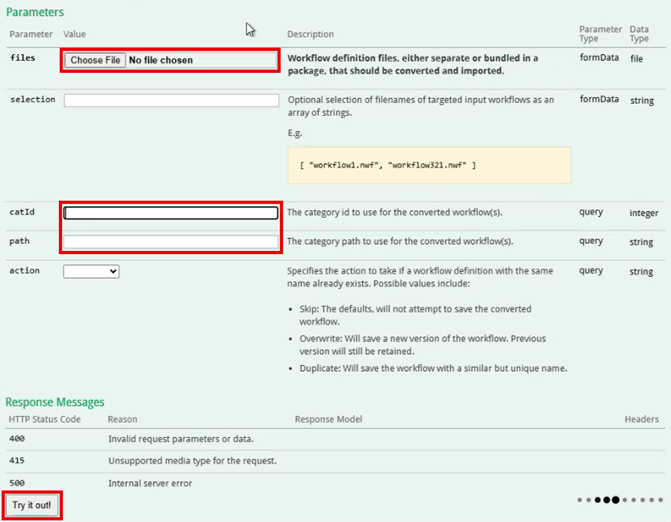
Swagger parameter Description files Use the Choose File button to browse and upload your single workflow (.nwf) or bundled workflow (.zip) files for import. catId The category Id to use for the imported workflows. path Type the target category name exactly as it is in the Designer. - In the Designer, check and confirm that the site workflows were correctly imported into the category.
-
Follow the steps in Post import to review and adjust each step’s configuration to ensure it meets your requirements.
- If you are using one of the supported versions listed above you must serialize your .nwf file before it can be recognized by the K2 Workflow Importer. Download the Nintex Workflow Serializer Package (.zip) and follow the steps in the included Convert-NintexWorkflow.ps1 user guide to complete the conversion.
- When using large structures with more than 10 outcomes, the Decision automatically adds an extension to a new Decision step since the limit is 12 outcomes per step. This new decision step then connects to the remaining outcomes. This applies to both State Machine actions (Decisions steps) and Assign Flexi Task actions (Task steps). It is recommended that you consider reducing the number of outcomes in your workflow within Nintex Automation K2 if you have more than 10 outcomes.
- When migrating a Run If action, the Decision step may contain an outcome called Otherwise. This outcome skips all actions that were previously inside the Run If action if condition is not met.
- When migrating a State Machine action containing a default value for the branch, a Set a Variable step is added and configured with the default value.
- Complex State Machine actions may appear more complex and confusing when imported into Nintex Automation K2 due to the way workflow lines are used to connect steps. Drag and move the steps around to create more space so that you can clearly see how the steps are connected.