Sync Service
The Sync Service synchronizes identities from your Identity Provider (IdP), such as Active Directory and Azure Active Directory, to the product.
Prerequisites
You need to install the Sync Service to enable this service type. For more information on installing and configuring the service, please see KB002707: Identity synchronization and caching.
Using the SmartObjects to perform the initial and ongoing syncs
You must perform the following steps to run the initial full identity sync after you enable the Sync Service and to schedule ongoing syncs:
- Get a list of providers in your environment.
- Run the initial sync for all providers in your environment. Confirm the status of the initial sync.
- Configure scheduled syncs for each provider.
- Confirm the status of scheduled syncs regularly .
Use Management to find the Sync Service SmartObjects in the System category.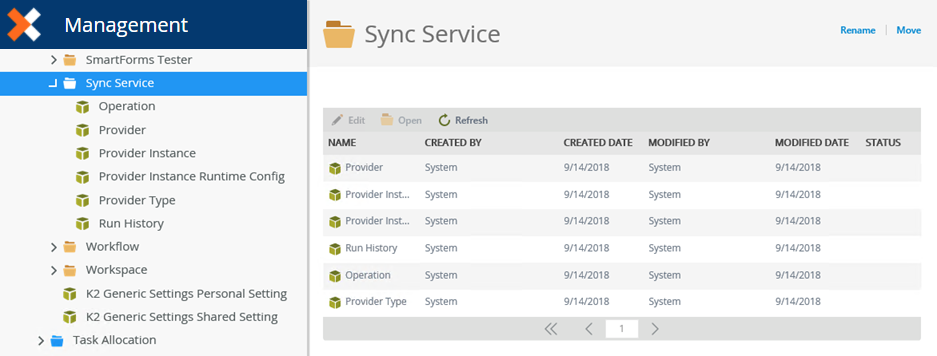
To start a full sync and configure scheduled syncs, you need the following details:
- Provider Name: this matches the security label configured in your environment. The Nintex Automation installation creates identity sync providers for each security label in your environment. Common ones include K2, Azure Active Directory, K2SQL, and SP. For more information about the values to configure sync providers for different types of IdPs, see KB002707: Identity synchronization and caching
- Provider Instance Name: this is the name of the provider instance and is the domain section of a fully qualified domain name. Use your domain name if you have Active Directory. The Azure Active Directory provider does not have a Provider Instance Name so leave it blank. SharePoint requires a Provider Instance Name which you can find by executing the List Provider Instances method of the Provider Instance SmartObject.
For example, if a sync provider instance is created for an Active Directory sync on a standalone Denallix server, the Provider Name is K2 and the Provider Instance Name is Denallix (the domain name).
- To get a list of Provider Names, execute the List Providers method of the Provider SmartObject.
- To get a list of Provider Instance Names, execute the List Provider Instances method of the Provider Instances SmartObject.
Use the methods of the Provider SmartObject to list existing providers and to see associated information.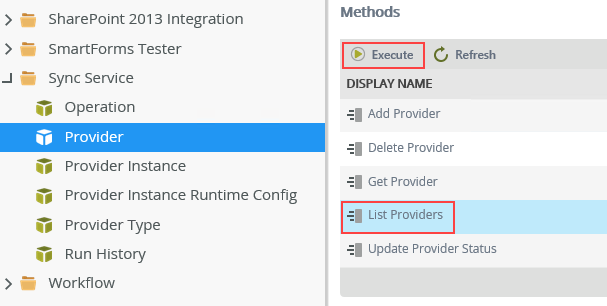
Execute the List Providers method to see provider names, types, and if they are enabled.
An example results page. 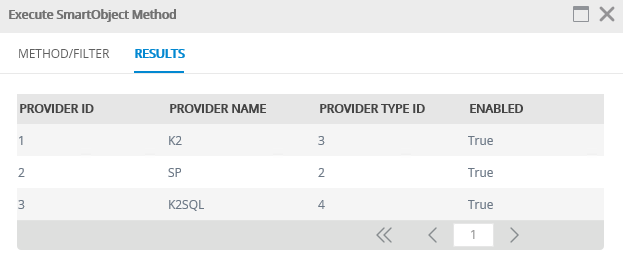
You use the Provider Name to start a sync and schedule ongoing syncs. Note that the Provider ID in the results for the List Providers method is also shown in the results of the List Provider Instances method shown below.
Use the methods of the Provider Instance SmartObject to list existing provider instances and see associated information about them.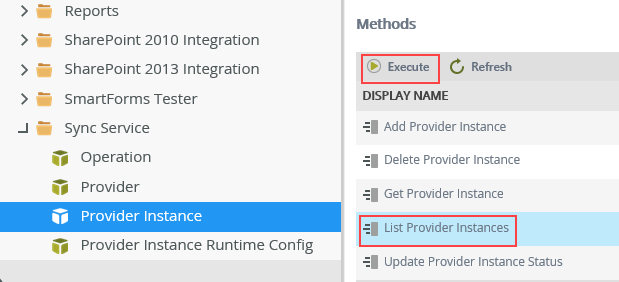
Execute the List Provider Instances method to see provider instance names and additional information. Use the provider instance name to start a full sync and to scheduled ongoing sync, which you do in the next section.

Use the methods of the Operation SmartObject to start a full sync, configure a sync schedule, and get information about existing schedules.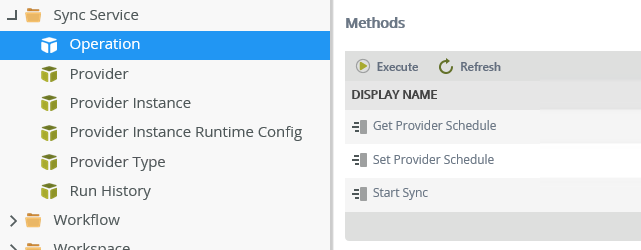
To manually start a full sync:
- Execute the Start Sync method.
- Enter the Provider Name (required) as text, for example, K2 for AD.
- Enter the Provider Instance Name as text. For example, your AD domain name Denallix. The Azure Active Directory provider does not have a Provider Instance Name and remains blank. SharePoint requires a Provider Instance Name which you can find by executing the SmartObject methods as shown above.
- Enter a value of Yes or No in the Skip Deleted box to include or exclude identities marked as deleted. The value defaults to No if you leave it blank. We recommend setting this to Yes for new installations, and No to upgraded environments.
- Click Execute to start the sync, and Done on the Results screen.
To set an ongoing sync schedule:
- Execute the Set Provider Schedule method
- Enter the Provider Name (required) as text, for example, K2 for AD.
- Enter the Provider Instance Name as text, for example, your AD domain name Denallix.
- Enter the Schedule time in the format DD:HH:MM:SS, for example, 00:07:00:00 (sync occurs every seven hours after the previous sync ended)
- Click Execute to set the sync schedule, and Done on the results screen.
To get a list of existing schedules:
- Execute the Get Provider Schedule method.
- Enter the Provider Name (required) as text, for example, K2 for AD.
- Enter the Provider Instance Name as text, for example, your AD domain name Denallix.
- Click Execute. The Results screen shows you the sync schedule for the provider you chose.
Use the methods of the Run History SmartObject to see run histories by either date range or status.
To get a run history by date range:
- Execute the Get Run History Entries By Date Range method.
- Enter the Provider Name (required) as text, for example, K2 for AD.
- Enter the Provider Instance Name as text, for example, your AD domain name Denallix.
- Enter the Sync Start date/time in the format MM/DD/YYYY HH:MM, for example, 09/13/2018 10:00AM
- Enter the Sync End date/time in the format MM/DD/YYYY HH:MM, for example, 09/14/2018 09:59AM
Executing the SmartObject gives you a list of previous sync runs in the date range along with some counts as shown in this image: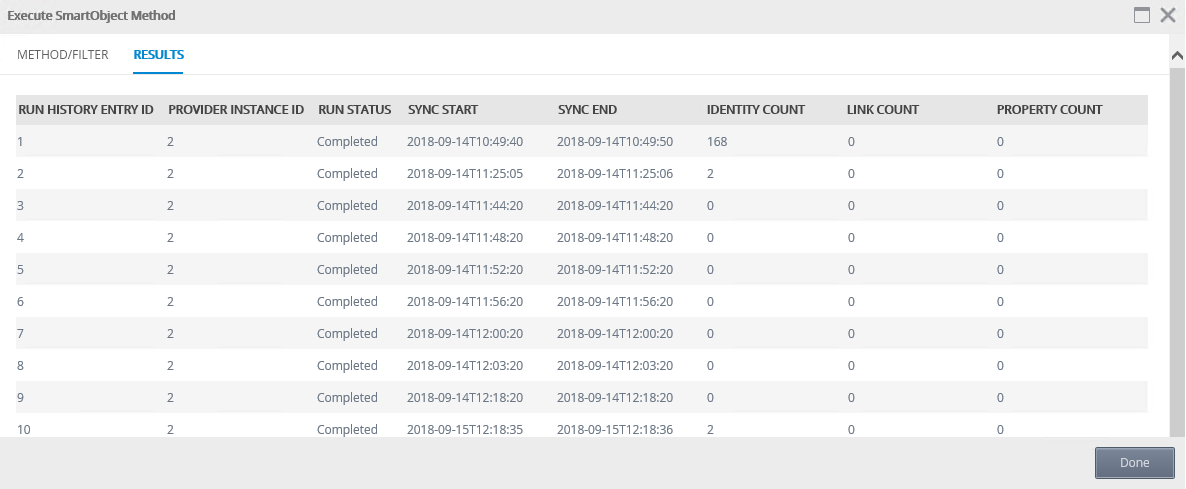
The first row shows the full sync of 168 identities in the IdP, while subsequent syncs only sync changes, two of which occurred on the tenth run.
To get a run history by status:
- Execute the Get Run History Entries By Status method.
- Enter the Provider Name (required) as text, for example, K2 for AD.
- Enter the Provider Instance Name (optional) in text, for example your AD domain name.
- Enter a Run Status which can be Synchronizing, Completed, or Failed.
If you want to run a full sync instead of a differential sync at some point after the initial sync, you first need to clear the SyncState and LastSyncDateOffset column values stored in the Provider Instance table in the K2 database. Follow these steps:
- Find the instance ID by running this query:
This image is an example of what is returned. Your environment might be different.
- Use this query to clear the values for the SyncState and LastSyncDateOffset columns for the Provider Instance ID you need:
CopyReplace [Provider Instance] with the ID for the Provider Instance on which you want to run the full sync. For example, ID 2 from the example image above. Remember that the ProviderID value corresponds to the ID value in the [SyncEngine].[Provider] table.
Clear the values
UPDATE
[SyncEngine].[ProviderInstance]
SET
[SyncState] = NULL,
[LastSyncDateOffset] = NULL
WHERE
ID = [Provider Instance]
- Run a sync for the provider to perform a full sync. The full sync generates new values for the SyncState and LastSyncDateOffset columns. From this point forward differential syncs are run if the IdP supports it as in the case of AD, Azure Active Directory, and SharePoint.
Once you are using the Sync Service, you can add an Active Directory (AD) domain, if needed, as documented in the topic Domains.
The steps are summarized here:
- Browse to Management.
- Expand Users > K2 > Domains.
- Click Add and fill in the required information.
Adding the domain like this automatically also adds the domain in the relevant tables for the Sync Service.
To remove a domain from the Sync Service follow these steps:
- Browse to Management.
- Expand Users > K2 > Domains.
- Click Remove for the selected domain. This removes the domain from Management.
To remove the domain from the Sync Service:
- Browse to Management > Categories > System > Sync Service.
- Open the Provider Instance SmartObject and run the Delete Provider Instance method.
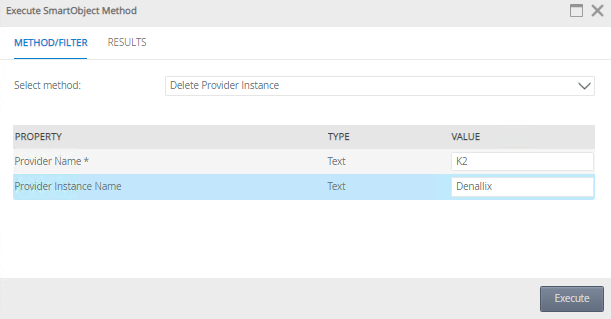
- Enter the Provider Name (required) as text, for example, K2 for AD.
- For the Provider Instance Name enter the domain name that was deleted earlier.
- Execute the SmartObject method and it will remove the values for the deleted domain in the Sync Service.
- This feature is only available when installing K2 Five 5.6 Fix Packs Fix Pack 2 or later.
- Use this feature only if you fully understand the impact of doing so as applying filters to attributes in the Sync Service can result in some users not having access to product components such as the Designer, Management, Workspace and SharePoint apps.
- The filter only applies to users and not to groups or organizational units.
-
The filter is only available when enabling the Sync Service on the server.
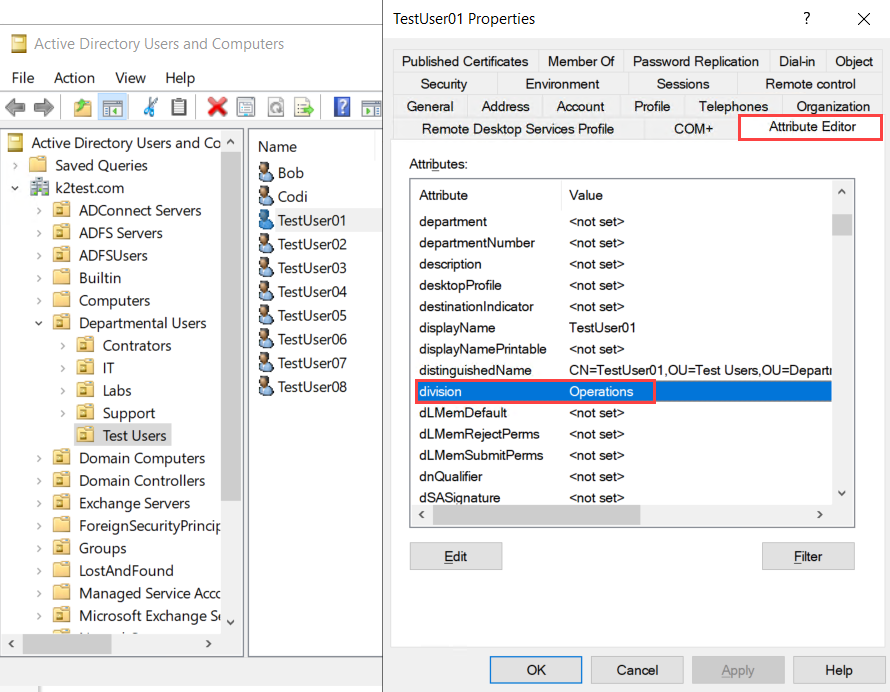
You can use an identity attribute to filter users in the product. The filter acts as middleware to filter identities in the product for a specific attribute set for that user in AD. For example if you have an organization with lots of users and you want to filter those users according to their divisions, you can use the Division attribute in AD to do this. By specifying a value for the attribute per user, you can filter users that belong to a specific division such as Operations. Note when doing this users belonging to other divisions or where the division is not set will not have access to product components. You can add admin users to an allowlist to ensure they are not restricted from accessing product components, regardless of which filters are set. The filter is applied to users of the AD User SmartObject. It does not apply to the AD Group or AD Organizational Unit SmartObjects.
Follow the steps below to configure a filter on an Active Directory Identity Attribute:
- Open the Properties of a user in Active Directory Users and Computers and go to the Attribute Editor tab. Set the value of the attribute you want to use in your filter. The example below uses the Operations value for the Division attribute.
- Run the following script against the K2 database to insert the filter attribute into the [SyncEngine].[ProviderObjectPropertry] table:CopyReplace [Filter Value] with the name of the attribute you want to use for the filter such as Division.
Insert filter attribute
DECLARE @ProviderFilteProp NVARCHAR(200);
SET @ProviderFilteProp = 'Filter Value';
IF NOT EXISTS (SELECT * FROM [SyncEngine].[ProviderObjectProperty] WHERE [Name] = @ProviderFilteProp)
BEGIN
INSERT INTO [SyncEngine].[ProviderObjectProperty]
([ProviderObjectID], [Name], [IsCore], [ComputedProperty], [ProviderObjectPropertyTypeID])
VALUES
(4, @ProviderFilteProp, 0, 0, 17),
(5, @ProviderFilteProp, 0, 0, 17)
END
ELSE
BEGIN
PRINT 'Records already Exists'
END;
SELECT *
FROM [SyncEngine].[ProviderObjectProperty] - Restart the server to refresh the changes you made in the K2 database.
- Run a sync for the provider to perform a full sync. This is required to update the data in the [Identity].[CacheConfiguration] table in the K2 database.
- Run the following script against the K2 database to set up the AD Sync filter to be used in the product:CopyUpdate the following variables:
Set up AD sync filter
/*Set IdentityAttributeFilterType for which attribute to filter on*/
/*Set IdentityAttributeFilterValue for the value that needs to be used in the filter*/
DECLARE @IdentityAttributeFilterEnabled AS NVARCHAR(100);
DECLARE @IdentityAttributeFilterType AS NVARCHAR(250);
DECLARE @IdentityAttributeFilterValue AS NVARCHAR(250);
SET @IdentityAttributeFilterEnabled = 'false'
SET @IdentityAttributeFilterType = 'Filter Type';
SET @IdentityAttributeFilterValue = 'Filter Value';
DECLARE @IdentityAttributeFilter TABLE
(
[Name] nvarchar(128) NULL,
[Value] nvarchar(max) NULL
);
INSERT INTO @IdentityAttributeFilter
VALUES
('IdentityAttributeFilterEnabled', @IdentityAttributeFilterEnabled),
('resultFilter','SourceCode.Hosting.Runtime.IdentityService.Filters.IdentityAttributeFilter'),
('IdentityAttributeFilterType', @IdentityAttributeFilterType),
('IdentityAttributeFilterValue', @IdentityAttributeFilterValue)
MERGE [Identity].[CacheConfiguration] AS TARGET
USING @IdentityAttributeFilter AS SOURCE
ON (TARGET.[Name] = SOURCE.[Name])
WHEN MATCHED AND TARGET.[Value] <> SOURCE.[Value] THEN
UPDATE SET TARGET.[Value] = SOURCE.[Value]
WHEN NOT MATCHED THEN
INSERT ([Name], [Value])
VALUES (SOURCE.[Name], SOURCE.[Value]);
SELECT *
FROM [Identity].[CacheConfiguration]- @IdentityAttributeFilterEnabled = 'false'
Replace [false] with true to enable the filter. - @IdentityAttributeFilterType = 'Filter Type'
Replace [Filter Type] with the attribute name you want to use for the filter. This must match the attribute name you used in step 2, for example Division. - @IdentityAttributeFilterValue = 'Filter Value'
Replace [Filter Value] with the value you want to use for the specific attribute, for example Operations where Division = ‘Operations’. The value must match the value you used in step 1.
The [Identity].[CacheConfiguration] table in the K2 database is updated as follows. Your environment may be different.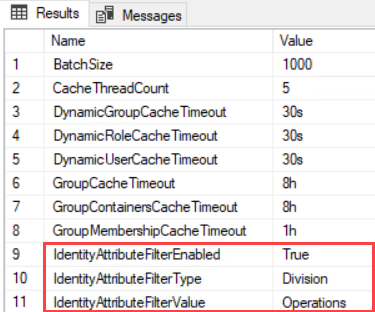
- @IdentityAttributeFilterEnabled = 'false'
- Restart the K2 server to refresh the changes you made in the K2 database.
Add admin users to the allowlist in the K2HostServer.exe.config file to ensure they always have access to product components, regardless of which filters are set. Add multiple users using a semicolon-separated list.
You can find the config file in the following location: "%ProgramFiles%\K2\Host Server\K2HostServer.exe.config"
Add the following entry to the "appSettings" section of the file for each admin user:
Add user to allowlist
<appSettings>
<add key="AdminIdentities" value="User FQNs” />
</appSettings>
For example:
Add user to allowlist
<appSettings>
<add key="AdminIdentities" value="K2:NintexTEST\TestUser” />
</appSettings>
You can add these entries according to your business requirements. Restart the server to apply the changes.
Considerations
- Hybrid SharePoint environments cannot use the Sync Service. If you use SharePoint in a hybrid environment, in other words using both SharePoint online and on-premises, the Sync Service only syncs the most recently registered SharePoint. So, if you first registered SharePoint on-premises and then later registered SharePoint Online, only SharePoint Online will be synced.
- When you enable the Sync Service, automatic syncing is enabled for SharePoint groups, but you must still configure a sync schedule for the SP provider. Note that if you try to sync groups in SharePoint by clicking the Sync Groups link on the K2 for SharePoint app settings page, you see the following message "Automatic Synchronization is turned on in this environment":

- When syncing with AD FS, only the first 1000 records (identities or groups) are returned by default. To sync all AD FS identities, change your configuration as described in KB002721 - How to configure ADFS to return more than the default 1000 records.
- Groups in Azure Active Directory with the same name are cached as a combined single group in K2. See the KB003504 article for more information.
- If you upgrade to Nintex Automation (5.7) and are using the Identity Sync Service, you may notice error messages logged to the host server log file relating to SharePoint. This is especially true if you sync an ADFS provider. For more information see the KB article KB003569 Code fix: After upgrading to K2 Five (5.4), errors are logged in the host server log file related to SharePoint.
- Configuring a filter on an AD Identity attribute:
- The filter is applied to users of the AD User SmartObject. For example when used in custom setups, such as using the AD User SmartObject as the data source for a Picker control, or when the AD User SmartObject is used as the default data source, such as the people picker in K2 for SharePoint.
- If you enabled the filter and want to disable it at a later stage, change the IdentityAttributeFilterEnabled variable to false. Restart the server to refresh the changes you made in the K2 database.
- If you want your service accounts to always be included in the filtered values, add them to the allowlist.
- When enabling and configuring the filter and then running a full sync, existing users are not removed. The filter only applies to user records containing the attribute you used to configure the filter.