K2 Five for SharePoint: Site Provisioning - Design
It is important to design the application before building it. Begin by laying out the workflow. This will help to identify the tasks needed to complete the workflow goal. From here, you can determine what forms you will need. Then, what data sources will you need to store data, or even retrieve data. Finally, decide if you need to report on the workflow and what kind of reports you will need.
The Site Provisioning application uses a SharePoint list as the data component and SmartForms for the forms component. The workflow starts when you submit a site request.
After building and deploying the workflow, you will test the application by submitting new site requests. Optional tutorials include building process instance reports and updating two views.
Workflow
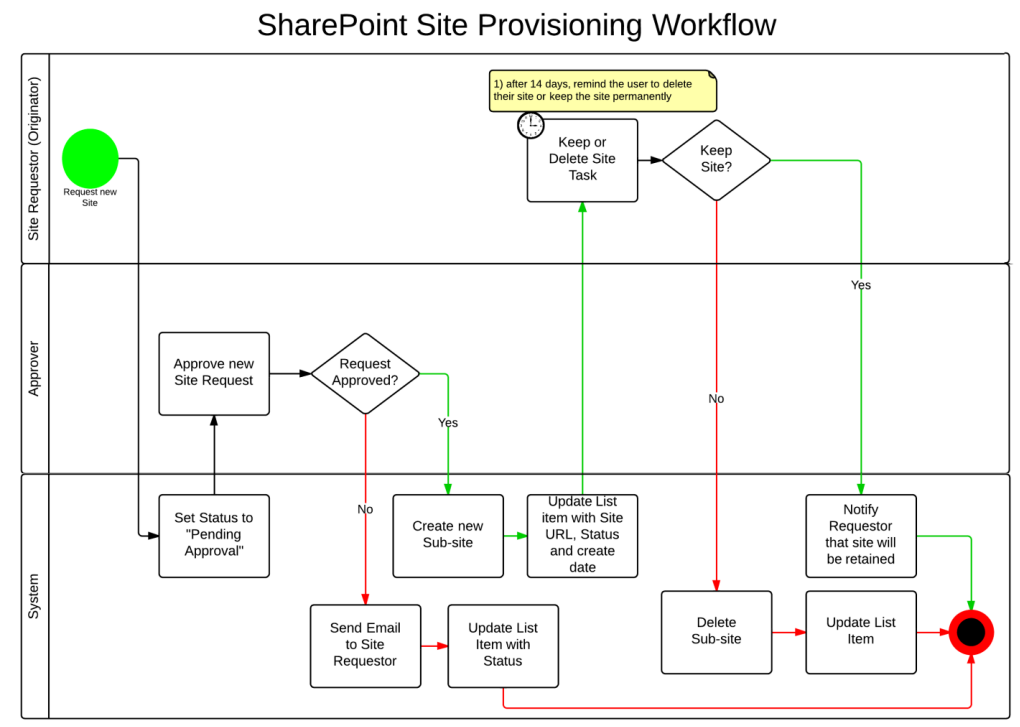
For an application that has a workflow component, a good place to start is to lay out the workflow. We used Visio to create the flowchart below, but there are many on-line tools that you can use, even paper and pencil works! The flowchart uses a swim lane format, with the first lane representing the workflow originator. The originator is the person who starts the workflow. The second lane represents the approver, or the person who will either approve or reject the new site request. The third lane represents system tasks, or tasks that the server will perform.
Site Request Workflow Design

The workflow starts when a user creates a new item in the Site Requests list. The next step is a system task where the server updates the status property indicating the workflow has started. Notice how the workflow moved from the first lane to the third lane. Workflows often intermingle user tasks and system tasks.
A user task follows where the assigned user must decide to approve or reject the new site request. If they approve the request, a system task creates the new site. If they reject the request, a system task sends an email to the workflow originator, then updates the status property.
If approved, the workflow moves back to a user task, assigned to the workflow originator. This step requires the originator to decide between keeping or deleting the new site. If delete is the decision, a system task removes the site and updates the status property. If kept, a system task sends an email confirming the site will remain in place.
Data
The Site Request application requires one SharePoint list for its data source. The list stores submitted site requests and the workflow updates the list item as it progresses.
The table below describes the configuration and columns for the SharePoint Site Requests list.
| Column Name | Type of Data | Notes |
|---|---|---|
| Title | Single line of text | The user enters the title when they create the list item. This value becomes the title of the new site, if created. |
| Site Description | Single line of text | The user enters the site description when they create the list item. This value becomes the description of the new site, if created. |
| Site Status | Single line of text | The workflow updates this column as it progresses. |
| Site Created On | Date | The workflow inserts the current date (if it creates a new site). |
| Link to Site | Hyperlink | The workflow inserts a link to the new site (if it creates a new site). |
Forms
The Site Request application uses K2 smartforms for user interaction. SmartForms give you more control over the look and feel of the form layout. You can also adjust the behavior of the form using rules. The standard SharePoint forms are not easily modified.
Reports
You will use the standard reports to view activity on your process instances.