4. Set the Folio and Add a User Task to Respond to the Greeting
In this step, you begin building the Hello World Workflow. First, you add a step that sets the Folio value. (See the note box below for an explanation of folios.) Next, you add a Task step. A task step typically assigns a task to a recipient and in this case, you assign it back to the workflow originator (you!). You can choose one of two actions for this task: Say Hello or Ignore. If you choose Say Hello, the workflow updates the Response column (in the Hello World list) with a greeting. If you choose Ignore, the workflow deletes the list item altogether.
-
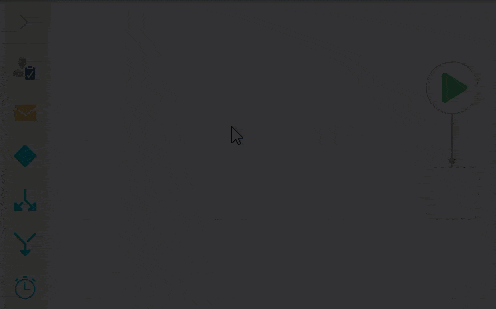
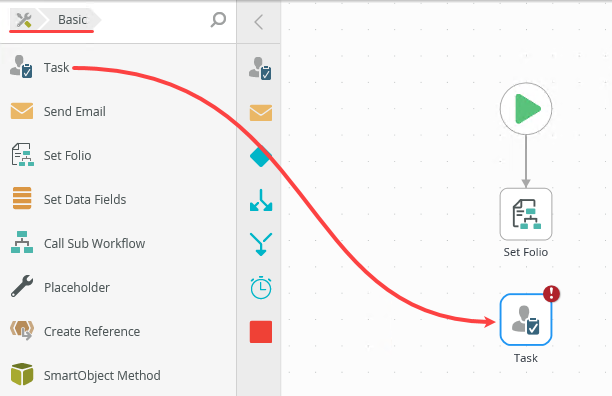
From the Toolbox > Basic node, add a Set Folio step to the placeholder below the Start step. The Toolbox is where you find workflow steps that you can drag onto the design canvas. For the Folio value, use the Title from the Hello World SmartObject reference. The reference is found in the Configuration Panel > Context Browser.
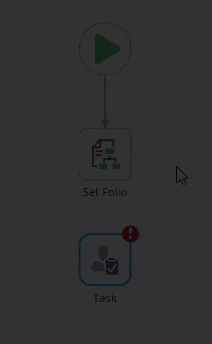
- First, you add a step that sets the folio value. Expand the Toolbox using the slider, then expand the Basic node. Drag a Set Folio step into the empty placeholder below the Start step. (The Start step has the green triangle.)
- Select the Set Folio step. (When selected, steps have a blue border.) Expand the Configuration Panel using the slider. The Configuration Panel has tools to configure each step. Click the Set Folio tab to make it active, (if it is not already). Expand the Context Browser using the slider.
The Context Browser provides access to data about the current user and process, as well as functions and SmartObject data. You can use variables dragged from the Context Browser throughout the configuration of workflow steps. At runtime, the variables are replaced with "live" data. There are four tabs:
- Fields: This section contains references to SharePoint lists, SmartForms, and SmartObjects. You can also create variables to hold and use data within the workflow itself, such as to store record IDs.
- Functions: This section contains tools for transforming data. Some examples include performing calculations, formatting text, and working with date and time values.
- SmartObjects: This section contains system and custom SmartObject references.
- Workflow: This section contains process variables. Examples include the originator's name, email, manager, and folio.
- In the Context Browser, expand the Hello World SmartObject located under the REFERENCES heading. Drag the Title property into the Folio text box. Collapse the Configuration Panel using the slider.
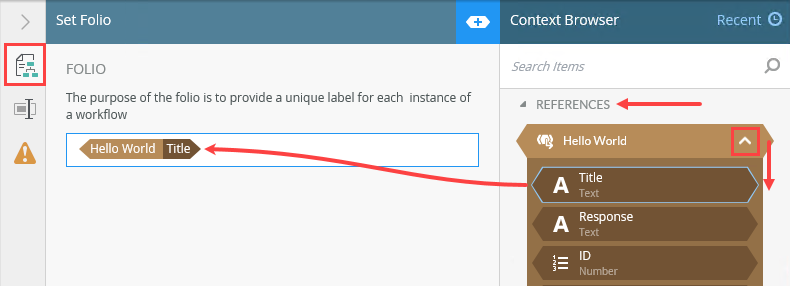
For the folio value, you will use a reference from the Context Browser. References are variables, which in this case means they are replaced with "live" data at runtime. You will set the folio using the Title property from the Hello World list.
A reference is essentially an association between a workflow instance and record(s) in some data store. For example, an item added to a SharePoint list starts a workflow. A reference is created between the workflow instance and the item that was created in the SharePoint list. This allows you to easily work with the list item that started the workflow. - First, you add a step that sets the folio value. Expand the Toolbox using the slider, then expand the Basic node. Drag a Set Folio step into the empty placeholder below the Start step. (The Start step has the green triangle.)
-
Next, you add a Task step and assign it to the workflow originator. You must "action" the task by selecting a response. You will configure two actions: Say Hello and Ignore. From the Toolbox > Basic node, drag a Task step below the Set Folio step. Connect the two steps. Use the following settings for the task step configuration in the Configuration Panel.
Tab Label Value Task INSTRUCTIONS Select either Say Hello or Ignore for your greeting decision. ACTIONS Say Hello
IgnoreForm FORM TYPE Basic Task Form Recipients RECIPIENTS Originator Email Alert TASK NOTIFICATION Customize Notification SUBJECT Use the Hello World SmartObject > Title reference from the Context Browser. Properties Name Respond to Greeting - The Task step assigns a task to one or more recipients (users). Task steps have actions, which are the decision options available for the recipients to select. The task step leads to a Decision step, which generates the outcomes, or lines, for each action. The workflow follows the appropriate outcome (selected by the task recipient). Expand the Toolbox > Basic node. Drag a Task step onto the design canvas, just below the Set Folio step.
When adding a step to the workflow design canvas, you may see a red warning badge. This badge simply indicates the step has required configurations. When you expand the Configuration Panel, the required configuration is also flagged.
- Connect the Set Folio step to the Task step. Begin by hovering over the bottom border of the Set Folio step. A handle appears. Click and drag the handle down to the Task step. Click anywhere on the design canvas to set the outcome.
- Select the Task step (if it is not already). Expand the Configuration Panel. Click the Task tab.
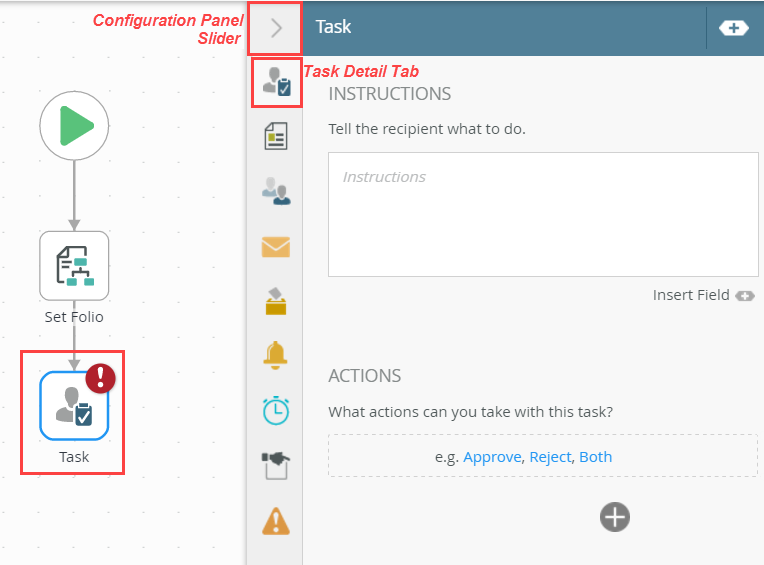
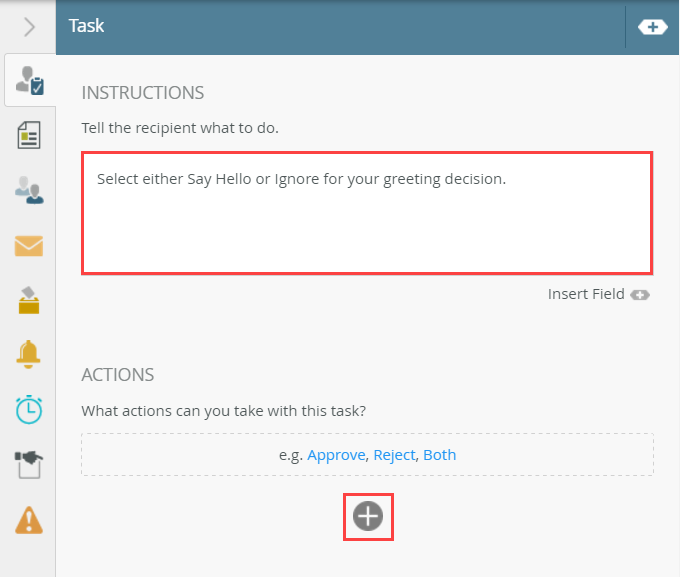
- For the INSTRUCTIONS, enter
Select either Say Hello or Ignore for your greeting decision. - For the ACTIONS, click the Add (+) icon.
- For the first action, enter
Say Hello
then click the Add (+) icon once again. For the second action, enter
Ignore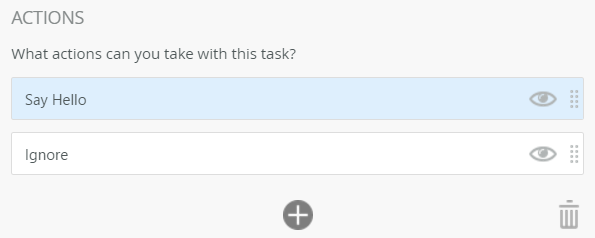
- Now you will associate the form the workflow uses for the user task. In this application, you will use a basic task form.
Click the Form tab. For the FORM TYPE, select Basic Task Form (it should be the default).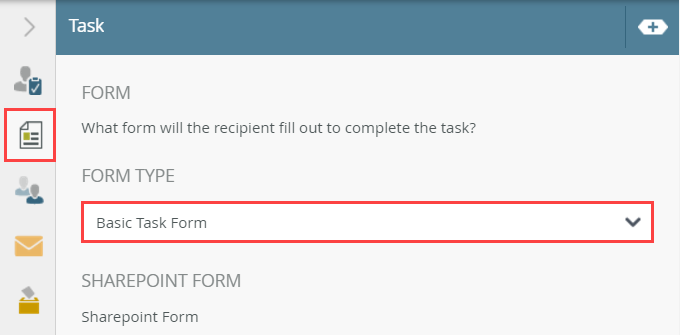
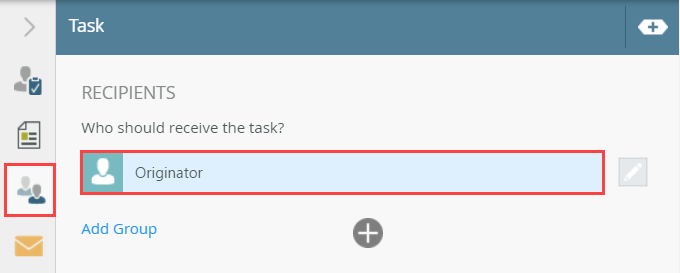
- Select the Recipients tab. The recipient is the person who must respond to the task. Confirm that the default value is Originator. The originator is the person who starts the workflow.
- Next you will configure the task notification email. This is the email the recipient receives when they have a new task. You will customize the email using values from the Context Browser. At runtime, the values are replaced with live content, specific to the workflow instance. In this way, you can personalize your email messages.
Click the Email Alert tab. CHECK the option to Customize Notification.Notice the BODY section loads the default task notification email. There are several Context Browser values (or variables) already in place. The first variable, Task > Participant Name retrieves the current user's name from the system values. The Worklist Item Link provides a link to the current workflow record. This link opens a form that has a view containing the actions configured (Say Hello, Ignore). You can select an action, then submit your decision. To view the entire email message, click the Open Text Editor link below the message block. Use the slider just right of the email body heading to close the text editor.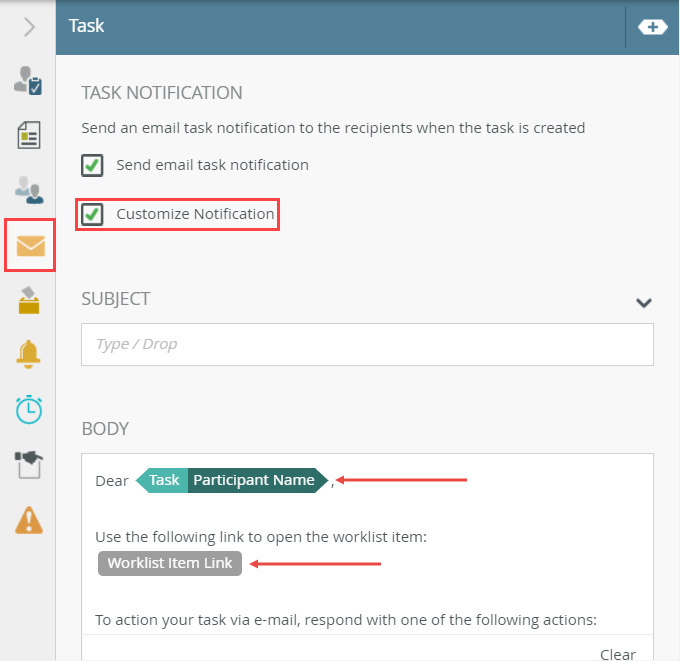
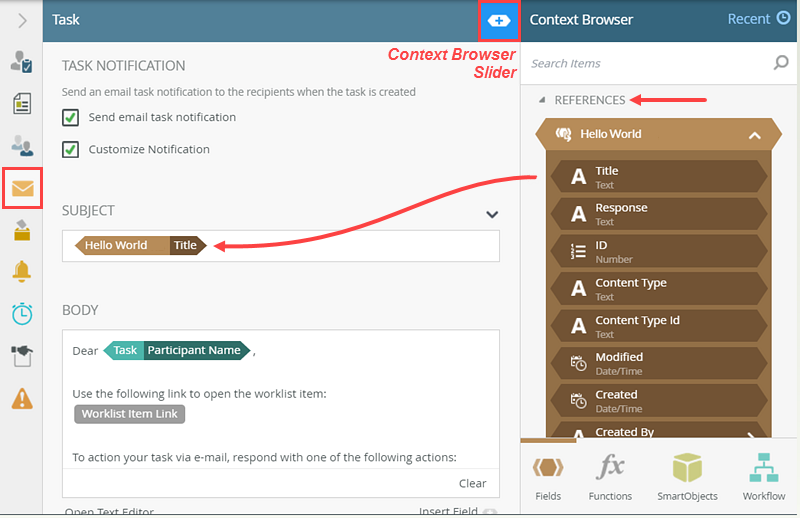
- Expand the Context Browser. Expand the Hello World SmartObject under REFERENCES. Drag the Title property into the Subject text box.
- Click the Properties tab. Name the step
Respond to Greeting
then collapse the Configuration Panel using the slider.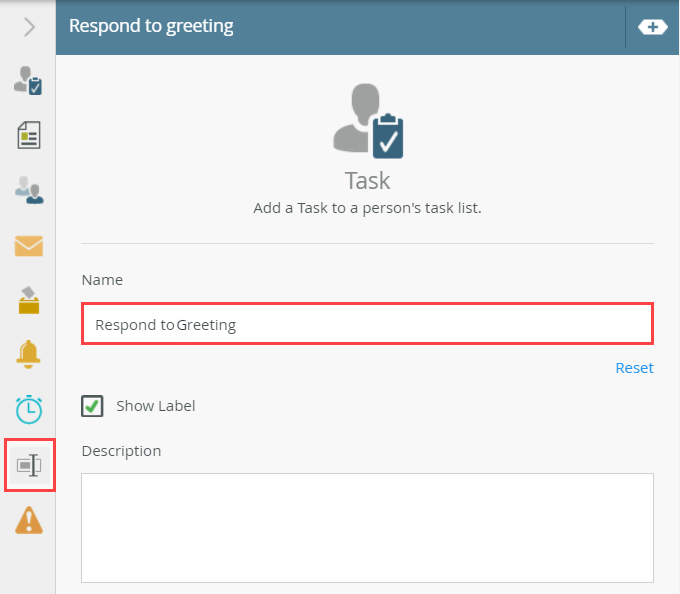
To customize this email, you will add the Hello World list Title reference to the Subject line.
- The Task step assigns a task to one or more recipients (users). Task steps have actions, which are the decision options available for the recipients to select. The task step leads to a Decision step, which generates the outcomes, or lines, for each action. The workflow follows the appropriate outcome (selected by the task recipient). Expand the Toolbox > Basic node. Drag a Task step onto the design canvas, just below the Set Folio step.
-
Add a Decision step below the Respond to Greeting step and connect the two steps. The Decision step generates the outcome lines (Say Hello and Ignore) for the task. In most cases, you follow Task steps with Decision steps. (You can also use Decision steps to set rules or conditions for which line to follow, based on some other criteria. You don't have any other configurations for the Decision step in this tutorial, however.)
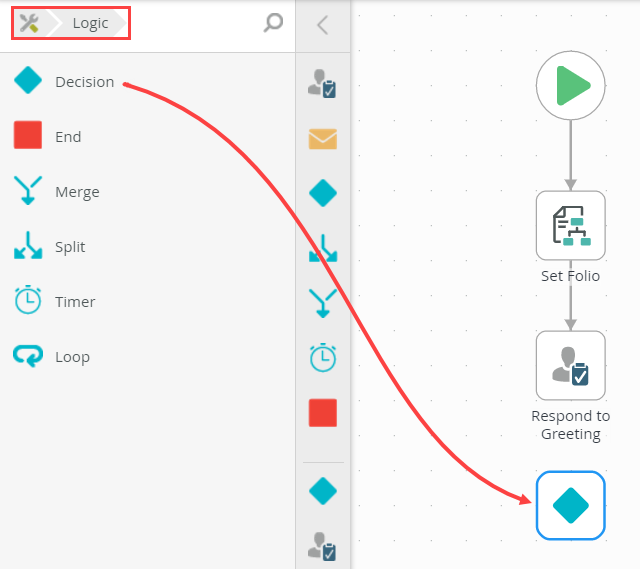
- Next, you add a Decision step that generates the outcome lines for the two actions you set earlier (Say Hello and Ignore).
Expand the Toolbox > Logic node. Drag a Decision step below the Respond to Greeting step.To return to the main Toolbox menu, click the Toolbox icon in the breadcrumb bar.
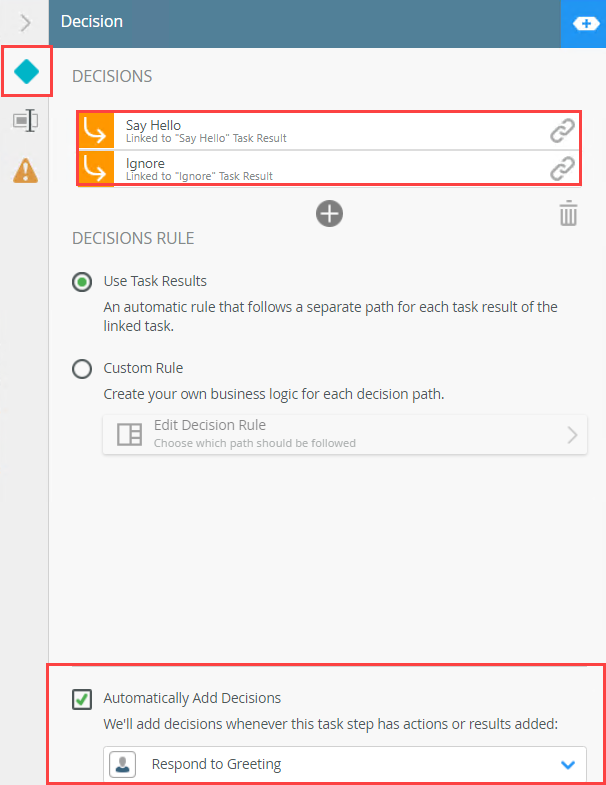
- Connect the Respond to Greeting step to the Decision step. Notice the Decision step now displays the two outcomes from the Respond to Greeting step (Say Hello and Ignore).

- Select the Decision step. Expand the Configuration Panel. (You may want to collapse the Context Browser if you need more room.) Click the Decision tab. Notice the two actions under the DECISIONS heading. When you connected the two steps, the actions were transferred from the Respond to Greeting step to the Decision step. Take a minute to review the settings. For this step, you will use the default DECISION RULE settings. However, you can create custom rules to add conditional statements to your outcome rules if desired.
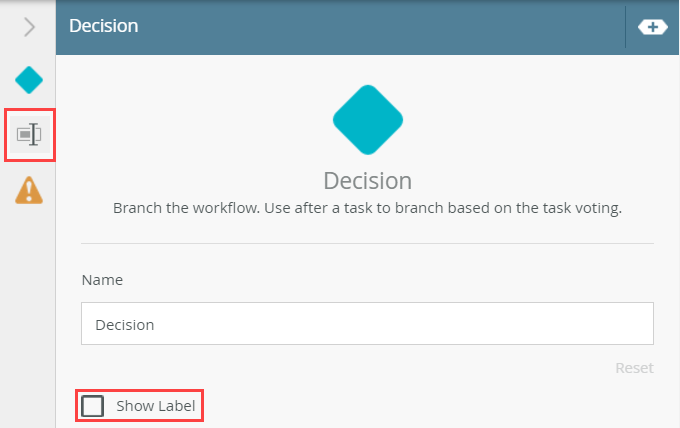
- Click the Properties tab. Confirm the option to Show Label is UNCHECKED. Since the Decision step connects directly to the Respond to Greeting step, it is logical that the two steps work together. You should label Decision steps if they are not directly related to another step. There are no further edits, so collapse the Configuration Panel.
For convenience, the Favorites Bar displays the most common steps. As you build workflows, the steps you use the most are added to the Favorites Bar as well.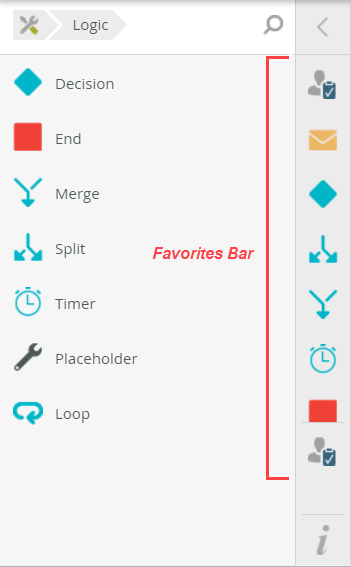
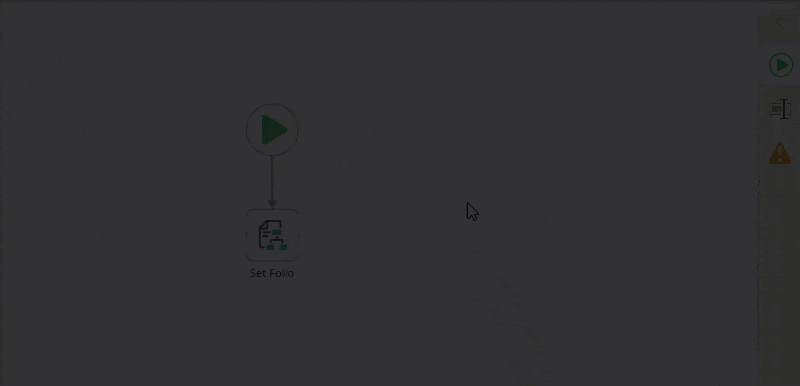
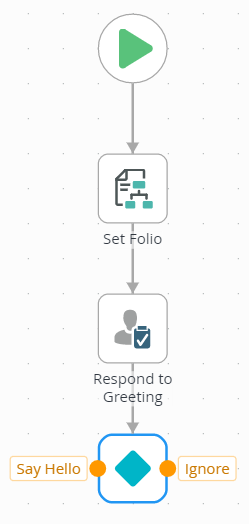
At this point, your workflow should look like the image below.
- Next, you add a Decision step that generates the outcome lines for the two actions you set earlier (Say Hello and Ignore).
Review
In this step, you began building the Hello World Workflow. The Toolbox contains steps that you can drag onto the design canvas, where you then connect them to other steps. The Configuration Panel contains the tools for configuring each step. Its options change, depending on the step type selected. The Context Browser is found in the Configuration Panel. Here, you have access to system variables, SmartObjects, and functions. At runtime, variables are replaced with "live" data associated with the current workflow instance. Using values from the Context Browser allows you to personalize your workflow steps.