How To: Add a Dynamic View Flow Link to a SharePoint List
-
This content uses the legacy Nintex K2 for SharePoint app. For more information about using the new Nintex Automation for SharePoint app, see Adding the App.
This article illustrates how to add a View Flow report link to a SharePoint list item. For this demonstration, you create a workflow for your SharePoint list, then add a step that updates a SharePoint column with a variable from the Context Browser. At runtime, the system replaces the variable with a link to the current list item's View Flow report.
Showing a link to the View Flow report in a SharePoint list

Scenario
Your organization requires you to submit expense claims online. The primary data source for storing expense claims is a SharePoint list. A workflow starts each time you add a new list item. As part of the workflow, you want to populate a column in the list with a link to the View Flow report. This way, users can determine the status of their claims by viewing the workflow progress.
Steps
In this scenario, you begin by building a SharePoint list. You add data and workflow application elements to the list. You add a step in the workflow that updates a column with a link to the View Flow report. Finally, you complete the workflow with a task step and two email steps.
Setup Steps
The following steps set up the scenario from start to finish. If you want to skip the setup steps and view the topic step, go to Use a variable to update a list column.
- Create a SharePoint List called Expense Claims. Add the following columns:
Name Type Notes Employee Name Single line of text Department Single line of text Claim Amount Number Configure this column for two decimal places. Link to View Flow Hyperlink The workflow updates this column with a link to the current workflow's View Flow report. - From your SharePoint environment, create a list called
Expense Claims
then open the list Settings.
- Create new columns for your list using the table below as a guide:
Name Type Notes Employee Name Single line of text Department Single line of text Claim Amount Number Configure this column for two decimal places. Link to View Flow Hyperlink The workflow updates this column with a link to the current workflow's View Flow report. 
- Click the list Title to return to landing page.


- From your SharePoint environment, create a list called
- Create application elements for the Expense Claim list. You only need to create the Data and Workflow elements for this demonstration. Keep the default workflow name and change the start workflow event to An item was added.
Now you create application elements for the Expense Claim list. There are four primary elements for applications: Data, Forms, Workflow, and Reports. Altogether, you have an application. For this demonstration, you only need to create the data and workflow elements. Data refers to a data source (where data lives) which is the SharePoint list in this case, represented through SmartObjects. The workflow element automates the submission of expense claims and provides the content for View Flow report.
- From the Expense Claim list landing page, click the List tab, then click the Application icon.

- On the Create K2 Application page, select the Data and Workflow elements. Keep the default workflow name, then change the start event to An item was added. Click OK (at the bottom of the page).

The Workflow Designer launches. The welcome screen includes an interactive panel which you can navigate through by clicking the left and right arrows. You can also click Close to continue to the design canvas.

- From the Expense Claim list landing page, click the List tab, then click the Application icon.
Use a variable to update a list column
The first step is to update the Link to View Flow column with a link to the current list item's report. You do this by adding a variable which the system replaces with live data at runtime.
- Add and configure an Update List Item step. Use the View Flow variable as the default value for the Link to View Flow column. Rename the step Set View Flow Link.
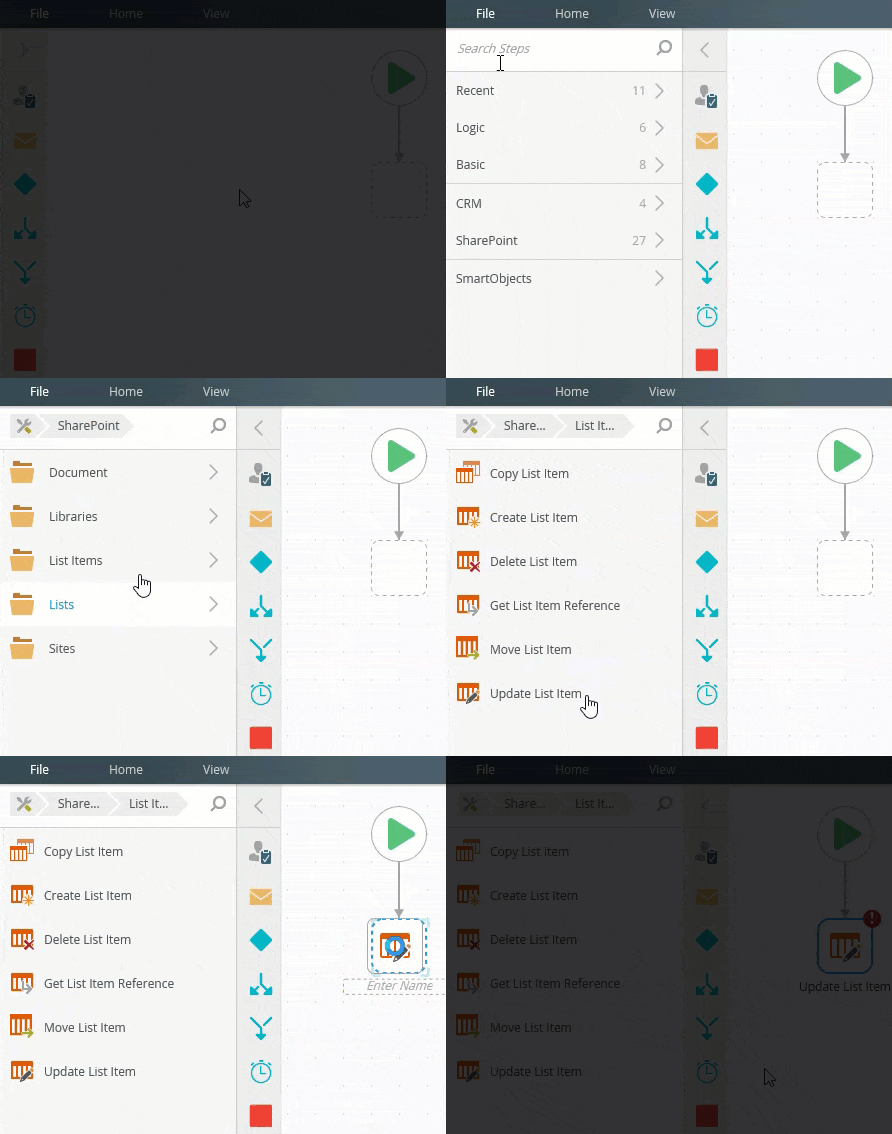
- From the Toolbox > SharePoint > List Items node, drag an Update List Item step into the empty placeholder below the Start step.The Toolbox contains steps from which you build your workflow. A workflow is a sequence of steps which automates a business process when followed from start to finish.

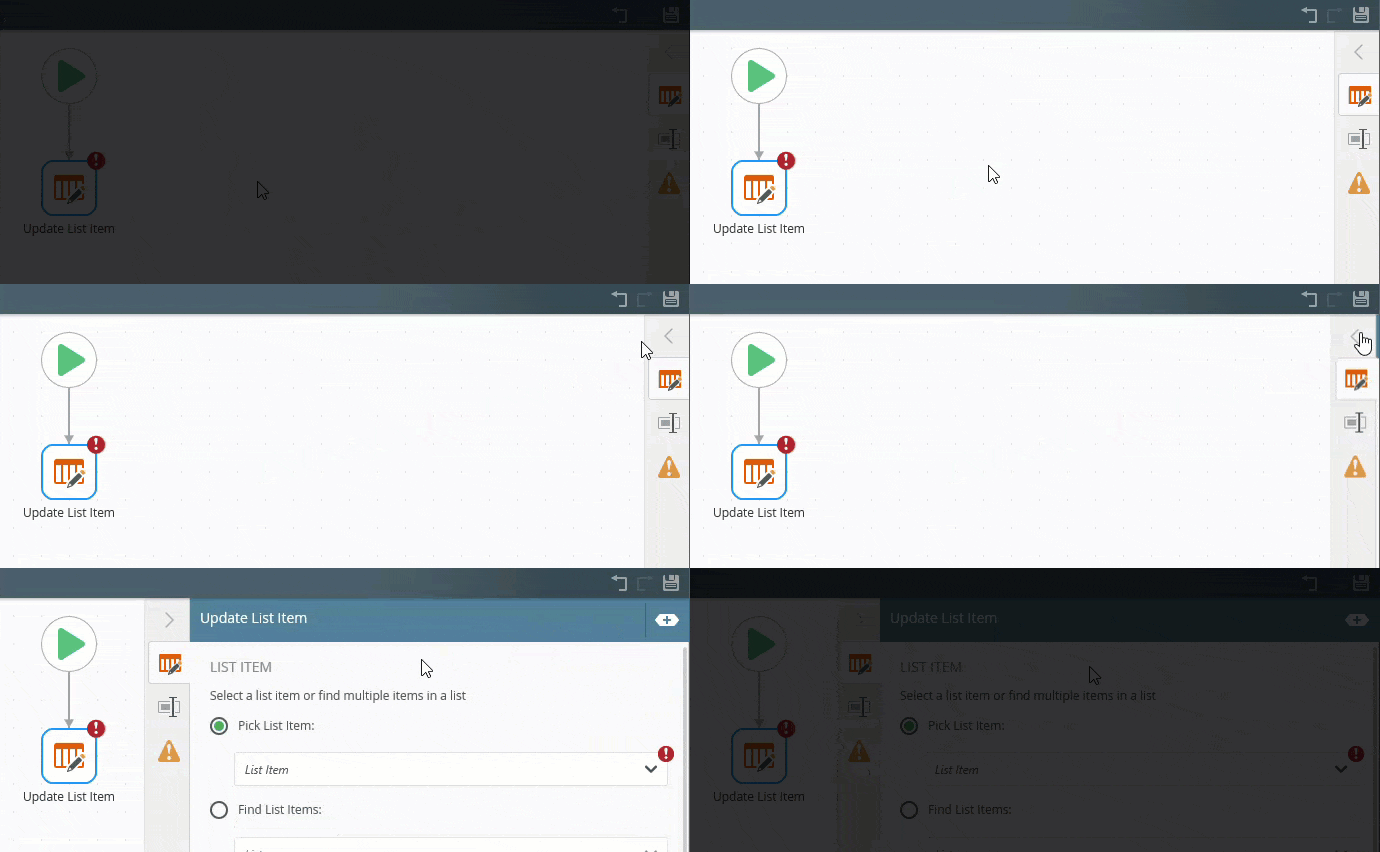
- With the step still selected (selected steps have a blue border), expand the Configuration Panel.The Configuration Panel allows you to configure and customize the steps you add to your workflow.

- First, you need to tell the system which list you want to update. Under the List Item heading, confirm Pick List Item is active. Click the List Item box and select Expense Claims.

- Next, you select which property (column) in the list item you want to update. Under the Properties heading, click the Add(+) icon and check the box for Link to View Flow.

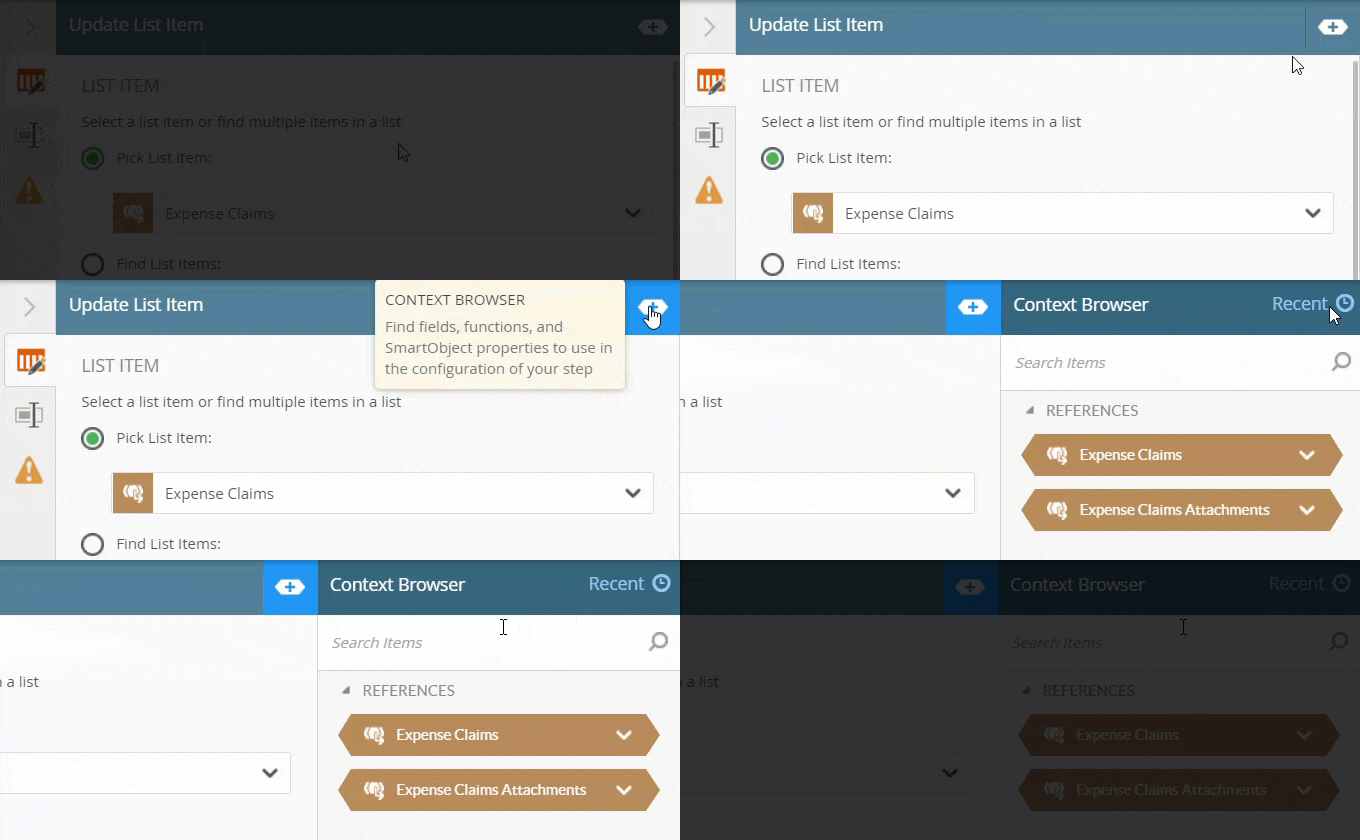
- Add the View Flow variable as the default value for the Link to View Flow column. Expand the Context Browser.The Context Browser contains references, variables, functions, and SmartObject properties. At runtime, the system replaces references and variables with live data. For example, it replaces the ID reference with the ID of the current record.

- The View Flow variable is a system variable found in the Workflow panel. Click the Workflow tab. Expand the Workflow node. Drag the View Flow variable into the Link to View Flow box.

- Next, rename the step so you can tell at a glance what it does. Click the Properties tab. Change the Name to
Set View Flow Link
then collapse the Configuration Panel by clicking the slider.
Now you add the default value for this column. Each list item represents a different workflow instance (remember the workflow starts each time you add a new item). You use a variable for the link and the system replaces variables with live data at runtime.
The system creates a View Flow report for each workflow instance. Each list item has a workflow associated with it; therefore each list item has a View Flow report. Use the View Flow variable as the default value for each list item (Link to View Flow column). At runtime, the system replaces the variable with the actual URL to the instance report.
Your workflow should look like the image below. Next, you add a task step and two email steps to complete the workflow.

- From the Toolbox > SharePoint > List Items node, drag an Update List Item step into the empty placeholder below the Start step.
- Add a Task step and connect it to the Set View Flow Link step. Add a Decision step and connect the Task step to the Decision step. Use the table below as a guide for configuring the Task step.
Property Value Notes Instructions Choose either Approved or Rejected, then submit the form. Actions Approved
RejectedRecipients Originator Keep the default recipient value. Properties Approval Task Rename the step so it's clear what the step does. - From the Toolbox > Basic node, drag a Task step below the Set View Flow Link step.To return to the Toolbox main menu, click the Toolbox icon in the breadcrumb bar.


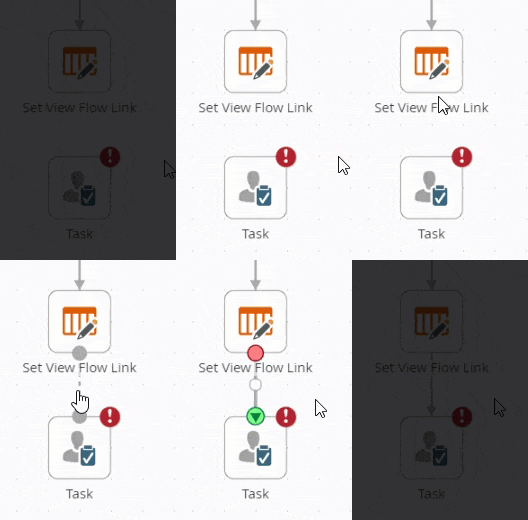
- Connect the two steps.To connect steps, hover over the border of the first step. When you see the handle appear, click and drag it into the second step. Click the canvas to set the line.

- Select the Task step, then expand the Configuration Panel. For the Instructions, enter
Choose either Approved or Rejected, then submit the form.
- For the Actions, click the Add(+) icon and add two actions:
Approved
Rejected
The recipient chooses one of the actions as their decision for the task.
- Click the Recipients tab. Keep Originator as the default recipient. The system assigns the task to this person.

- Click the Properties tab. Change the step name to
Approval Task
then collapse the Configuration Panel.
- From the Toolbox > Logic node, add a Decision step below the Approval Task step. Connect the two steps. The Decision step generates the outcome lines for each action. Notice you have two outcome lines, one for the Approved action and one for the Rejected action.

-
Add a Send Email step and connect it to the Approved outcome. Configure the email so that you let the Originator know the approved decision. Rename the step, Email Originator Approved. Repeat this for the Rejected side. Let the Originator know the rejected decision. Rename this step Email Originator Rejected. Add an End step and connect both email steps to the End step.
- To complete each outcome, add a Send Email step and configure it to let the Originator know the approval decision. From the Toolbox > Basic node, drag a Send Email step and align it with the Approved outcome. Connect the outcome line to the email step.

- Select the Send Email step, then expand the Configuration Panel. Keep the default recipient, Originator.

- For the Subject line, enter
Expense Claim Approved
then enter any content you like for the Body to let the claim submitter know the decision.
- Rename the step
Email Originator Approved
then collapse the Configuration Panel.
- Repeat the steps above for the Rejected outcome. Add a Send Email step and align it with the Rejected outcome. Connect the outcome with the email step. Configure the step to let the Originator know the rejected decision. Enter content for the Subject line and message Body. Rename the step
Email Originator Rejected
then collapse the Configuration Panel. - From the Toolbox > Logic node, drag an End step below the Decision step. Connect both email steps to the End step. Your completed workflow should look like the image below.

The two emails steps should look like the image below.

Use End steps to complete workflow outcomes. You can configure End steps to terminate the workflow or use them as visual indicators that there are no more steps to follow. In this demonstration, End steps provide a clean end to the outcomes.
- To complete each outcome, add a Send Email step and configure it to let the Originator know the approval decision. From the Toolbox > Basic node, drag a Send Email step and align it with the Approved outcome. Connect the outcome line to the email step.
- Deploy the Expense Claim Workflow. Return to the Expense Claim list to begin testing.
- Before you can use the workflow, you must deploy it to the server. Deploying a workflow publishes it and makes it available for use. If you change the workflow, you must deploy it again so that the server can record the changes. Click File > Deploy. When you see the success dialog, click File > Close to return to the application elements page.

- From the Expense Claims application elements page, click the Expense Claims title to return to the list landing page.

- Before you can use the workflow, you must deploy it to the server. Deploying a workflow publishes it and makes it available for use. If you change the workflow, you must deploy it again so that the server can record the changes. Click File > Deploy. When you see the success dialog, click File > Close to return to the application elements page.
- Add at least two new items to the Expense Claims list. Do not enter a value for the Link to View Flow column. Refresh the list and confirm you have two unique URLs for each View Flow report.
You are ready to test the application to see the Link to View Flow column populated with dynamic URLs.
- From the Expense Claims list landing page, click new item. Complete the form fields except for the Link to View Flow boxes. Remember, the workflow populates this value from a system variable during the Set View Flow Link step. Click Save.

- Repeat the step above and add a second new item to the list.
- Refresh the list. The Link to View Flow column now displays URLs. Notice the ProcessID (this is the workflow ID) is unique for each item. Remember that each new item starts a workflow, so there are multiple workflows, hence different ProcessIDs.

- (Optional) If time allows, action one of the workflow tasks, the open the View Flow report for that task. In a new browser tab, launch Workspace (Desktop).If you do not know how to access Workspace (Desktop), see Accessing Sites.
- Click the Inbox to expose assigned tasks.

- Click one of the task titles to expose the task in the central pane. Select a decision from the Action drop-down list. Submit the form. Click OK when you see the confirmation message.

- Return to the list and click the View Flow link for the item you actioned. Review the report. Can you tell from the report if the claim was approved or rejected?

- From the Expense Claims list landing page, click new item. Complete the form fields except for the Link to View Flow boxes. Remember, the workflow populates this value from a system variable during the Set View Flow Link step. Click Save.
Your workflow should look like the image below at this point.
Review
The View Flow report provides real-time access to your workflow's progress. The Context Browser contains references, variables, functions, and SmartObject properties. At runtime, the system replaces references and variables with live data. Use a View Flow variable from the Context Browser as a default value for a column in a list. The result is a link to the View Flow report that is unique for each list item's associated workflow.