Integrating the product and SharePoint Online with minimum permissions
This topic outlines the process of configuring the product and SharePoint Online with minimum permissions by registering a custom Enterprise Application in your product tenant. See Understanding Resource Specific Consent for Microsoft Graph and SharePoint Online for more information.
-
We recommend upgrading to Nintex K2 Five (5.6) or later to increase security for the client secret as field masking was not added in previous versions.
-
Only the update config script must be run on the K2 Server. This is necessary as the script modifies local resources. If you are running the script on a secondary device, the information required for Microsoft Entra ID (previously known as Azure Active Directory) such as client secret and trust certificate must be manually uploaded.
Prerequisites
The following prerequisites are required before starting with the configuration
- Tenant ID from Microsoft Entra ID (Azure Active Directory)
- Install Powershell 7 on the K2 Server
-
When you run the Nintex K2 for SharePoint Registration Wizard or the Nintex K2 for SharePoint Activation Wizard, a resourceId error may occur. The fix is available in: An error occurs in K2 for SharePoint Registration and Activation Wizards
-
Ensure the domain that the product site is running on is added as a validated custom domain in Microsoft Entra ID. The product needs the application identifiers set to match the base URLs. Microsoft does not allow direct editing of these URLs in the app manifest or via the API. A restriction was added that only URIs that are validated on the tenant can be used. See Add your custom domain for details on how to add a custom domain.
Permissions
The following roles and permissions apply in Microsoft Entra ID and SharePoint Online.
| Action | Role/Permission required to perform the action |
|---|---|
| Step 1 | |
| Create SharePoint Online application | Application Administrator Role |
| Setup custom domain | Domain Name Administrator |
| Grant admin consent | Global Administrator or Privileged Role Administrator |
| Step 2 | |
| Grant-PnPAzureADAppSitePermission | Site Collection Administrator |
| Grant-PnPAzureADAppSitePermission | Site Owner |
| Step 3 | |
| Run K2 Registration Wizard | Global Administrator |
| Run K2 Activate Site Wizard | Site Collection Administrator |
| K2 server file system changes | K2 Administrator |
Note that you must have the domain validated in Microsoft Entra ID for the application Identifiers to be set correctly. See Add your custom domain.
- Edit the Create SP Online App script using Powershell ISE and add the following values:
- Tenant ID
- Custom application name for example K2 integration
- K2 Site base URL as per your Microsoft Internet Information Services (IIS) site
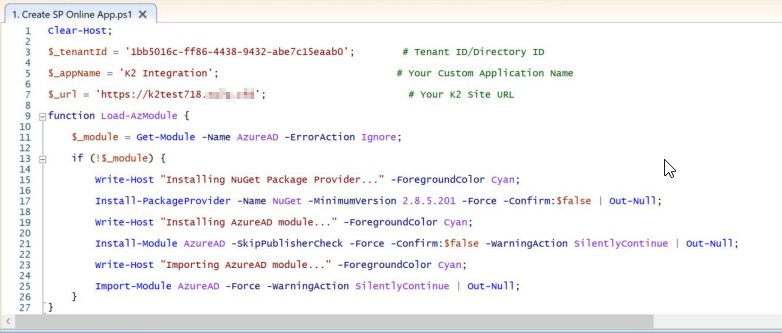
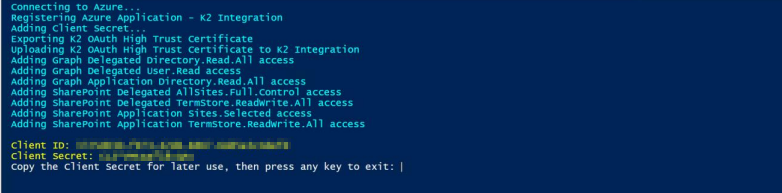
- Execute the Create SP Online App script and save the Client ID and Client Secret for later use.
Validate the custom application in Microsoft Entra ID as follows:
-
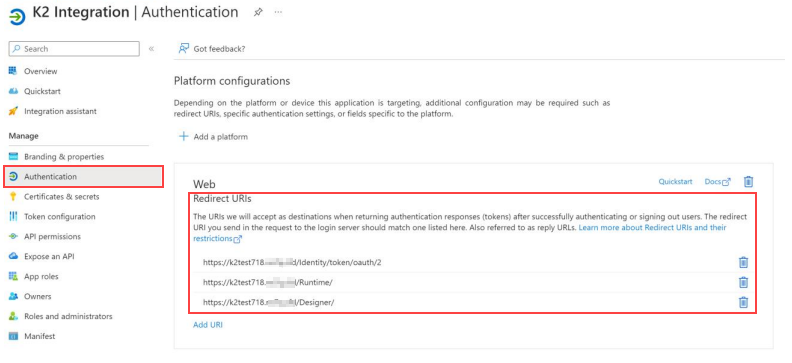
Open App registrations > Search for custom app and view details.
-
In the Authentication menu item, ensure that the Redirect URIs are the same as those in your K2 server.
-
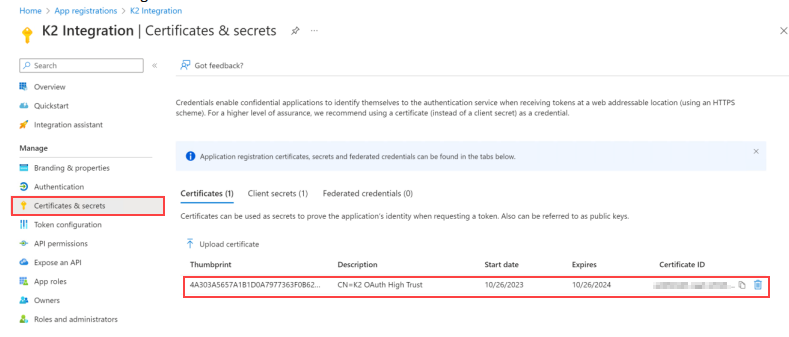
In the Certificates & secrets menu item, if the Create SP Online App script is run on the K2 server, then Microsoft Entra ID automatically populates the OAuth High Trust certificate. This is used by the product to sign app only tokens that are used during elevated calls and workflows.
-
If the Create SP Online App script is run on the K2 server, then Microsoft Entra ID automatically populates the Client Secret. This will be configured by the product after the registration wizard is complete.

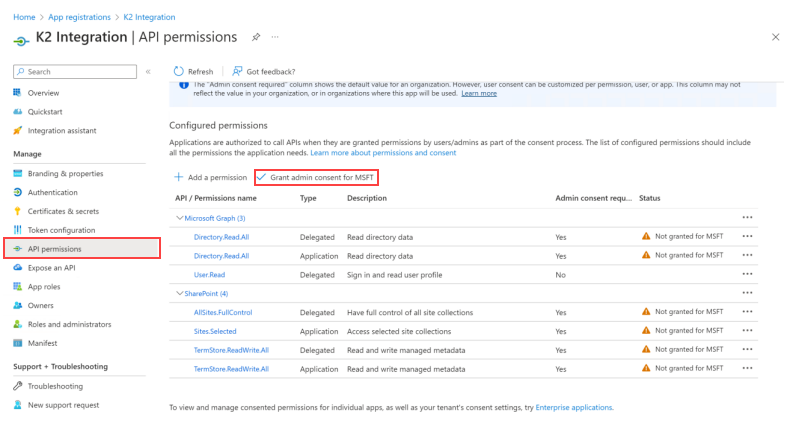
To enable the application to make API calls, you need to grant it admin consent.
-
Navigate to the API permissions menu item in Microsoft Entra ID and click Grant admin consent for MSFT.
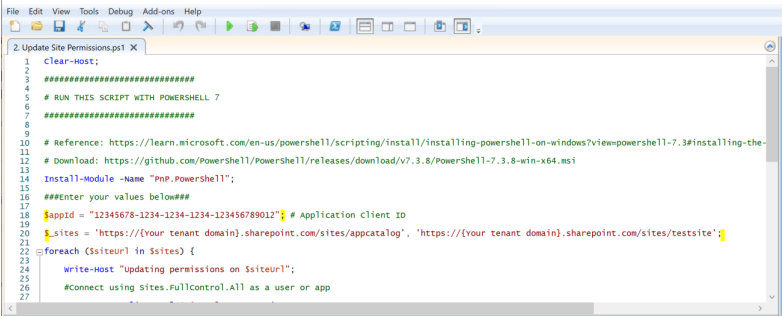
To specify which SharePoint site collections are authorized to access from API calls, you must run the Update Site Permissions script as follows:
-
Open the Update Site Permissions script in Powershell ISE.
-
Supply the Application Client ID generated in step 1.
-
Supply the SharePoint App Catalog Site URL and at least one other site where the application will be created. for example 'https://{your domain}.sharepoint.com/sites/appcatalog' and 'https://{your domain}.sharepoint.com/sites/testsite'.
-
Open PowerShell and execute the script. This script must be executed with PowerShell 7. The script enables the appcatalog site and the site where the application is created. Multiple sites can be specified with a comma delimited list. See expected output:

Install the product and follow the steps below.
-
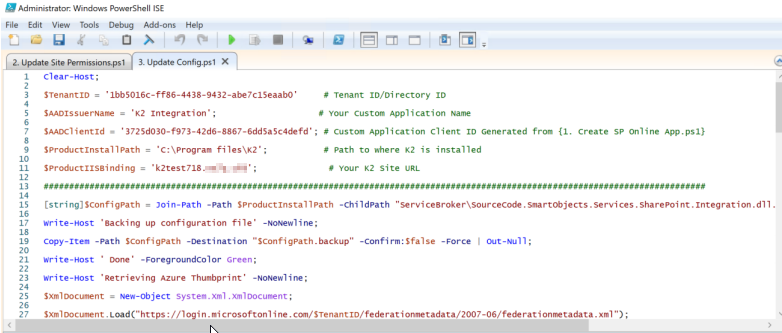
Edit the Update Config script using PowerShell ISE and add the following values
-
Tenant ID
-
Custom application name
-
Custom application client ID (This was generated in Step 1)
-
Path to where the product is installed
-
K2 site URL
-
-
Execute the Update Config script. This script must be run on the K2 Server.
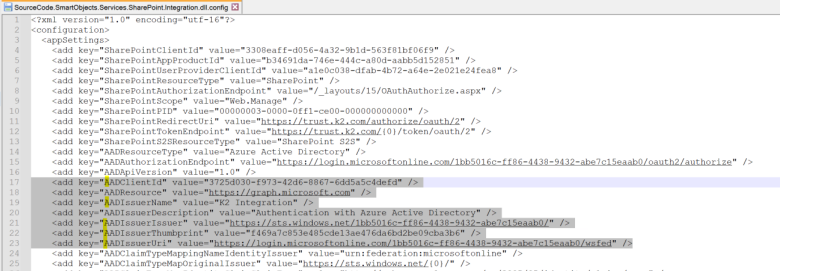
It updates the (K2 directory)\ServiceBroker\SourceCode.SmartObjects.Services.SharePoint.Integration.dll.config file with values for the product to integrate with the custom app.
-
Validate the changes made to the file. For example, AADClientId, AADIssuerName and AADIssuerUri values are updated.
-
Make a copy of this file as it may be overwritten on upgrade to a future version of the product, and must be manually replaced.
-
Install the Nintex Automation for SharePoint app to the appcatalog site.
-
Deploy the app.
-
Run the Registration Wizard. You must authorize the application with full control as the Global Tenant Administrator initially.
-
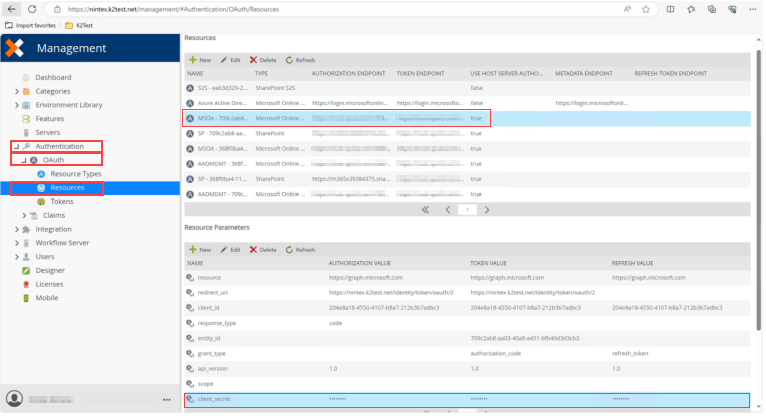
Open Management Site > Authentication > OAuth > Resources and edit the MSOA resource. Edit the client_secret parameter and use the client secret generated in step 1 as the value for Authorization, Token, and Refresh.
-
Activate other SharePoint Site Collections as needed.
-
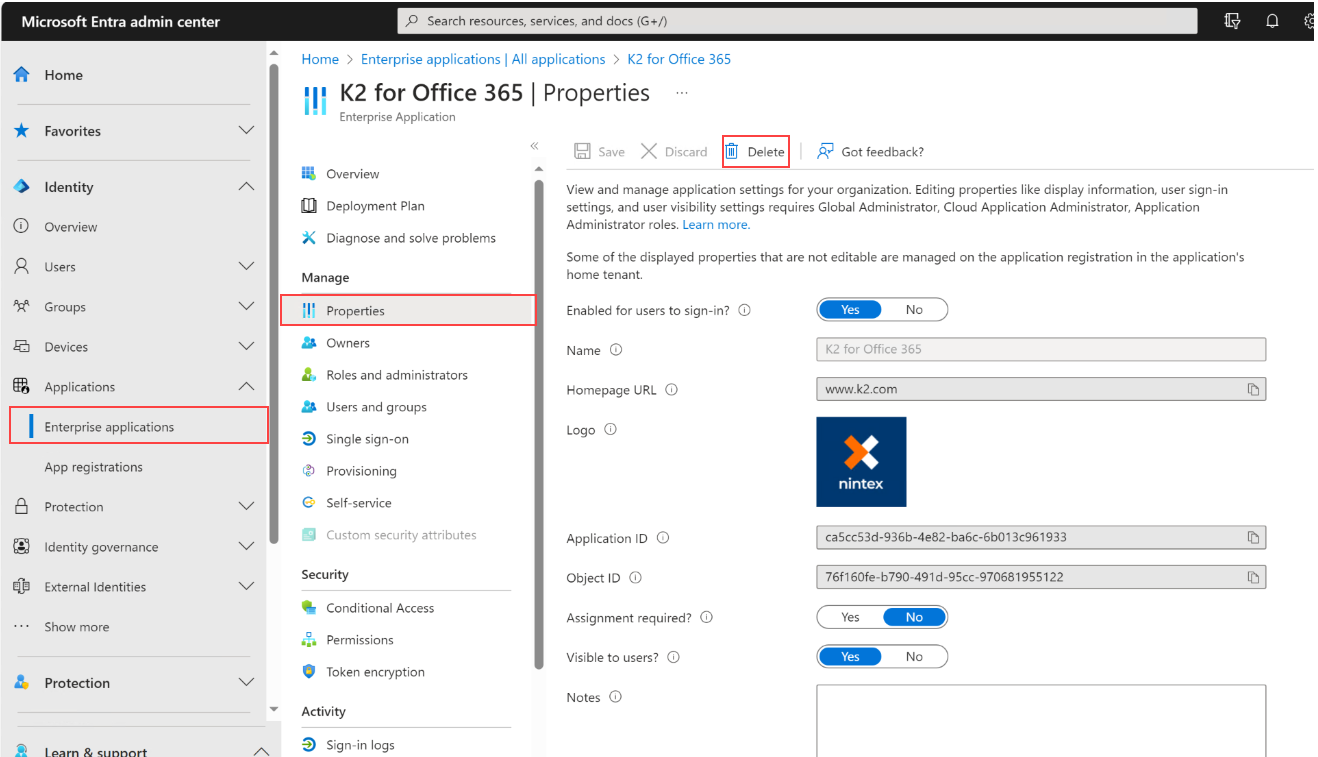
Open Microsoft Entra ID > Enterprise Applications
-
Open K2 for Office 365 application > properties
-
Delete this application for your tenant or revoke permissions
-
If installing on Nintex K2 Five (5.6) or earlier, a fix pack is available to address a resourceId not found error when running the SharePoint Registration wizard or activating a SharePoint site. See K2 app for SharePoint Online error (resourceId Parameter name: Value not provided.)
-
When rerunning the SharePoint Registration wizard, admin consent is regranted for the K2 for Office 365 application. You can revoke or delete it from the tenant portal afterwards.
-
When rerunning the SharePoint Registration wizard, the resource client secret configuration is lost in Management. You must add these values again after running the SharePoint Registration Wizard as shown here.
-
Client secrets expire after a set time (default 180 days). A new one must be generated, see Register an app in the Microsoft identity platform - Microsoft identity platform. The new client secret must be added here for you to run SharePoint forms or SmartObjects without errors.
-
Steps to activate a new site collection if needed
-
As Site Collection Administrator: Run the Update Site Permissions as shown in step 2
-
As Appcatalog Site Collection Administrator: Deploy the Nintex Automation for SharePoint app to the new site collection. (Manage App Deployments / Tenant scoped app deployment screen)
-
As SharePoint Tenant Administrator: Run the Enable Custom Script Powershell command (or through SP Admin UI) as described in SharePoint Online Site Activation SmartForms Pages Upload Issue to avoid global admin authentication prompt when activating the SharePoint site.
-
As Site Collection Administrator / K2 Administrator: activate the SharePoint site.
-
-
When running the Create SP Online App script, an error as shown below may occur.

The product needs the application identifiers set to match the base URLs. Microsoft does not allow direct editing of these URLs in the app manifest or via the API. A restriction was added that only URIs that are validated on the tenant can be used. See Add your custom domain for details on how to add a custom domain. -
The following error may occur when running the Create SP Online App script.
Request_BadRequest
Message: Invalid value specified for property 'resourceAppId' of resource 'RequiredResourceAccess'.
Workaround: Open Microsoft Entra ID > Applications > App Registrations > Manifest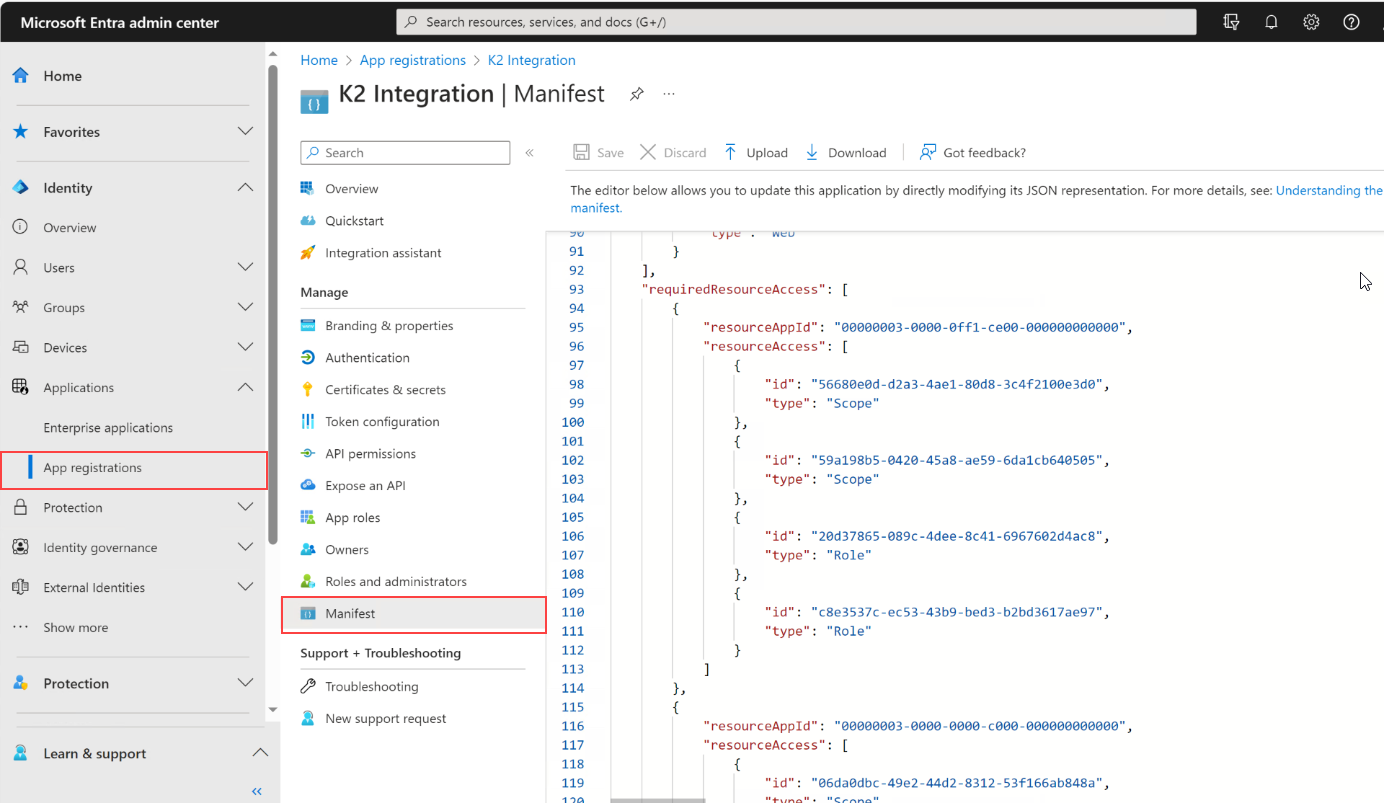
Modify the application manifest directly and replace the requiredResourceAccess section with the below:
"requiredResourceAccess": [
        {
            "resourceAppId": "00000003-0000-0ff1-ce00-000000000000",
            "resourceAccess": [
                {
                    "id": "56680e0d-d2a3-4ae1-80d8-3c4f2100e3d0",
                    "type": "Scope"
                },
                {
                    "id": "59a198b5-0420-45a8-ae59-6da1cb640505",
                    "type": "Scope"
                },
                {
                    "id": "20d37865-089c-4dee-8c41-6967602d4ac8",
                    "type": "Role"
                },
                {
                    "id": "c8e3537c-ec53-43b9-bed3-b2bd3617ae97",
                    "type": "Role"
                }
            ]
        },
        {
            "resourceAppId": "00000003-0000-0000-c000-000000000000",
            "resourceAccess": [
                {
                    "id": "06da0dbc-49e2-44d2-8312-53f166ab848a",
                    "type": "Scope"
                },
                {
                    "id": "e1fe6dd8-ba31-4d61-89e7-88639da4683d",
                    "type": "Scope"
                },
                {
                    "id": "7ab1d382-f21e-4acd-a863-ba3e13f7da61",
                    "type": "Role"
                }
            ]
        }
    ],
Revoke permissions for site collections
Permissions can be revoked for site collections by following the steps in the following link: Revoke-PnPAzureADAppSitePermission
For example:
PowerShell 7.3.8
                PS C:\> Connect-PnPOnline -Url https://m365x67600804.sharepoint.com/sites/Main -Interactive;
                PS C:\> Get-PnPAzureADAppSitePermission
                Id : aTowaS50fG1zLnNwLmV4dHxmOGU1ZDFhZC1mMmFkLTRlZjktYjY2Zi0yMDY2OWQ5MDNhODRANWJlNDc5MzMtZmJlZS00NTQ0LTlhOWItNzJiMzc2YjQyMThh
                Roles : {fullcontrol}
                Apps : {SitesResourceSpecific, f8e5d1ad-f2ad-4ef9-b66f-20669d903a84}
                PS C:\> Revoke-PnPAzureADAppSitePermission -PermissionId aTowaS50fG1zLnNwLmV4dHxmOGU1ZDFhZC1mMmFkLTRlZjktYjY2Zi0yMDY2OWQ5MDNhODRANWJlNDc5MzMtZmJlZS00NTQ0LTlhOWItNzJiMzc2YjQyMThh
                Confirm
                Are you sure you want to revoke the permissions?
                [Y] Yes [N] No [S] Suspend [?] Help (default is "Y"): Y
                PS C:\> Get-PnPAzureADAppSitePermission
            PS C:\>