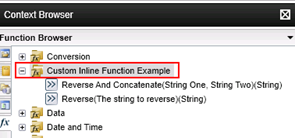
Custom Inline Functions
Inline functions allow simple text manipulation, data type conversions, and math and date calculations in the context of a process. These Inline Functions are exposed in the Context Browser of the Workflow design tool. This approach allows process designers to call functions through a declarative, UI-based manner instead of resorting to custom code in server events.
Inline Functions run in the context of the Workflow Server, so they have the potential to affect server performance. Highly complex code for Inline Functions should therefore be avoided and you should take the necessary precautions to write code that is efficient and manages memory and resources responsibly.
You can download a sample custom Inline Function project from K2Documentation.Samples.Extensions.InlineFunctions (on GitHub). The sample project is provided for demonstration purposes only. It is not supported by the product and is not intended to be used as-is in production environments.
Designing the Custom Inline Function Assembly
Inline Functions are implemented by creating a C# class library with public static methods, and then decorating the classes and methods you wish to expose as Inline Functions with specific attributes.
Bear the following points in mind when creating custom Inline Functions:
- Any method which is to be exposed as an Inline Function must be declared as a public static method.
- Classes should be public
- You must use resource files to populate the attribute values so that the Inline Functions can support localization
- All functions in the same class will display in the same category in the Context Browser
- Use .NET primitive types for input parameters and return values
- Passing and returning lists of values is performed through arrays of primitive types
- Defining an input parameter of type System.Object type causes the type validation step to be skipped on the UI, and you can pass in any value. If you do this, keep type safety in mind and handle type conversion errors gracefully in your code.
The first thing you need to do is to create a Windows Class Library. The following references are necessary to add to your project:
- SourceCode.Framework (there are multiple SourceCode.Framework references, use the one located at
%PROGRAMFILES%\K2\Bin\SourceCode.Framework.dll - SourceCode.Workflow.Functions (located in %PROGRAMFILES%\K2\Bin\Functions)
- SourceCode.Workflow.Functions.Design (located in %PROGRAMFILES%\K2\Bin)
You need using statements for the following namespaces
using SourceCode.Framework;
using SourceCode.Framework.Design;
using SourceCode.Workflow.Functions;
using SourceCode.Workflow.Functions.Design;Once you have the project set up, you can start adding your classes and methods. Each class may represent a series of functions, with each method corresponding to individual functions displayed in the Context Browser.
Any single class can only contain functions of a single category because the category is determined at the class level
The built-in categories are as follows:
- Conversion
- DateAndTime
- Logic
- Mathematical
- TextManipulation
Defining the Category
At the class level, the Category Attribute is used to determine which category the functions will appear in. For example, to create a custom category your code attribution would look like the following:
The namespace of this custom function project is MyInlineFunction and a resource string has been defined, MathCategory which contains the name of the category. MyMath is the name of the class that is attributed with this category.
An example of one of the standard Inline Functions' category attribution
// A built-in category attribution looks like the following.
[Category("SourceCode.Workflow.Functions.Resources", "CategoryConversion", typeof(Conversion))]Defining the Name and Description
At the method level, attribution defines the name and description associated with the each function. For example, to define your custom function, your code attribution would look like the following:
Defining the Name, Description, and Icon
[DisplayName("MyInlineFunction.Resources", "MyMathFunctionName", typeof(MyMath)), Description("MyInlineFunction.Resources", "MyMathFunctionDescription", typeof(MyMath))]The resource strings MyMathFunctionName and MyMathFunctionDescription are defined in the project.
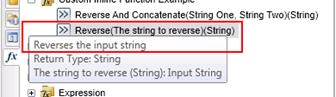
Defining the Parameters
The parameters of your method must also include a name and a description. The data type of these parameters appears after the name of the function, so do not include any characters that may confuse the process designer, especially parentheses.
For example, the following method adds two numbers and the parameters are of type long.
Defining the Parameters
// The parameters of your method must also include a name and a description.
public static long MySum(
[DisplayName("MyInlineFunction.Resources", "MyMathFunctionParm1Name", typeof(MyMath)),
Description("MyInlineFunction.Resources", "MyMathFunctionParm1Description", typeof(MyMath))
] long value1, [DisplayName("MyInlineFunction.Resources", "MyMathFunctionParm2Name", typeof(MyMath)),
Description("MyInlineFunction.Resources", "MyMathFunctionParm2Description", typeof(MyMath))
] long value2)
{
return value1 + value2;
}
For reference, use the table below to understand where the various attributes are surfaced.
| Scope | Attribute | Design time behavior |
|---|---|---|
| Class | Category |
|
| Method | DisplayName Description K2Icon 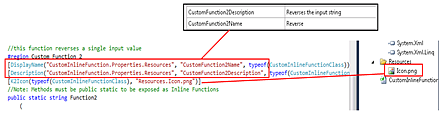 |
|
| Parameter | DisplayName Description 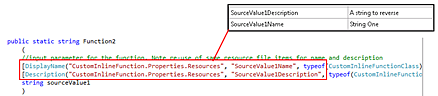 |
|
Deploying Custom Inline Functions
Once you have created and built the custom Inline Function, the assembly must be copied to specific machines. Once the assembly has been copied to the relevant directories on these machines, it will be discovered and presented by the workflow design tool.
K2 Application Server (in other words, all servers running the K2 service)
To register the custom inline function with the environment, copy the output assembly to the following folder on all K2 Servers: %PROGRAMFILES%\K2\Bin\Functions.
This is required regardless of the design tool used to design the workflows, because the code for a Inline Function is executed by the K2 Application Server at runtime.
- On each K2 application server, copy the Inline Function .dll file to %PROGRAMFILES%\K2\Bin\Functions
- Update the %PROGRAMFILES%\K2\Host Server\Bin\InlineFunctionLookup.json file as in the example below. The new function is shown in bold, be sure to add the comma between entries and make sure the version and public key match the values for your strongly-named assembly.
Example of the InlineFunctionLookup.json file
{
"1": {
"AssemblyName": "SourceCode.Workflow.Functions.DataFunctions, Version=4.0.0.0, Culture=neutral, PublicKeyToken=16a2c5aaaa1b130d"
},
"2": {
"AssemblyName": "SourceCode.Workflow.Functions, Version=4.0.0.0, Culture=neutral, PublicKeyToken=16a2c5aaaa1b130d"
},
"3": {
"AssemblyName": "SourceCode.Workflow.Functions.ExcelServices, Version=4.0.0.0, Culture=neutral, PublicKeyToken=16a2c5aaaa1b130d"
},
"4": {
"AssemblyName": "SourceCode.Workflow.Functions.OpenXML, Version=4.0.0.0, Culture=neutral, PublicKeyToken=16a2c5aaaa1b130d"
},
"5": {
"AssemblyName": "SourceCode.Workflow.Functions.SharePoint, Version=4.0.0.0, Culture=neutral, PublicKeyToken=16a2c5aaaa1b130d"
},
"6": {
"AssemblyName": "SourceCode.Samples.Functions, Version=1.0.0.0, Culture=neutral, PublicKeyToken=1fa9823abad9b25d"
}
}
Debugging Custom Inline Functions
When debugging a custom inline function, determine whether you are trying to debug the function at runtime (in other words, when it is being used by a workflow running on the K2 server) or at design time (in other words, when a user is using the inline function when designing a workflow). Note that there is no specific logging configuration for Inline Functions
Normally, you would only need to debug your inline function in Runtime mode, since there is very little code that actually executes when the inline function is used at design time.
Runtime debugging
- Stop the K2 service on the target server
- Add breakpoints to your code
- Build and then copy the assembly .dll file and .pdb file to the K2 Host Server bin directory (%PROGRAMFILES%\K2\Host Server\Bin)
- Enable Remote Debugging on the target K2 Server if debugging remotely
- Start the K2 Service
- Use the Visual Studio Debug > Attach to Process menu to attach to the K2HostServer.exe process on the target K2 application server
- Use your inline function in a workflow, deploy the workflow and then start an instance of the workflow to hit the custom inline function
- Visual Studio should hit your breakpoint and you will be able to step through your code
Design-time debugging
- Add breakpoints to your code
- Deploy the assembly to the relevant web server as described in the Deploying section of this topic
- Enable Remote Debugging on the target WFE or IIS Server if debugging remotely
- Determine which w3wp.exe process is used to host the website where the design tool is being used
- Use the Visual Studio Debug > Attach to Process menu to attach to the w3wp process that you identified in the previous step
- Use your inline function in a workflow
- Visual Studio should hit your breakpoint and you will be able to step through your code