Getting started with Custom Controls
There are some fundamental points you should know before starting to build custom Controls for SmartForms.
- Creating custom controls is a developer task
Creating custom controls requires knowledge of C#, XML, JavaScript, jQuery, CSS and other web technologies, and custom controls are normally implemented using an IDE like Visual Studio. - Controls are web UI components
Since controls are used on SmartForms which are just ASP.NET web pages, it follows that custom controls are implemented as web UI components. Note that SmartForms controls are not .ascx user controls or Web Parts; but rather an implementation of a particular base class. Since controls are web-based, it means that they are stateless and you need to bear in mind the effect of page life-cycles and statelessness. - Use the SDK to create and register custom controls
The recommended approach to create custom controls is to use the SmartForms Control SDK. This SDK consists of two assemblies containing base classes and namespaces you will need to use, and a utility which is used to register the custom control in a SmartForms environment:- SourceCode.Forms.Controls.Web.SDK.dll
- SourceCode.Forms.Controls.Shared.dll
- ControlUtil.exe (located by default in %PROGRAMFILES%\K2\Bin)
- Custom controls are implemented as .NET .dlls
The eventual output of a custom control project is a single .NET .dll file. The various files that might make up a web control, such as JavaScript files and style sheets, are included in the .NET .dll as embedded resources. The SmartForms rendering engine uses .NET reflection to "pull" these resources and the code for the control from the .dll and perform the processing. Various attribute decorators are used in the .cs file for the control to allow Reflection to find the necessary resource files. You can have multiple controls in the same assembly - An XML file describes the control
The controlutil utility is used to register the control in the SmartForms database. This utility needs to understand the behavior and Properties of the custom control, so we include a XML file as an embedded resource in the assembly which the utility uses to register the custom Control with SmartForms. This XML file is known as the ControlTypeDefinition file. The ControlTypeDefinition XML file has a specific structure, which is described further in the Control Definition XML File topic. - Controls can include server-side and client-side code
Just like standard ASP.NET controls, custom controls can include both server-side code (typically implemented in a .cs file) and client-side code (typically implemented in a .js file). The important points to bear in mind are the stateless nature of web controls, the page life-cycle and the runtime behavior of the .js files. Because .js files are not compiled, syntax errors in your .js files will not prevent the project from building. Be careful when modifying your .js files and use developer tools in browsers to help you troubleshoot .js files. If you are using your custom control on a View but it just never appears, chances are that there is a syntax error in your .js file. - Controls could implement AJAX or jQuery functionality
You can use normal web development techniques and technologies like AJAX or jQuery in your custom controls. In fact, the SmartForms engine uses jQuery extensively. Experience with jQuery will prove valuable when building custom SmartForm Controls - You can include multiple .js files and cross-reference other .js files
You can include multiple .js files with your project, as long as the files are embedded resources in your .dll file and the .cs file is decorated with the [ClientScript] attribute that points to each .js file. You can also cross-reference other .js files in your scripts, just make sure that those files available, and be aware of potential cross-site-scripting security limitations. - You can add dedicated style sheet (.css) and resource files (.resx) with custom controls
If needed, you may add dedicated style sheets (.css) files, resources (.resx files), images or other resource files to your project. As usual, just remember to set the files as embedded resources add the necessary attributes to the .cs file so that the SmartForm rendering engine can find the resource files at runtime. - Custom controls must be manually deployed to target SmartForms environments and registered using the controlutil utility
To deploy custom controls, you must copy the assembly to the servers where the SmartForms design-time and runtime web sites are installed. Custom controls are NOT included in Package and Deployment packages. Controls must be registered with the SmartForms environment using the controlutil utility before they will be available for use. - It is important to verify that your custom controls set the correct content type for requests that load content because the product platform enables strict MIME type checking. See the topic Considerations and Best Practices for Custom Controls for more information.
We recommend that you also review the content in the topic Considerations and Best Practices for Custom Controls before starting with Custom Controls.
Custom Control Project Structure
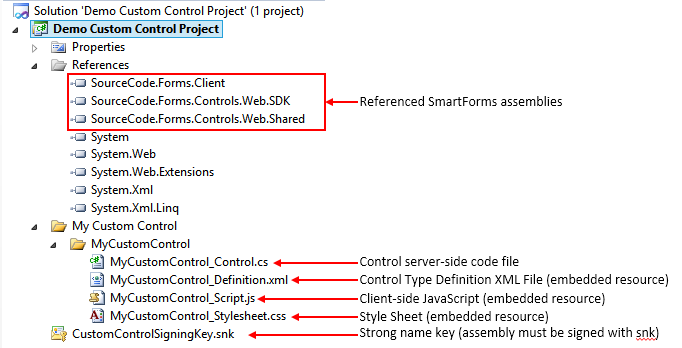
The image below illustrates a sample custom control project in Visual Studio.
- SourceCode.Forms assemblies have been added as project references
- The project contains one custom control called MyCustomControl (projects may contain multiple custom controls)
- Basic custom controls require at least a server-side control code (.cs) file and a embedded resource XML file (the Control Type Definition file, which contains the various properties and methods of the control definition)
- Additional resources like client-side JavaScript or css files must be added as embedded resources in the project, and if appropriate, these files must be defined as WebResource files in the control .cs file
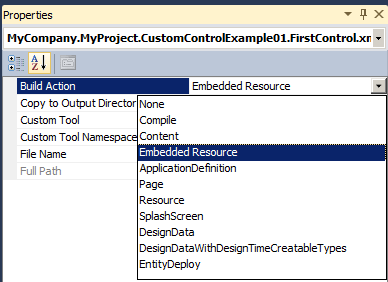
Setting a project item to Embedded Resource
- Click on the Item
- Go to Properties for the item.
- Change the Build Action by selecting "Embedded Resource" from the dropdown