Adding and Using a Custom Resource File
This topic takes a look at adding a custom resource file.
Two things are needed:
- An embedded resource (*.resx) file
- A ClientResources link in the namespace
This project on Github contains the sample project described in this topic. You can view the project on Github instead of writing out the code, if you prefer:
K2Documentation.Samples.Extensions.SmartForms.CustomControl
Adding a resource file
- Create an embedded resources file (in this example we have named the file Resources.resx)
The name of the resource file should NOT contain characters like [. , ' ;] e.g: My.Resource.resx as these cause issues with how the resource file is mapped.
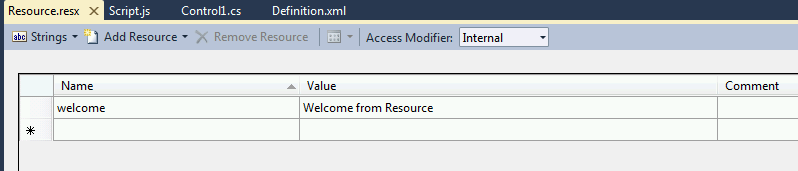
- Edit the Resources file by adding the Welcome Message values as shown in the image below:
- By default resource files (.resx) are already embedded, so we do not have to adjust that property.
- Add a ClientResource definition to the namespace using the fully qualified name, as demonstrated in the sample code displayed below:
Copy
Adding a ClientResource definition
using System;
using System.Collections.Generic;
using System.Linq;
using System.Text;
using System.Web;
using System.Web.UI;
using System.Web.UI.WebControls;
// SourceCode namespaces used in the control
using SourceCode.Forms.Controls.Web.SDK;
using SourceCode.Forms.Controls.Web.SDK.Attributes;
namespace SmartForms.CustomControls
{
//Link to the definition file
[ControlTypeDefinition("CustomControlResource.Definition.xml")]
public class ControlUsingResource : BaseControl
{
protected override void CreateChildControls()
{
Label label1 = new Label();
// You will need to create an embedded resource file (in this example we have named the file Resource.resx)
label1.Text = Resource.welcome;
this.Controls.Add(label1);
}
}
} - Build the modified custom control.
- Register the control using the controlutil.exe
- Use the control on a View and run the view to see the welcome text as defined in the embedded Resource file