Nintex Analytics
You can use Nintex Analytics to gain insight to your Nintex for SharePoint 2019 subscription data. You can view your data straight out of the box, and also have access to deep-dive pages where you can export your data at the click of a button. See the Nintex Analytics help documentation for more information.
After Nintex Analytics is activated in your SharePoint tenant, you can create a data connection to SharePoint from Nintex Analytics. After activation, make a note of the following to be used when adding the data connection in Nintex Analytics:
- Region
- Isolation ID
- Access Token
Note: If you have published workflows containing Hawkeye Beacon actions that are currently sending data to Nintex Hawkeye, you must republish the workflows to begin sending data to Nintex Analytics. Once you republish the workflows containing Hawkeye Beacon actions, data will no longer be sent to Nintex Hawkeye.
Activate Nintex Analytics in your SharePoint tenant
Note: Before you start you must perform a database update to ensure that all data is sent to Nintex Analytics. Access the Database management page from SharePoint Central Administration to ensure databases are up to date.
- Right-click the Nintex for SharePoint 2019 installer and click Run as administrator.
- Follow the steps in the installer to install the latest Nintex for SharePoint 2019 version.
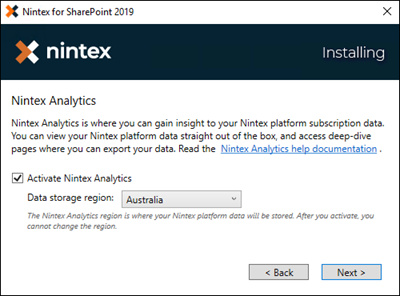
- When you get to the Nintex Analytics step shown below in the image, do the following:

- Select the relevant data region from the drop-down.
Note: The data region cannot be changed after you activate Nintex Analytics in your tenant.
- Select the Activate Nintex Analytics check box to activate Nintex Analytics in your tenant during the installation process.
Note: You can clear the Activate Nintex Analytics check box during installation, if you want to activate it later from the Central Administration page of your SharePoint tenant.
- Select the relevant data region from the drop-down.
- After installation, go to the Nintex Administration page in your SharePoint tenant to view the successful activation.
- In the Central Administration page of your SharePoint tenant, click Nintex Administration.
- In the Nintex Administration page, click Nintex Analytics.
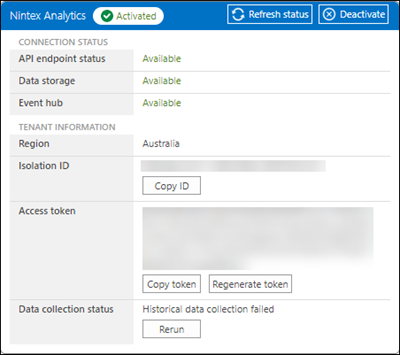
When Nintex Analytics is successfully activated the following is displayed:

Note: Before you start, you must perform a database update to ensure that all data is sent to Nintex Analytics. Access the Database management page from SharePoint Central Administration to ensure databases are up to date.
- In the Central Administration page of your SharePoint tenant, click Nintex Administration.
- In the Nintex Administration page, click Nintex Analytics.
- Select your Nintex Analytics Region from the Region selection drop-down.
Note: The data region cannot be changed after you activate Nintex Analytics in your tenant.
- Click Activate Nintex Analytics.
When Nintex Analytics is successfully activated, the following is displayed:

Copy the Isolation ID and Access token to create a data connection from Nintex Analytics
After activating Nintex Analytics in your SharePoint tenant you can copy the Access token and the Isolation ID to create a data connection to the SharePoint tenant from Nintex Analytics.
- In the Central Administration page of your SharePoint tenant, click Nintex Administration.
- In the Nintex Administration page, click Nintex Analytics. After activation the following will be displayed in the Nintex Analytics administration page:

- Click Copy ID to copy the Isolation ID and store it in a secure location to be used when creating a data connection.
- Click Copy token to copy the Access token and store it in a secure location to be used when creating a data connection.
For more information about creating data connections from Nintex Analytics, see the Data connections topic in the Nintex Analytics help documentation.
Troubleshooting
After activating Nintex Analytics and it is not working, follow the troubleshooting steps given below:
Check if the Nintex Analytics services are available in your SharePoint tenant.
- In the Central Administration page of your SharePoint tenant, click Nintex Administration.
- In the Nintex Administration page, click Nintex Analytics.
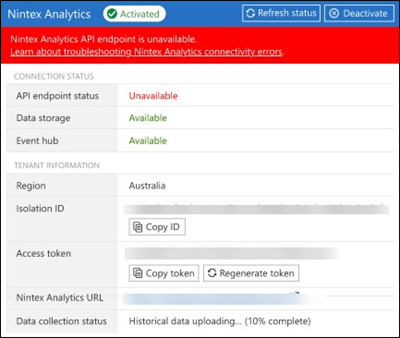
- Click Refresh status. As shown in the image below, all the services under Connection status should be shown as available:

If any of the services are not working, an error message similar to the one shown in the image below will be displayed: If you see an error message please contact Nintex Customer support for assistance.

If your network has a proxy server, ensure that the proxy is setup for Nintex Workflow. Follow the steps below to setup proxy server:
- In the Central Administration page of your SharePoint tenant, click Nintex Administration.
- Click External connection settings.
- In the Proxy server section, select the Connect with proxy server option and enter details.
If the farm has a firewall setup, allow the following URL and services, and unblock port 443 for each of these URL and services:
- https://wus01-tln-nas.nintexcloud.com/
- *.servicebus.windows.net
- *.blob.core.windows.net