
|
 |
|
 |
|
 |
|

|
By using references, content containing context specific information pertaining to the list item and this instance of the workflow can be constructed for use within workflow actions.
To insert a reference:
-
In the Insert Reference dialog, select the reference and double click on an item from the list; OR
-
Select the item and click on the OK button.
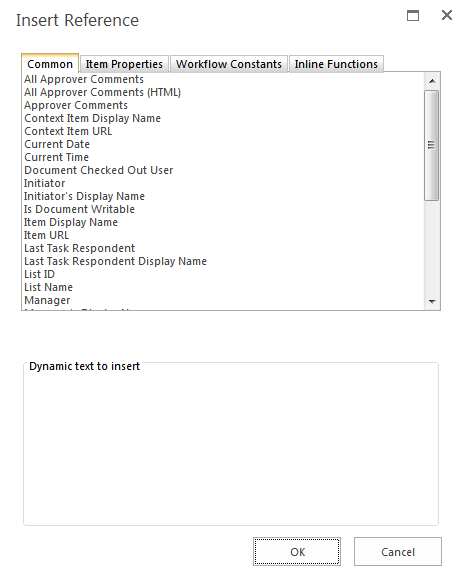
Reference information is divided into different categories:
- Common: These are lookup values specific to the workflow, the context of the item and the current task within the workflow.
- Item Properties: These are metadata columns for the item for which the workflow is associated.
- Workflow Constants: These are values that have been set globally either on a web farm, site collection or site level that can be used within the workflow. Refer to Workflow Constants for more information.
- Inline Functions: Allows for additional processing to be done on a text or value. Refer to Inline functions for more information.
- Workflow Variables: these are the Workflow variables configured for the workflow.
Note: Available tabs on the Insert Reference dialog may change depending on the options available within the workflow action from which the Insert Reference link was clicked.
'Common' Lookup References
The following are references available in the Common tab:
- All Approver Comments: All comments made by all approvers in all task actions that have run in the workflow.
- All Approver Comments (Html): All comments made by all approvers in all task actions that have run in the workflow, formatted for HTML.
- Context Item Display Name: The display name of the item that the workflow is running on. For example, in a list workflow, the display name will be the name of the SharePoint list item that the workflow is running on.
- Context Item URL: The URL to the item that the workflow is running on. For example, in a list workflow, the url will direct to the SharePoint list item that the workflow is running on.
- Current Date: The current date.
- Current Time: The current time.
- Document Checked Out to User: The username (domain\username) of the user who has the item that the workflow is running on checked out. Applies to libraries only.
- Initiator: The username (domain\username) who caused the item to be entered into the workflow.
- Initiator's Display Name: The display name of user who caused the item to be entered into the workflow.
- Is Document Writable: Resolves to 'Yes' if the file in a library can be updated. Resolves to 'no' if it is checked out or being edited. Note this will always resolve to 'yes' in a list.
- Item Display Name: The display name of the item on which the workflow is running.
- Item URL: The URL of the item in workflow.
- Last Task Respondent: The username (domain\username) of the user who last registered a response to a task.
- Last Task Respondent Display Name: The display name of the user who last registered a response to a task.
- List ID: The unique ID of the list containing the item in workflow (Advanced).
- List Name: The name of the list in which the workflow item is located.
- Manager: The username (domain\username) of the workflow initiator's manager (if configured in Active Directory).
- Manager's Display Name: The display name of the workflow initiator's manager (if configured in Active Directory).
- New Line: The new line character.
- Site Collection ID: The ID of the site collection in which the workflow is running.
- Site ID: The ID of the site in which the workflow is running.
- Site Name: The title of the site in which the workflow item is located.
- Site Owners: A semicolon delimited list of the usernames (domain\username) of users in the site owners group.
- Start Date: The date the item's workflow was started.
- Start Time: The time the item's workflow was started.
- Tab: The tab character.
- Task Description: The text provided in the task description field for the task, formatted for plain text.
- Task Description (Html): The text provided in the task description field for the task, formatted for HTML.
- Task Name: The text provided in the task name field for the task.
- Web Url: The full URL of the site in which the workflow item is located.
- Workflow Instance ID: The unique ID given to the running workflow instance (Advanced).
- Workflow Log URL: The URL where the status of the workflow can be viewed in textual form.
- Workflow Owner: The user who published the workflow.
- Workflow Status URL: The URL where the status of the workflow can be viewed.
- Workflow Title: The title of the workflow.
The following references are available from within request approval notifications:
- Approval Url: The URL in SharePoint where an approval for the item in the workflow can be made.
- Approve: A URL that will approve the task without requesting further input. Can be appended with a querystring confirmationpage=url to show to display a custom confirmation page. Can be appended with querystring hsl=[true|false] to determine whether to show the workflow status link on the default confirmation form.
- Approver Comments: The comments of the approvers who responded to the most recent task.
- Approver Name: The display name of the user currently required to approve the document.
- Approver's Manager: The display name of the manager of the user assigned to the current task.
- Approver's Manager's Display Name: The display name of the user assigned to the current task.
- Delegate Url: The URL in SharePoint where an approver can delegate a task if allowed.
- Reject: A URL that will reject the task without requesting further input. Can be appended with a querystring confirmationpage=url to show to display a custom confirmation page. Can be appended with querystring hsl=[true|false] to determine whether to show the workflow status link on the default confirmation form.
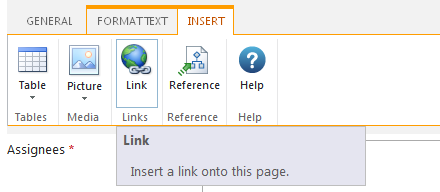
Create a hyperlink using a reference
When inserting a reference into a Rich Text box, the reference can be inserted as a hyperlink.
To insert a reference as a hyperlink:
- In the workflow action dialog box, within the Ribbon, click on the Insert tab.
- Then click on Link.
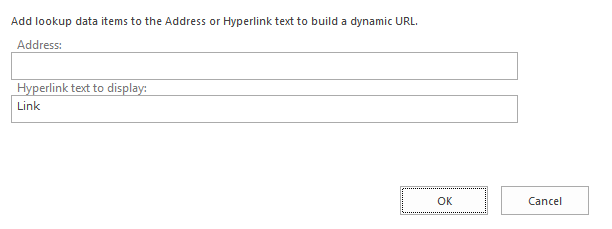
- In the Insert Reference dialog, select the reference and double click on an item from the list.
- The reference will be inserted into the Address textbox.
- In the Hyperlink text to display textbox:
- Enter the text that will be displayed which will be clickable by the user; OR
- Select a reference and double click on an item from the list.
Note: By placing the cursor in either Address or Hyperlink text to display textboxes, a combination of lookup data and manually typed plain text can be used.
- When all settings have been configured, click the OK button.
Other uses for inserting a hyperlink using the reference:
- Specify a URL for a reference. In the Address, type in a URL and then insert the reference.
- Building strings based on a starting URL followed by a reference. Type in a starting URL (for example a portal search address or a Google search address) and then insert the reference. Remember to use the correct protocol (http:// or https:// etc).